With the arrival of the BIQU B1 on the 3D printing scene, we wanted to take a look a what this new kid on the block brings to the table. The easiest way we found to do this, aside from some hands on time with both machines, was to find the closest competitor on the market, which turned out to be the Ender 3v2 in both price point and features.
Before we get into thing in more detail, let's start with the base specifications:
| Ender-3 V2 | BIQU B1 | |
| Price | $279.99 (Was $299.99) | $298 |
| Build Volume | 220 x 220 x 250 mm | 235 x 235 x 270mm |
| Max Bed Temperature | ≤100°C | ≤100°C |
| Max Nozzle Temp | ≤250°C | ≤260°C |
| 32 Bit Board | Yes | Yes |
| Silent Stepper Drivers | Yes | Yes |
| Color Screen | Yes | Yes |
| Touch Screen | No | Yes |
| Bed Material | Carborundum Glass Bed | Spring Steel w Textured Surface |
| Filament Sensor | Yes | Yes |
| Resume printing support | Yes | Yes |
| Layer Resolution | 0.1-0.3 mm | 0.1-0.3 mm |
| Stock Nozzle | 0.4 mm | 0.4 mm |
As you can see, on paper the two are quite similar, but there are differences and the question becomes, does the BIQU B1 bring enough improvements to the table in order to make up for the $20 price difference? Let's take a closer look at those differences.
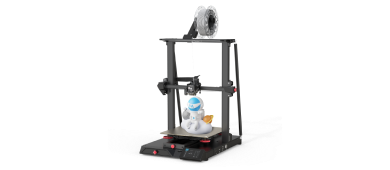
Printer Bed Comparison
Ender 3 V2

BIQU-B1

Combining a little bit of something old with something new, the B1’s bed is a spring steel sheet of seemingly high quality and is notably reversible, so that printing can be done on either side. It is held to the bed with impressive strength due to a strong magnetic plate underneath. While hard to show in the image, the steel sheet is covered in some plastic or other material that is textured in such a way that to make the surface extremely abrasive, lending to the effortless plate adhesion we observed while working with the printer.
Accessory Support
Ender 3 V2

While support for BLTouch and a Smart Filament sensor compatibility is listed as a feature for the Ender 3 V2, this requires a firmware and breakout board. This in turn requires customers to open up their electronics enclosure and really dig deep into the main board for the correct location. Between doing all this and even printing a mount to attach BLTouch, it can not be said that this process is easy, or user friendly.
BIQU-B1

The electronics and design of the Ender 3v2 seem positively dated in comparison to the BIQU-B1, which has easily accessible ports on the rear of the printer for a plug-and-play experience for both a filament sensor and BLTouch. The manufacturers even seem to see fit to include a nice metal mount and screws to get your BLTouch installed into place with minimal effort. For those who are interested in features like this, they should find that the B1 is well worth the additional $20 even before we address the main elephant in the room.
User Interface Comparison
Ender 3 V2

For a printer which was released in the same year as the B1, the Ender 3 V2 user interface is a huge upgrade from the original Ender 3 with a much larger and decent resolution color screen but it seems terribly dated in comparison to the B1.
When people see the Ender 3v2 it is very common for people to try to use it as a touch screen, and who can blame them? Touch screens are everywhere in our society from our pockets to our cars and everywhere in between, so why not your 3D printer?
Unfortunately, there is no touch screen on the Ender 3v2.
BIQU-B1

The user interface for the B1 is one of the best we have had the chance to work with of any 3D printer in this price range, and will likely set the standard for what users will come to expect from Mid-Range 3D printers and above going forward.
During testing the the touch screen was bright, sharp, colorful and most importantly is very quick and responsive; on par with a budget smartphone. Also included is a dial for more conventional operation, but we hardly ever used it aside from fine numerical adjustments.
Conclusion
When strictly looking at what these printer do, 3D printing, both are capable machines with the same body time, and comparable accuracy, stability and filament compatibility; if you put the work in to set it up well, it will print well in turn. Looking at this alone, it would be hard to ever decide to make the jump to the relatively unheard of BIQU-B1 when you could go for the tried and true Ender 3v2 from Creality for $20 less, but that really isn't the whole story.
The more that we used the B1, the more we became captured by the thoughtful refinement of the printer, with it's friendly user interface and upgrade friendly design, the B1 is the clear winner in our book, worth the extra cost any day of the week.


This is the board for the V2
https://www.sainsmart.com/products/creality3d-silent-mainboard-for-ender-3-3d-printer-ver-1-1-5
The B1 uses BTT SKR V1.4
They both seem to run their own variation of Marlin, but the B1 has two operating sytstems, one of which is marlin as this video shows:
https://youtu.be/fZko4WAFcTo?t=53
What boards do these 2 priners use and are they Narlin compatible or using proprietary firmware.