
Written by Dennis Heinze
After we recently jumped on the 3D printer train and thought that we finally had a fully equipped machine park for our projects with CNC milling, CNC laser, and said 3D printer, Creality came around the corner with the CR-Scan Ferret. A 3D scanner will hopefully help us generate data for all of these CNC machines. Many thanks to SainSmart for providing the review sample. As part of this article, we not only want to look at the Ferret 3D scanner but also test applications in combination with CNC milling and 3D printers and possibly also lasers.
unboxing
The Ferret 3D scanner comes in a hard shell case covered with gray fabric. The unboxing is almost finished after opening the zipper. Except for the Creality logo, which was applied crookedly in our case, which somewhat triggers my inner monk, the storage box makes a very good impression. All individual parts have a perfectly formed area and appear protected.
scope of delivery
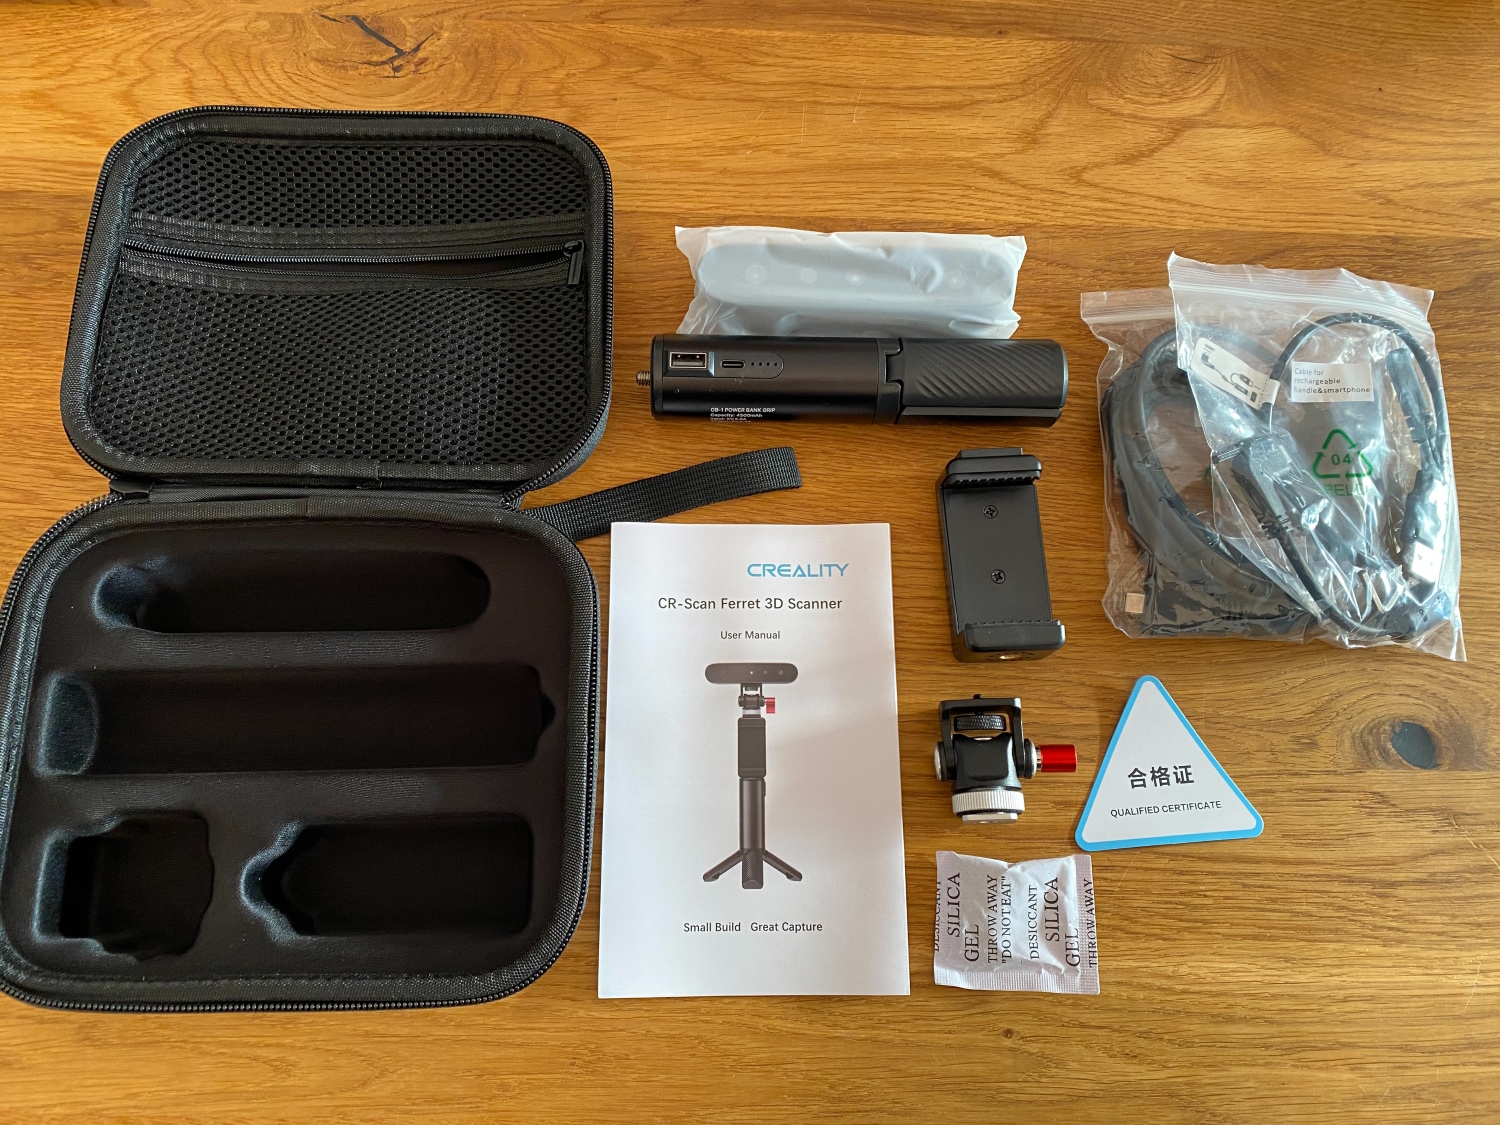
In addition to the pure 3D scanner, the following accessories can also be found:
- User manual in English
- phone holder
- Handle with tripod function and integrated power bank (4500 mAh)
- elbow
- Allen key (for the contra-angle)
- 2m USB cable for PC connection
- Y-USB cable for smartphone operation
Technical specifications
Creality specifies the 3D Scan Ferret with the following values:
Accuracy: 0.1mm
Resolution/Point Pitch: 0.16mm
Single Detection Area: 560*820mm@700mm
Working Distance: 150~700mm
Minimum Sampling: 50*50*50mm
Frame Rate/Scan Speed: Up to 30fps
Light Source: IR-A: 780nm – 1450 nm (NIR)
External Scanning: Support bright sunlight scanning
Tracking Mode: Visual Tracking
Color Texture: Support
Alignment: Feature / Marker / Color
Output Format: OBJ / STL / PLY
Device Weight: 105g Device
Size: 120*30*26mm
working method
In general, there are various types and techniques of 3D scanners. Some works with structured light and project a kind of grid onto the object, whose distortion of the individual lines is interpreted. Many, including the CR-Scan Ferret, work with lasers and triangulation. These two methods are mainly used for short-range measurements. Lasers are also used on construction sites or other larger work areas, but in a different function. At large distances, the laser is sent in pulses on its journey to the object and the distance is determined by measuring the runtime. Also to be found in this area is the refinement of the pulse method with the phase shift, so that the change in phase of the emitted laser beam is compared with the reflected one.
The general structure consists of a laser that emits light and a sensor that captures the light reflected from the object. The exact distance to the object can be determined by means of a triangle calculation, since the distance between the laser and the sensor is known or is physically specified by the device. Put simply, the laser emits a beam onto a point on the object to be scanned. The beam is reflected and perceived by the sensor. For this one point, the distance in space is now known. This process is now repeated thousands of times until a point cloud is formed. All recorded points in space then represent the object. The software can then create a 3D model from this and convert the many points into a coherent body (so-called meshing).
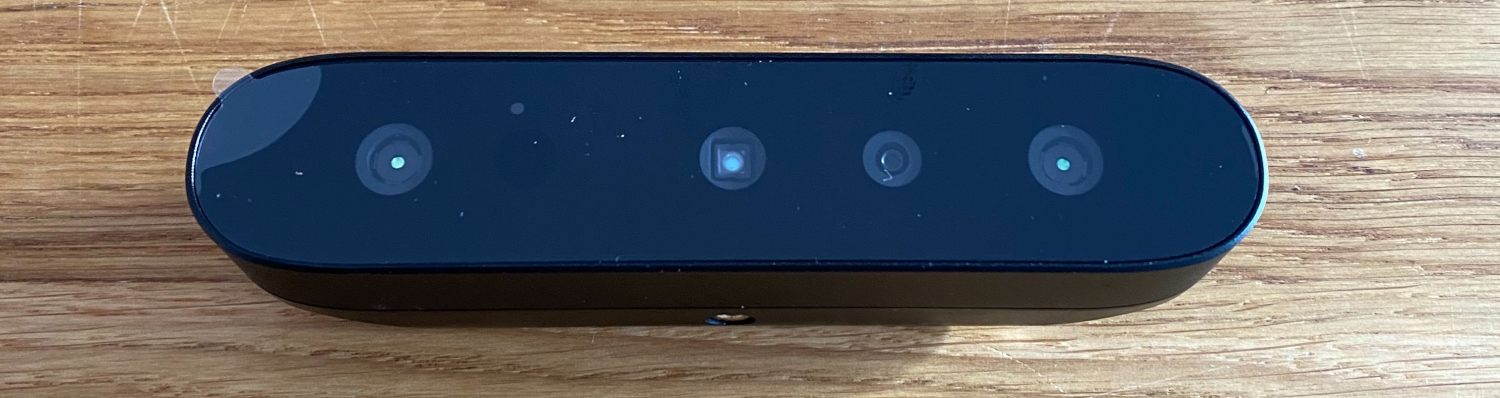
The Ferret 3D scanner uses two lasers and several cameras. In addition to a camera for depth measurement, a 1 MP IR camera with 1280×800, there is also a normal camera with 2.1 MP and 1920×1080 pixels. The Ferret 3D scanner could actually be used as a webcam on a laptop. In scan mode, this commercially available camera takes care of the recording of the colors, so the later model, at least if it is stored in the correct file format (.obj, for example), is not displayed in one color but like the original.
Problems with this technique
There are some physical limitations to the general concept of scanning with light. Devices, such as the Scan Ferret, work with the defined reflection of the emitted light. A transparent object can therefore inevitably not be recorded using this 3D scanner. The situation is similar with shiny or highly reflective materials. Holes also reflect too much due to their geometry. This can be remedied by so-called matting sprays, which we will also test in the course of this article. This circumstance must be taken into account when using it, otherwise problems with the scan can quickly occur.
Mobile Mode (Android)
In general, the 3D Scan Ferret can be used in two modes: Mobile or via PC. First the bad news for all Apple disciples - currently there is no way to use the Scan Ferret in mobile mode with an iPhone or generally with Apple devices (Mac OS support also only in June 2023 according to Creality) However, there is light in sight , because Creality is working in the background on a WLAN adapter that makes the Ferret wireless and will publish corresponding apps for iOS and Android so that both systems are supported. As of May, I don't know a release date for it yet. Creality's justification is obvious, because the 3D scanner requires a connection via USB 3.0 for proper communication and power supply,
Nevertheless, it would be worthwhile to have the full range of functions available at the time of release and not just get them in dabs. It is also still questionable whether the WLAN adapter will be included in newly purchased Scan Ferrets and how it will affect the price for existing customers. We will post an update here as soon as we receive the adapter.
Creality recommends the following smartphones:
| Samsung:
|
Google:
|
Moto:
|
Live:
|
Nubia:
|
one-plus:
|
OPPO:
|
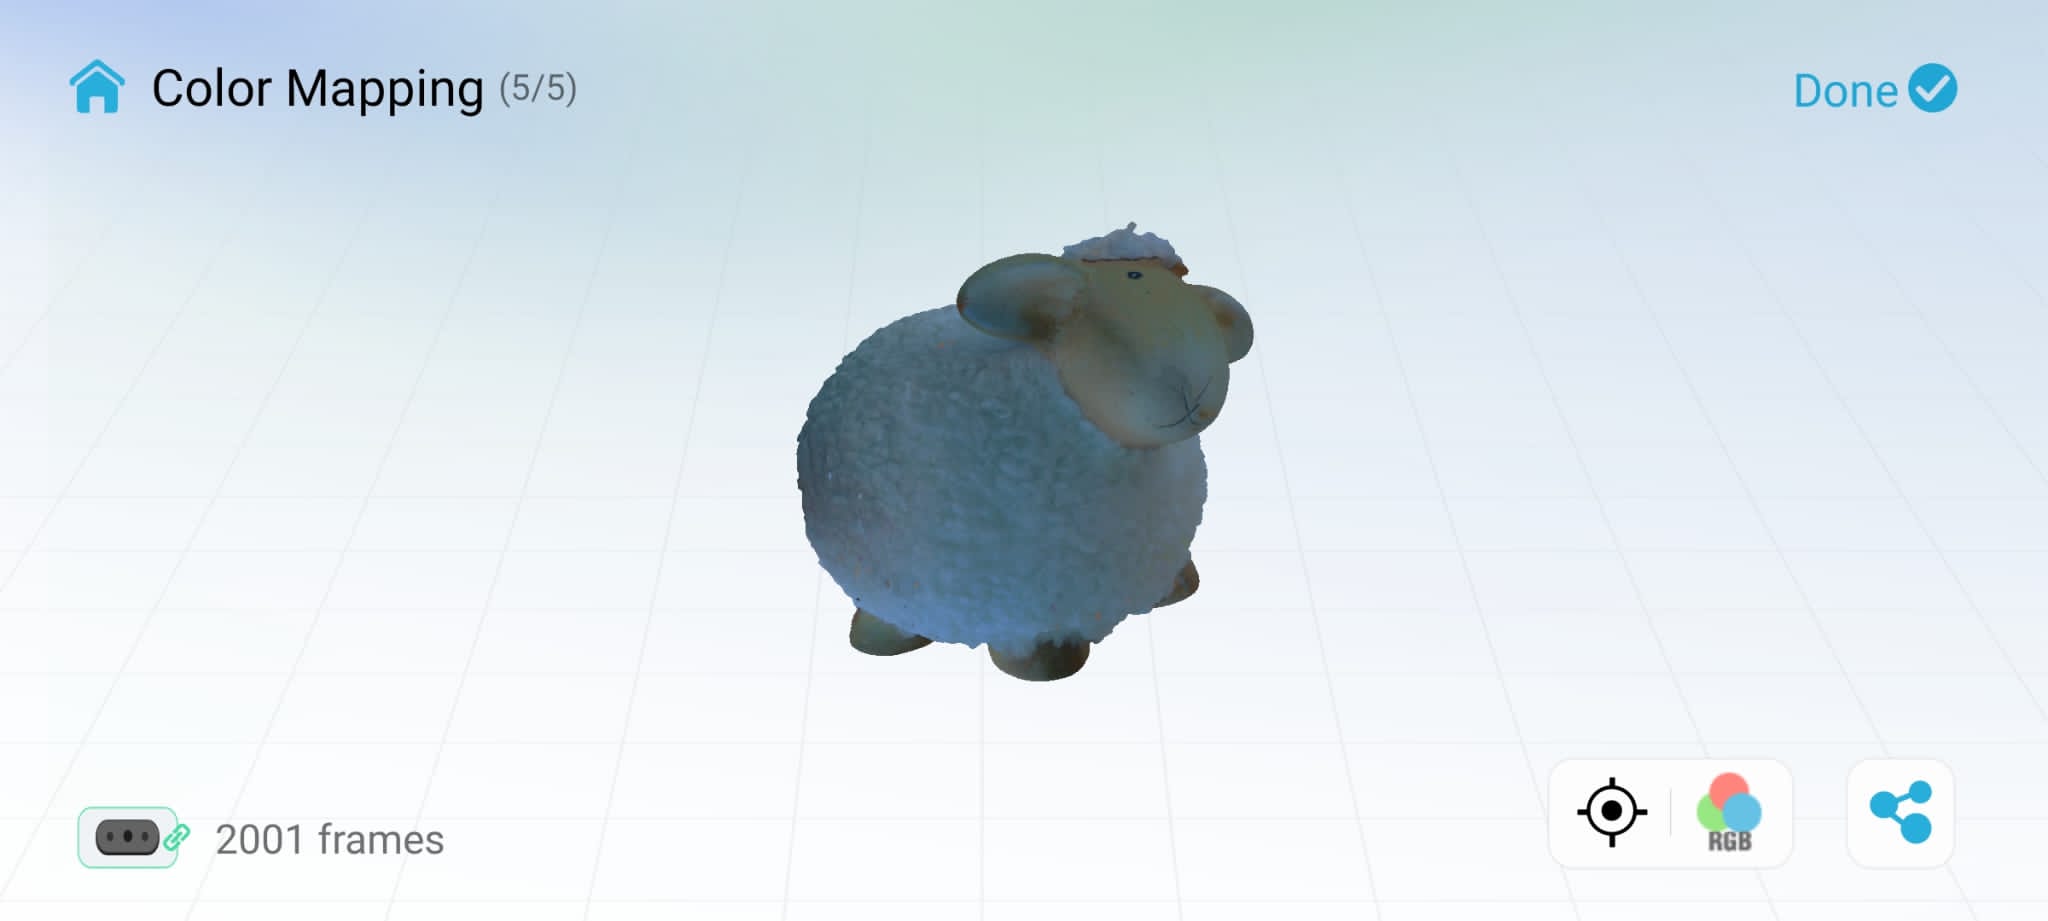
In fact, it also worked without any problems on a One Plus 8T, whereas it always crashed on a Samsung S10+. A full scan on the S10+ was not possible. Contrary to the missing USB 3.0 port on the Samsung smartphone, which led to the blocking of the Hi-Quality mode, the crashes can hopefully be fixed with a software patch. The One Plus 8T has said USB 3.0 connectivity and leads to the following scan of a sheep, which can now be printed 1:1. Or 2:1 or whatever you like. Processing would probably be faster with the recommended One Plus 10, but the scan result should be identical. However, as with our One Plus 8T, there can be a limit of 2000 frames, but this is not the case with supported smartphones.
The app itself is also currently not available from the Google Play Store, which is not just one more step, since you have to download the .apk manually from Creality's website . No, it also means that you have to install an app from unknown sources (corresponding option in the phone settings), but also that you have to check for updates and install them manually. Although Creality has been a well-known player in the segment for years, this type of app installation always leaves an aftertaste.
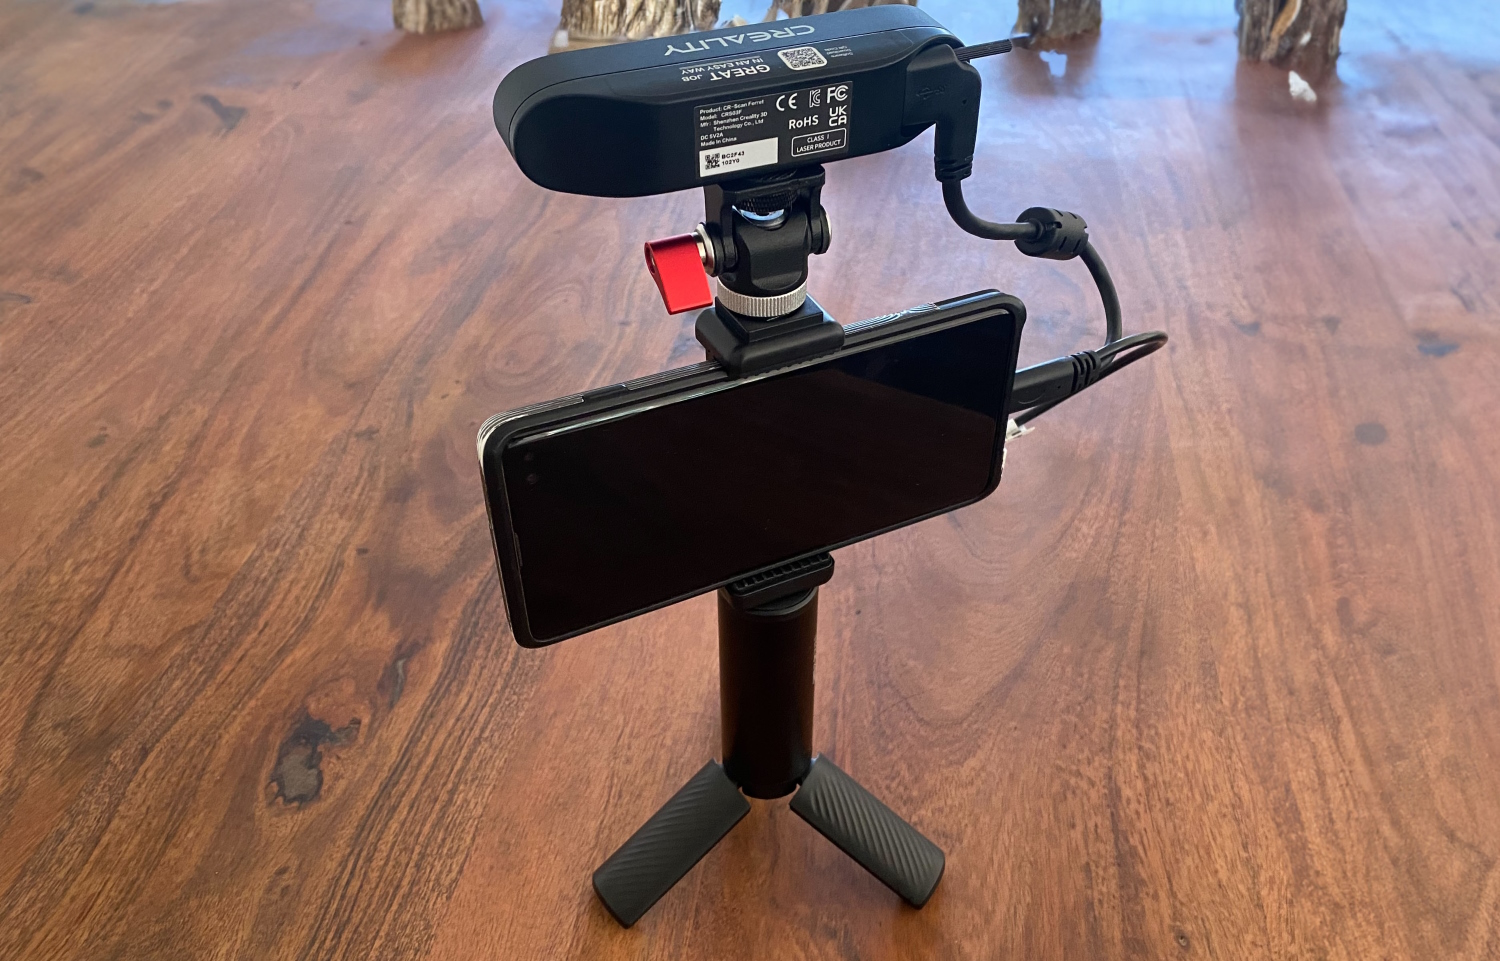
The setup for the handheld mode is done quickly. Your smartphone can be up to 9 cm wide with the case to still fit into the spring-loaded holder. A Y-cable connects the 4500 mAh power bank in the handle to the smartphone and Scan Ferret. This means that your cell phone is charged during use or at least keeps the battery level, since the application is very computationally intensive. A fold-out tripod allows the entire apparatus to stand upright. The power bank can be charged via USB C connection right next to the charge indicator. The processing makes a good impression in line with the price. The construction is a mix of metal and plastic paired with rubberized surfaces on all screw connections and the feet.
The use is generally very goal-oriented. Using screenshots, I tried to illustrate the process of scanning a garden figure in the form of a sheep. After starting the app, the USB cable is connected to the scanner, mobile phone and power bank in the handle. The app now shows in the bottom left that the scanner is online. Depending on the security settings, a pop-up appears asking whether the use of the scanner is approved.
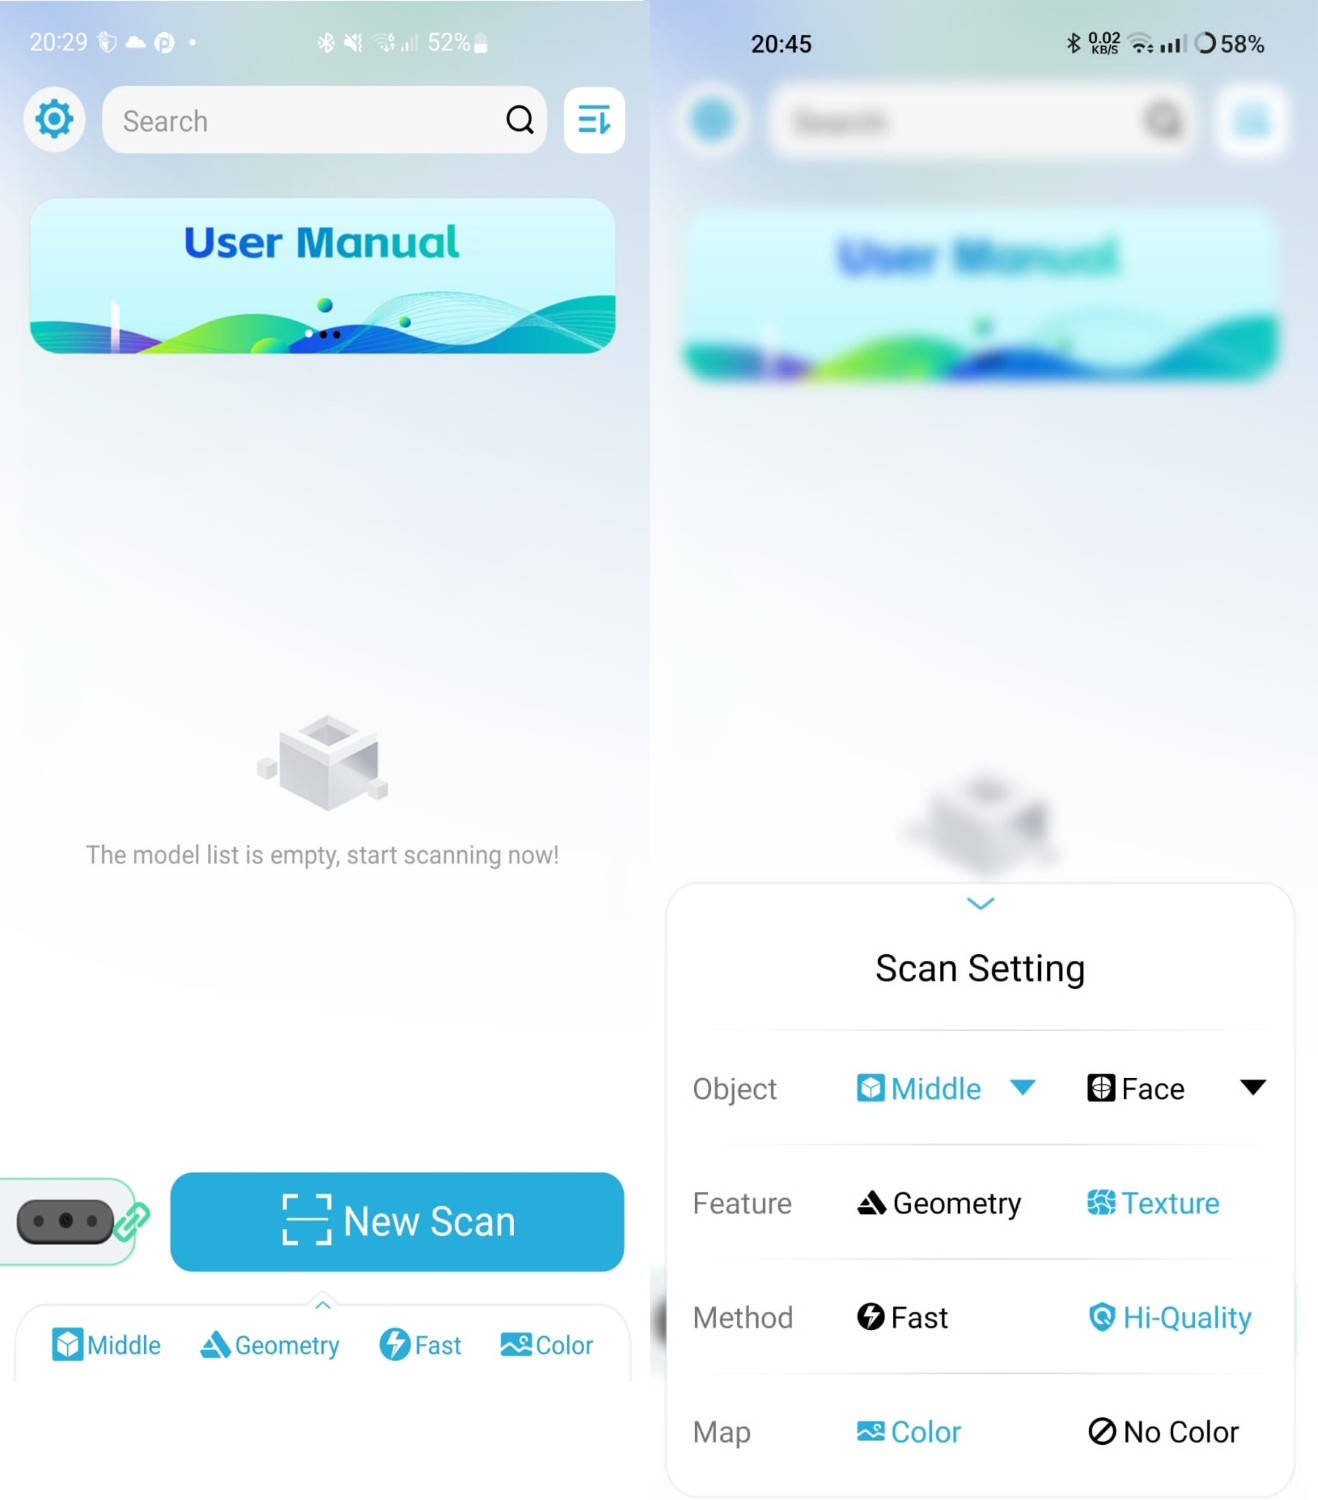
The parameters for the subsequent scan can be selected in the main menu. A click on the lower bar opens the scan settings. The size of the model, scan mode and quality settings as well as the color settings can be made here. As soon as you click on "New Scan", you are already in the middle of it.
The previews of the IR camera and the normal camera are displayed on the left. The small slider icon in the respective preview lets you set the exposure. It is important for the scan to have few or, in the best case, no red or blue areas on the IR camera. The auto setting does a good job though. However, if the error "Too few IR Tracking Info" appears, the exposure must be adjusted manually.
The rectangle with the scissors in the corner cuts out the ground the model is standing on and ignores it for the scan. This option should be selected relatively at the beginning if required, since otherwise the subsurface is already in the 3D model.
Another important button in this overview is the pause icon, so that you can easily switch the model and also scan the underside without errors or artifacts. The object is scanned in one position until the 3D model (on the right in the picture) is completely green. Click Pause, turn the model upside down and continue scanning with Play. Until the model is complete from all sides.
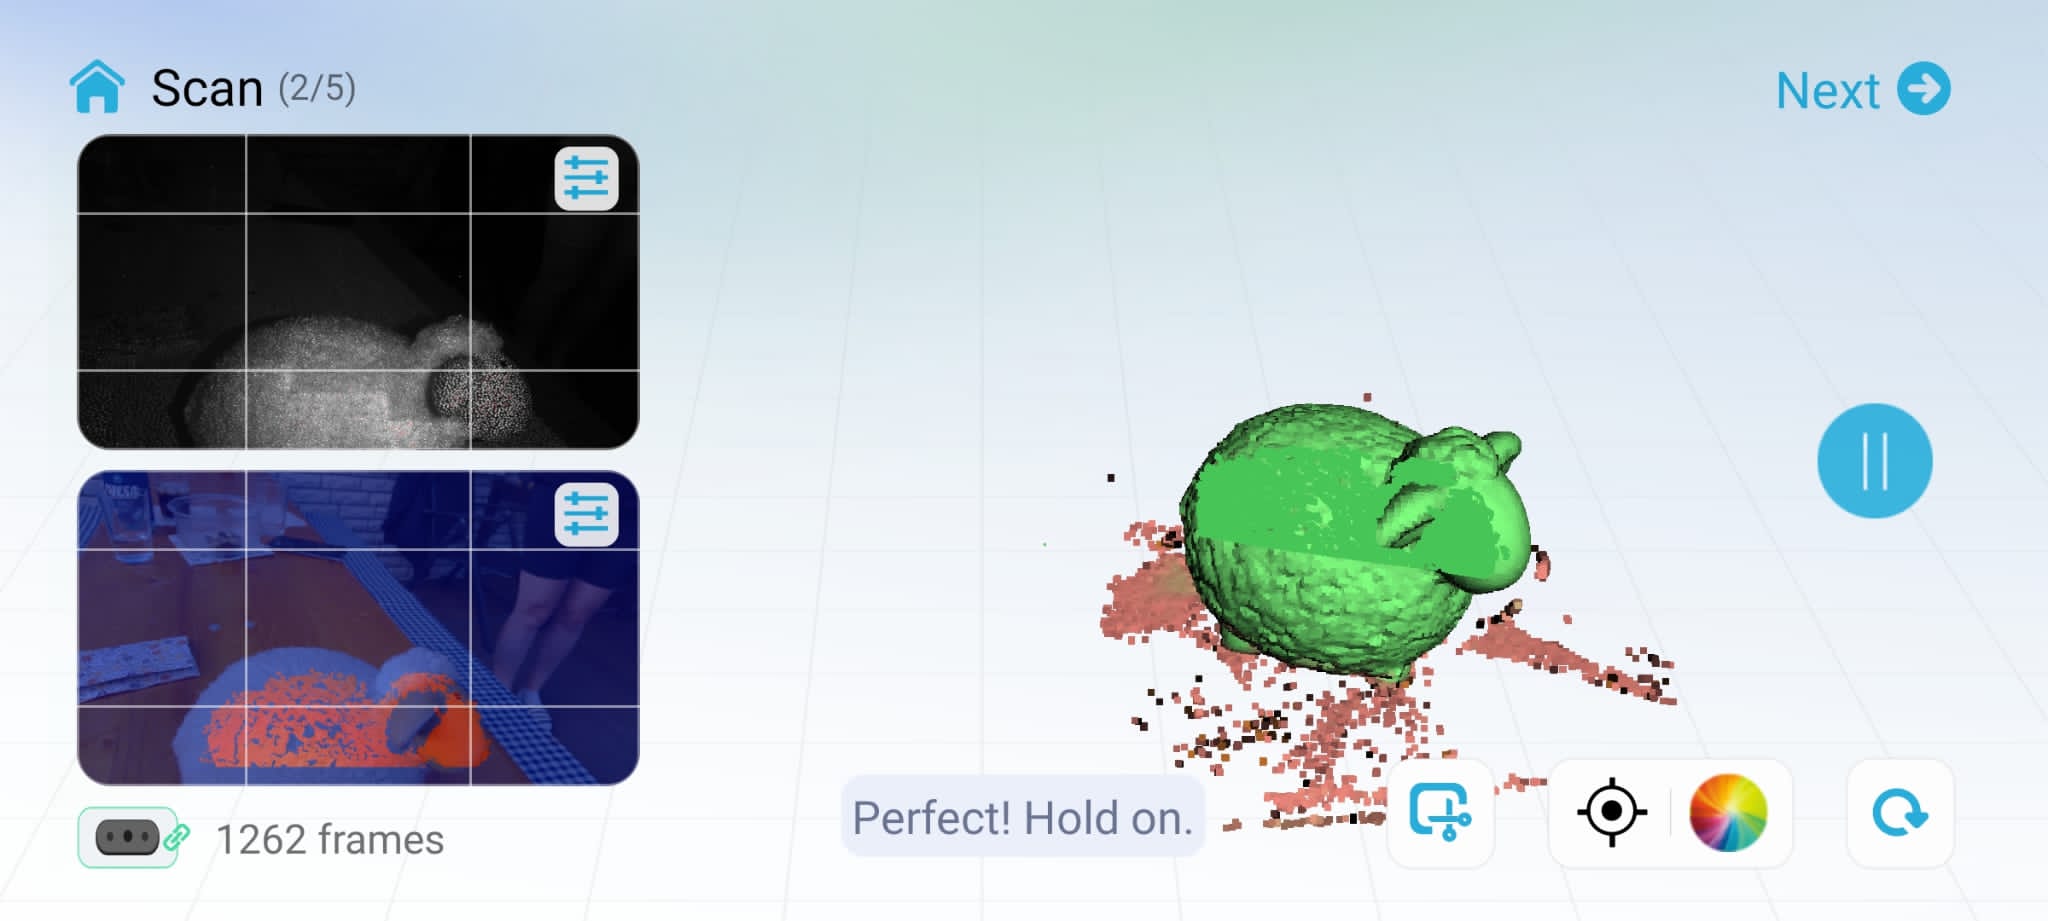
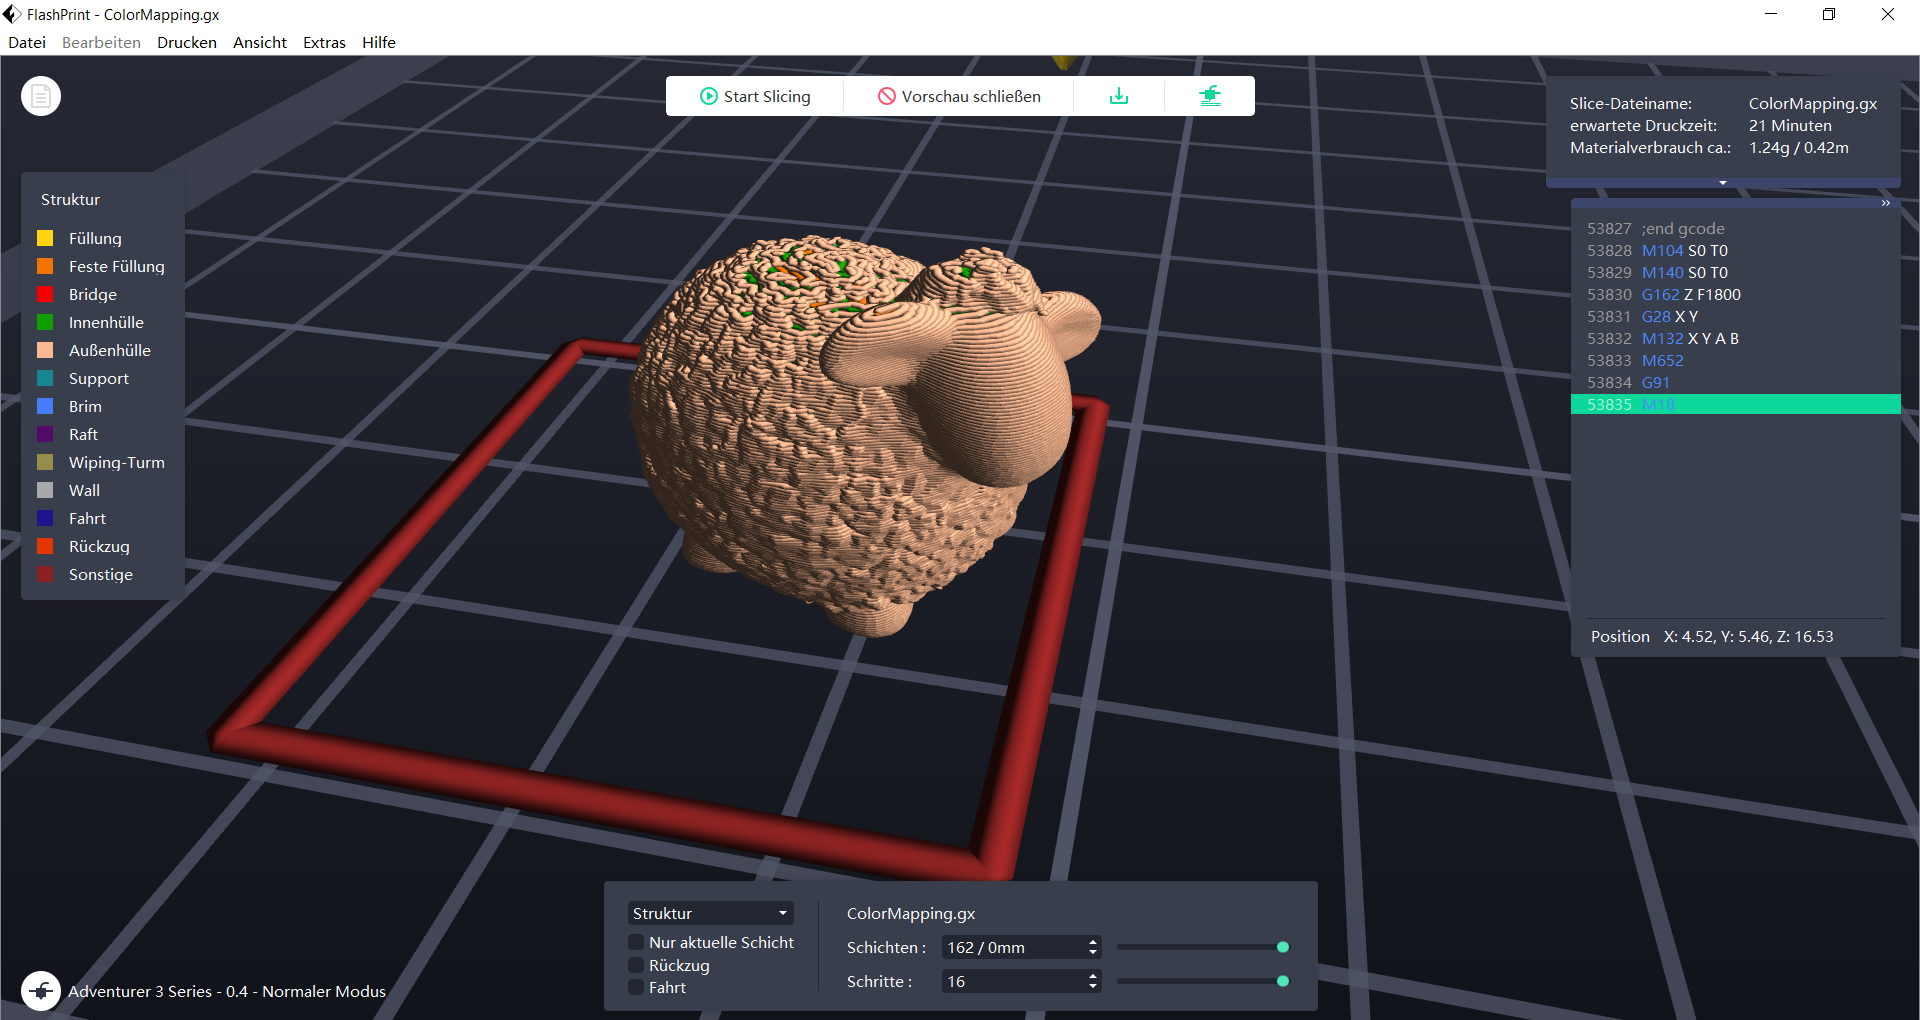
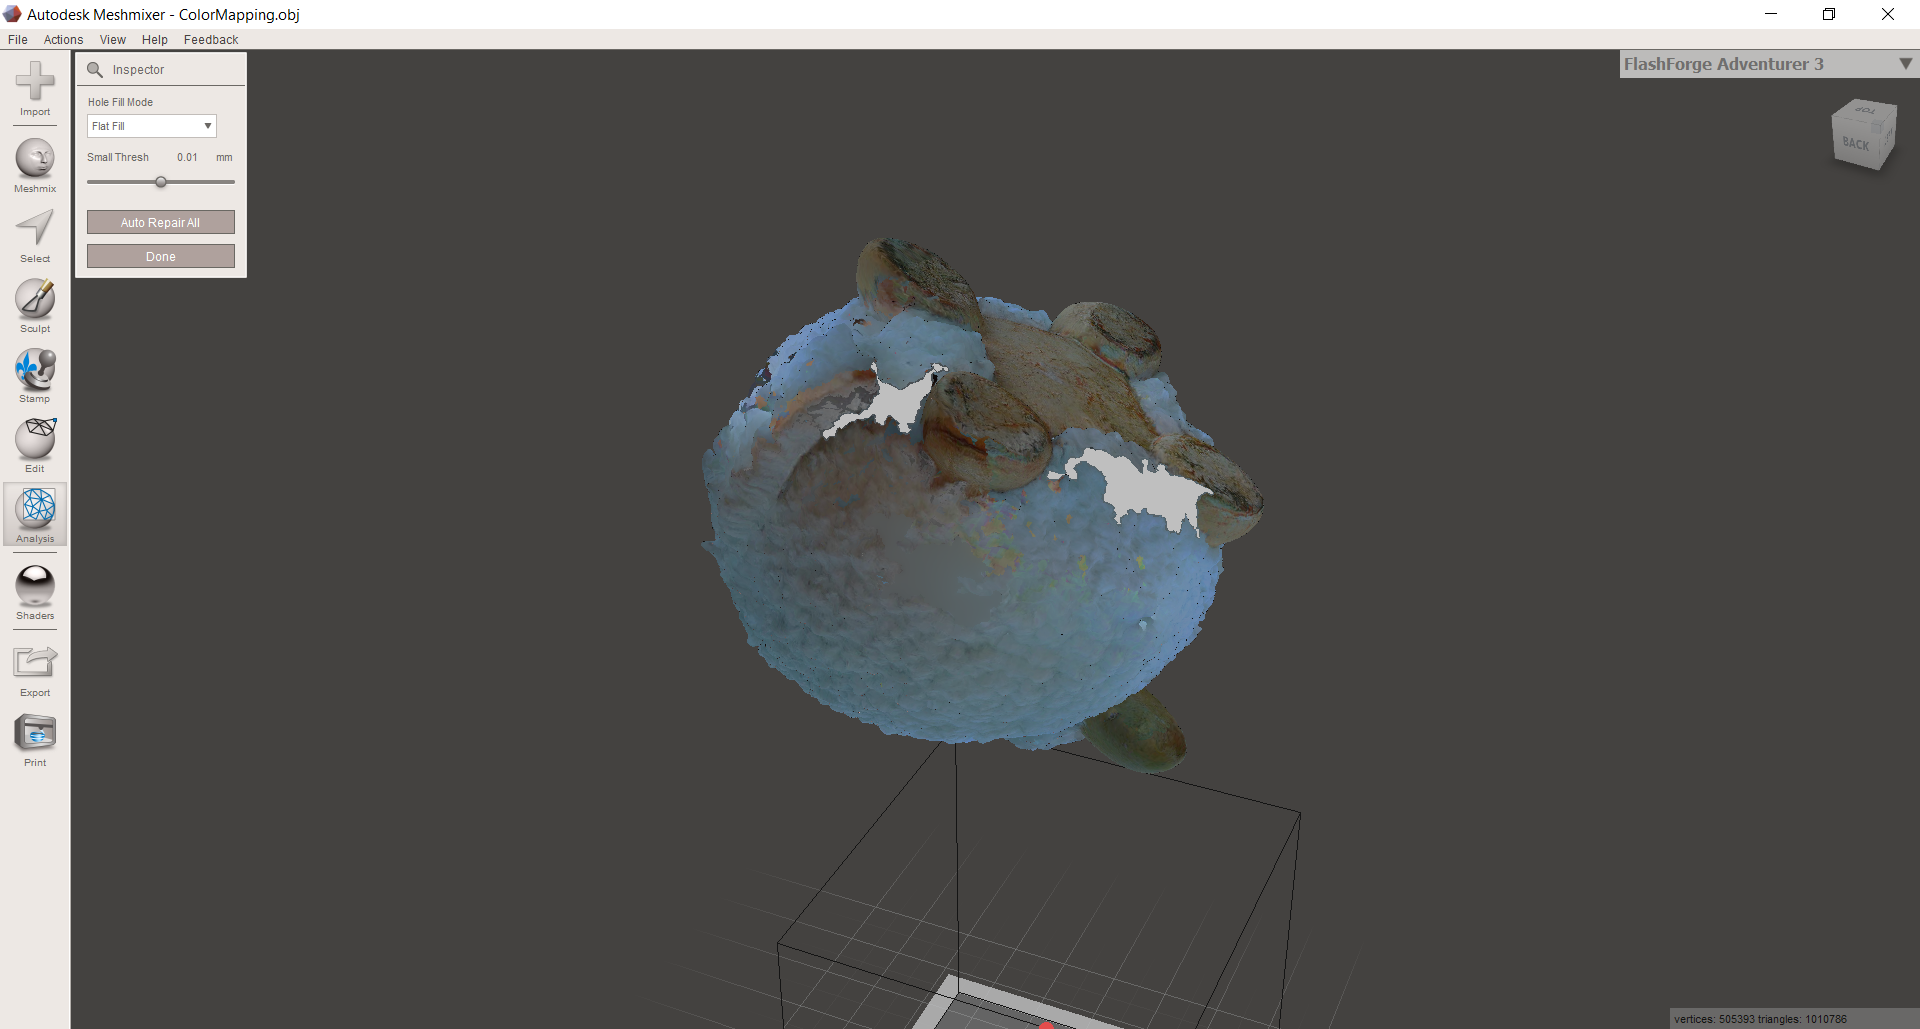
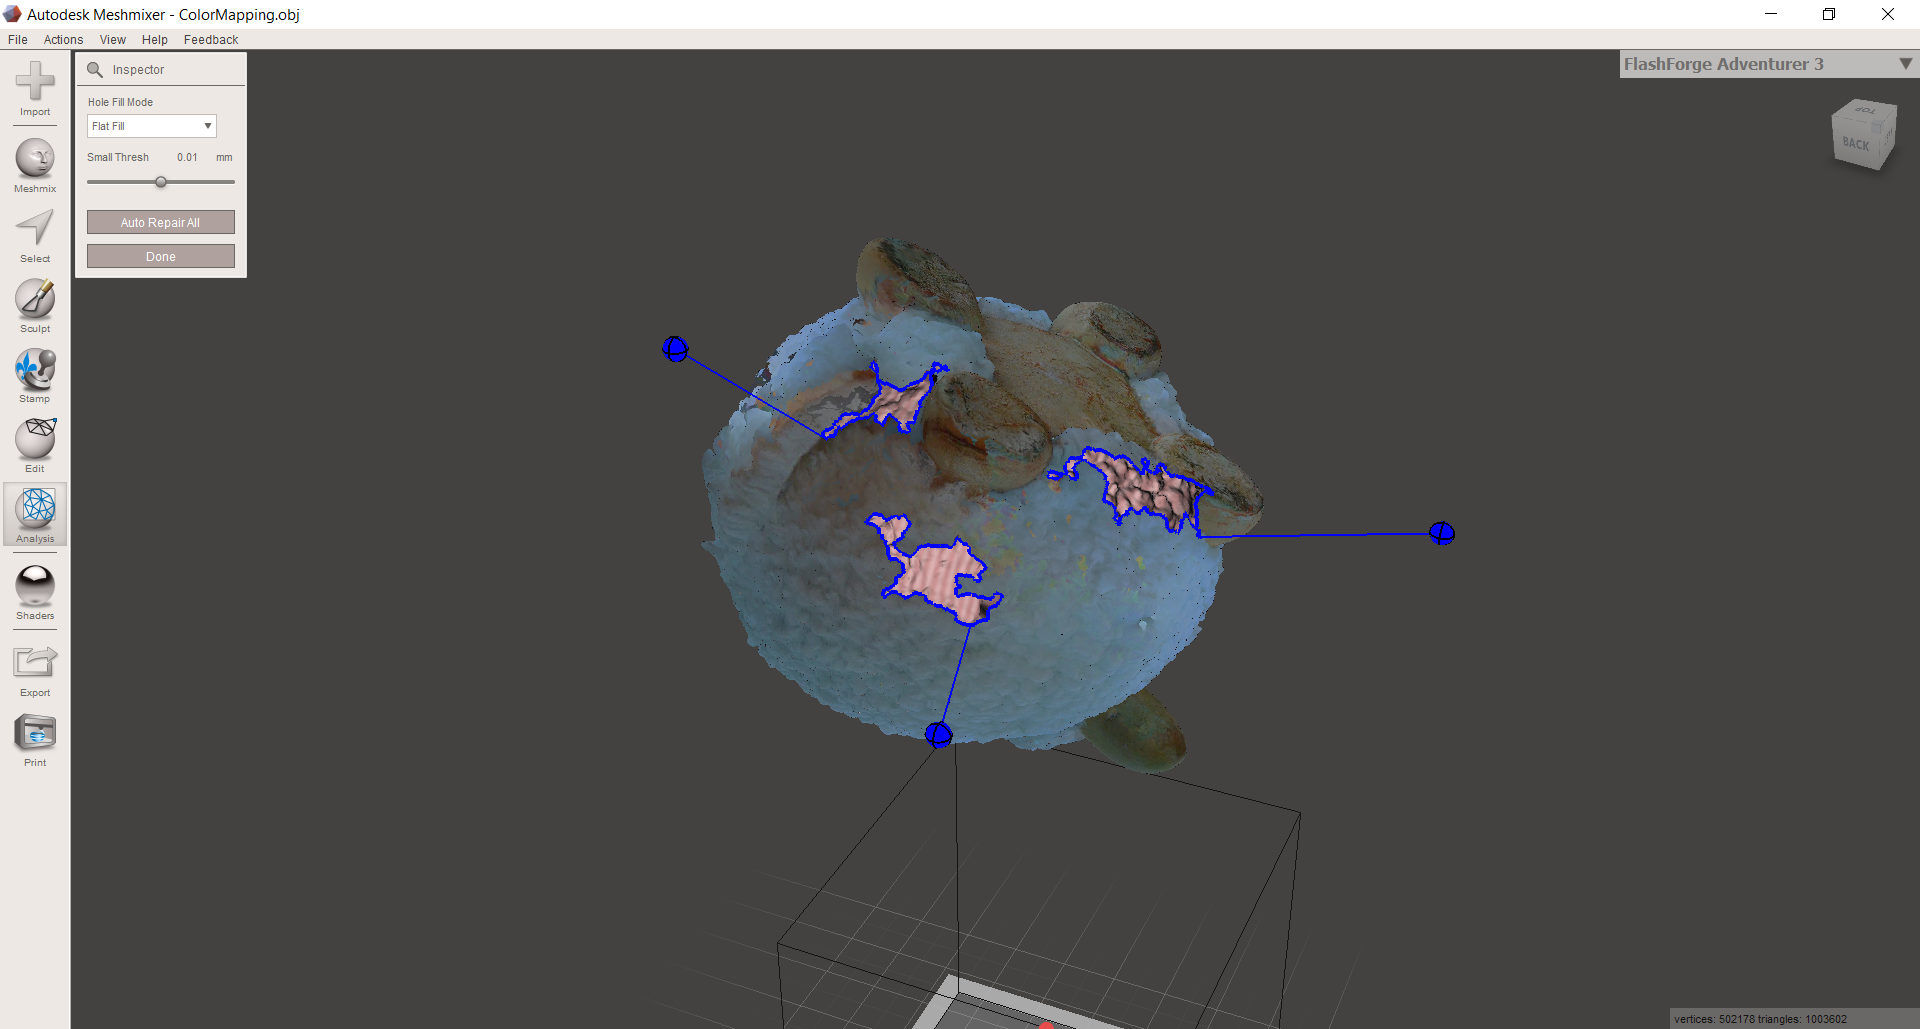
Unfortunately, the scan was aborted at the end, oddly enough at exactly 2000 frames. However, it was already sufficient for the project. After another 5 minutes, the scan was optimized and provided with color information. The result can now be checked for errors in the MeshMixer and in fact we unfortunately have 3 gaps in the mesh due to the cancellation. Fortunately, with two more clicks, these could be compensated by MeshMixer. However, whether a problem is that easy to fix always depends on the size and scope of the problem or defect. With the STL file that is now available, you can feed the 3D printer or its slicer directly and make a true-to-scale copy (or smaller/larger).
Update June:
The Creality Scan app is now listed in the Playstore . A manual installation via APK is no longer necessary.
laptop fashion
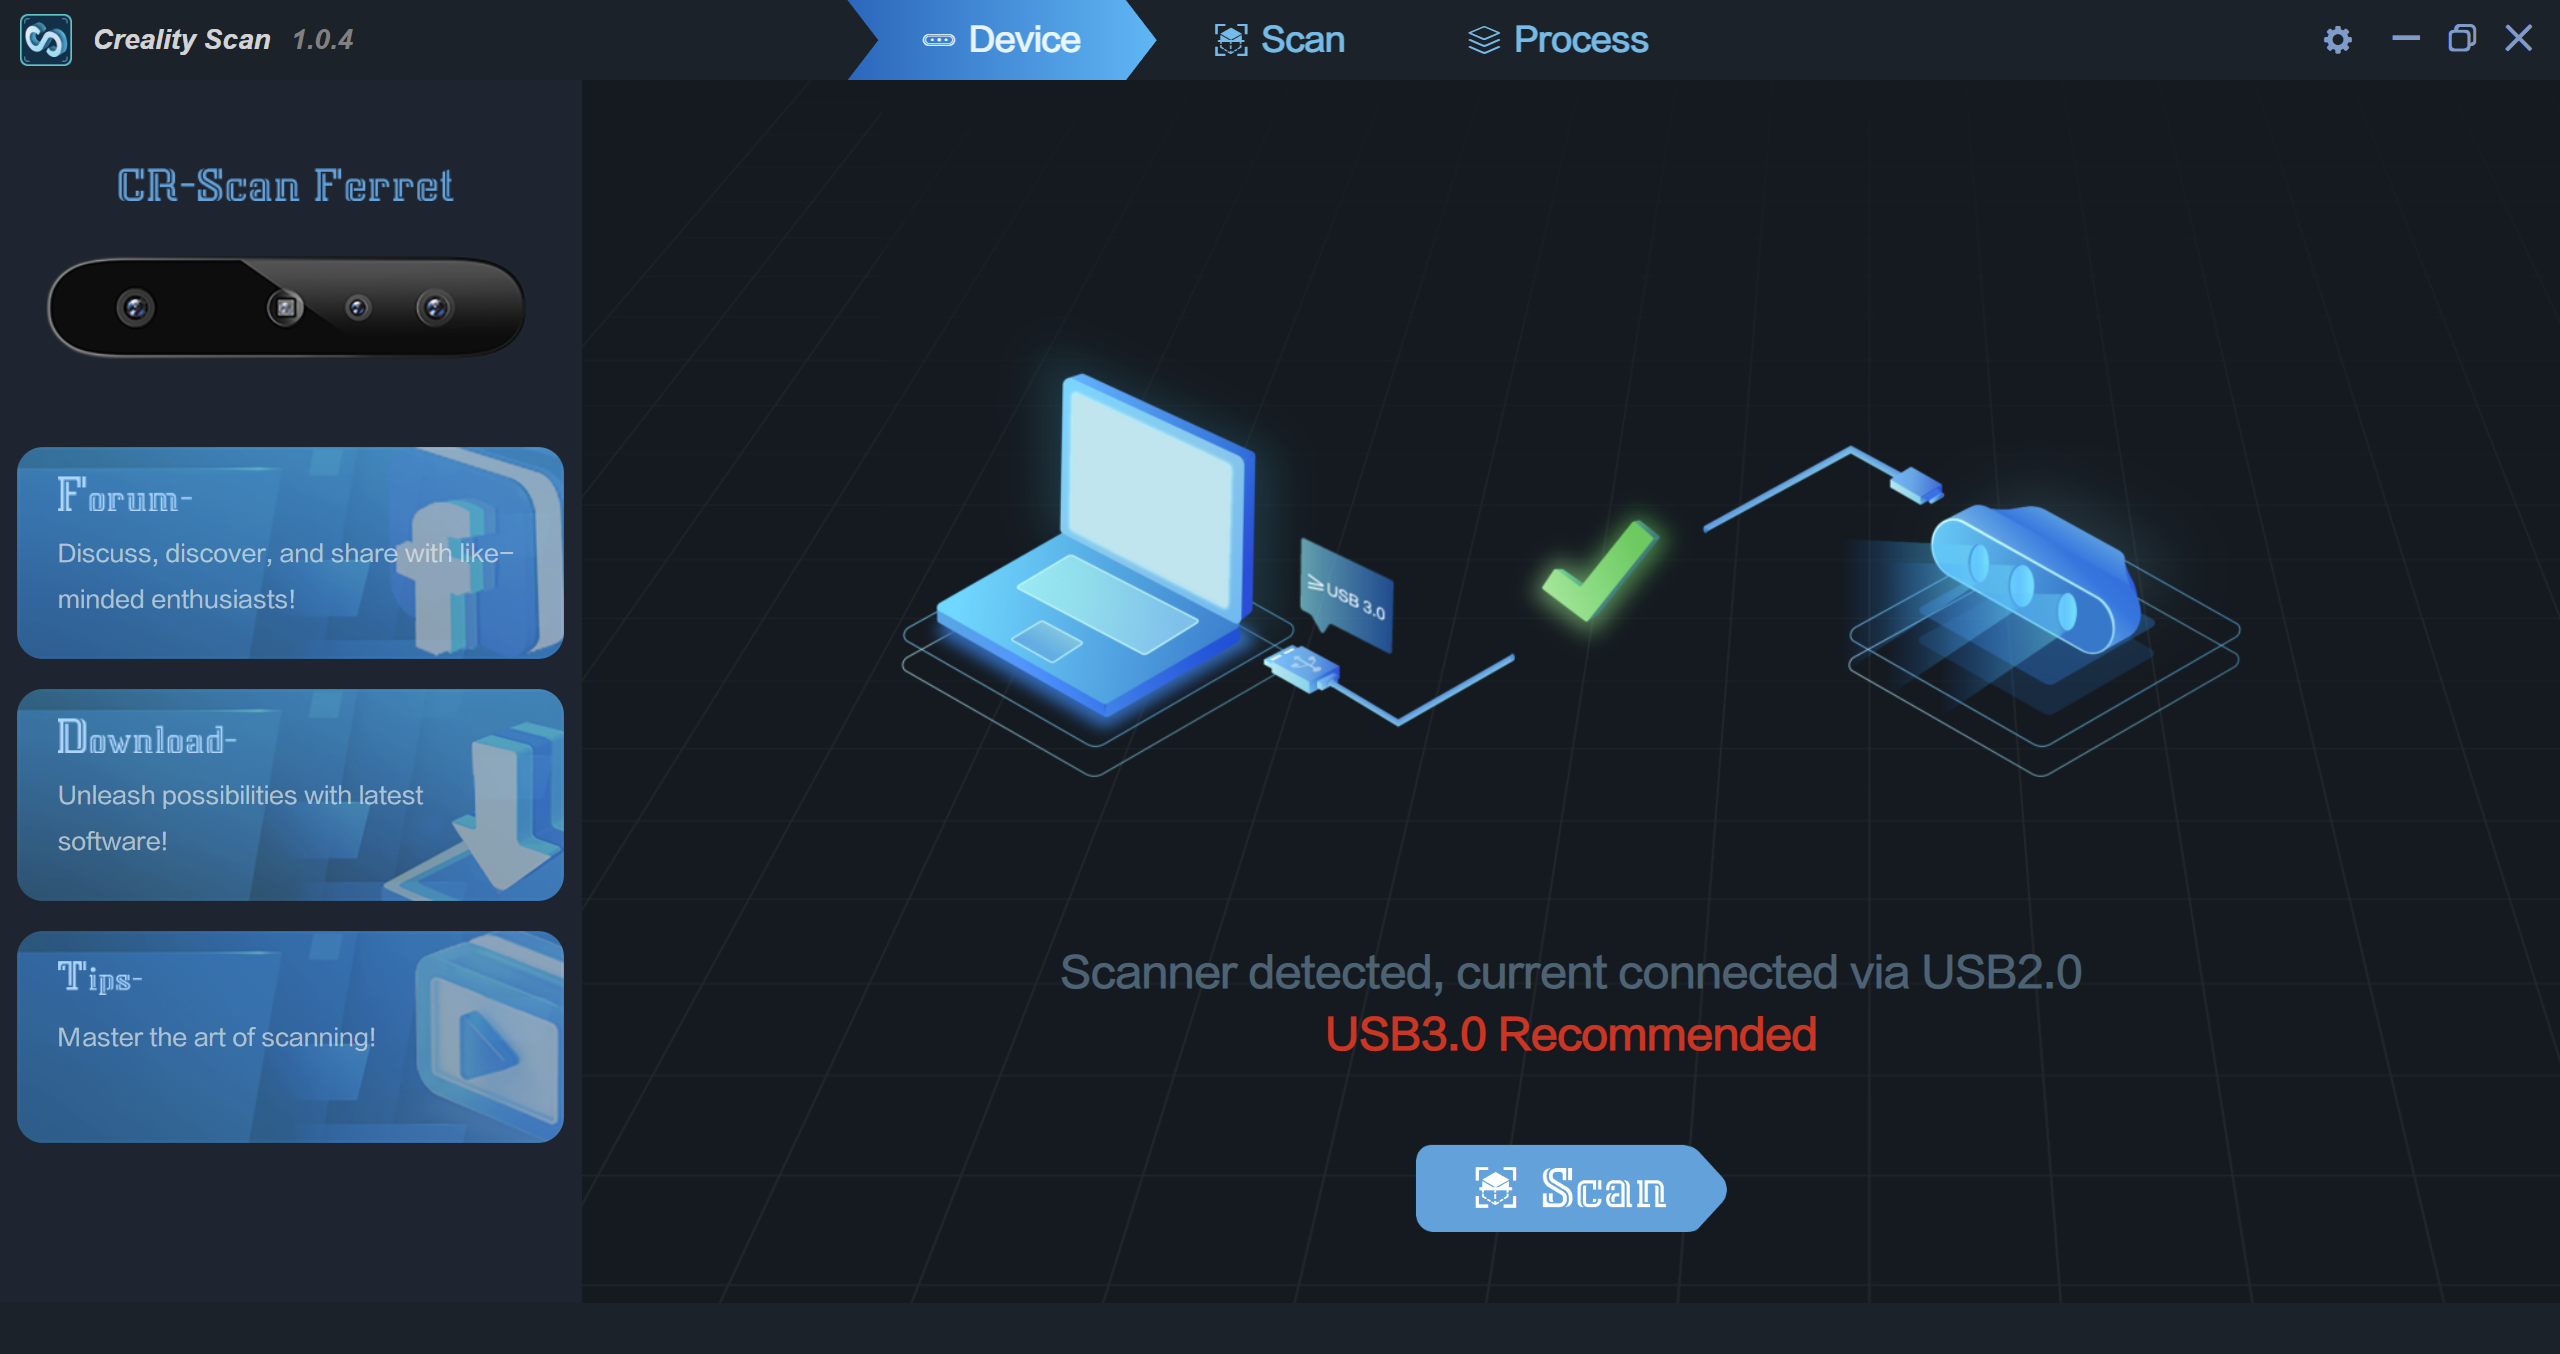
After changing the USB cable to the long version, the scanner can also be used on a laptop. Thanks to more computing power, the scan may run more smoothly. Post-processing, meshing and linking the color information is also faster. Important: Use a USB 3.0 or higher port for the connection.
The "Creality Scan" software can be downloaded from the product page and is used in version 1.0.4 for our test.
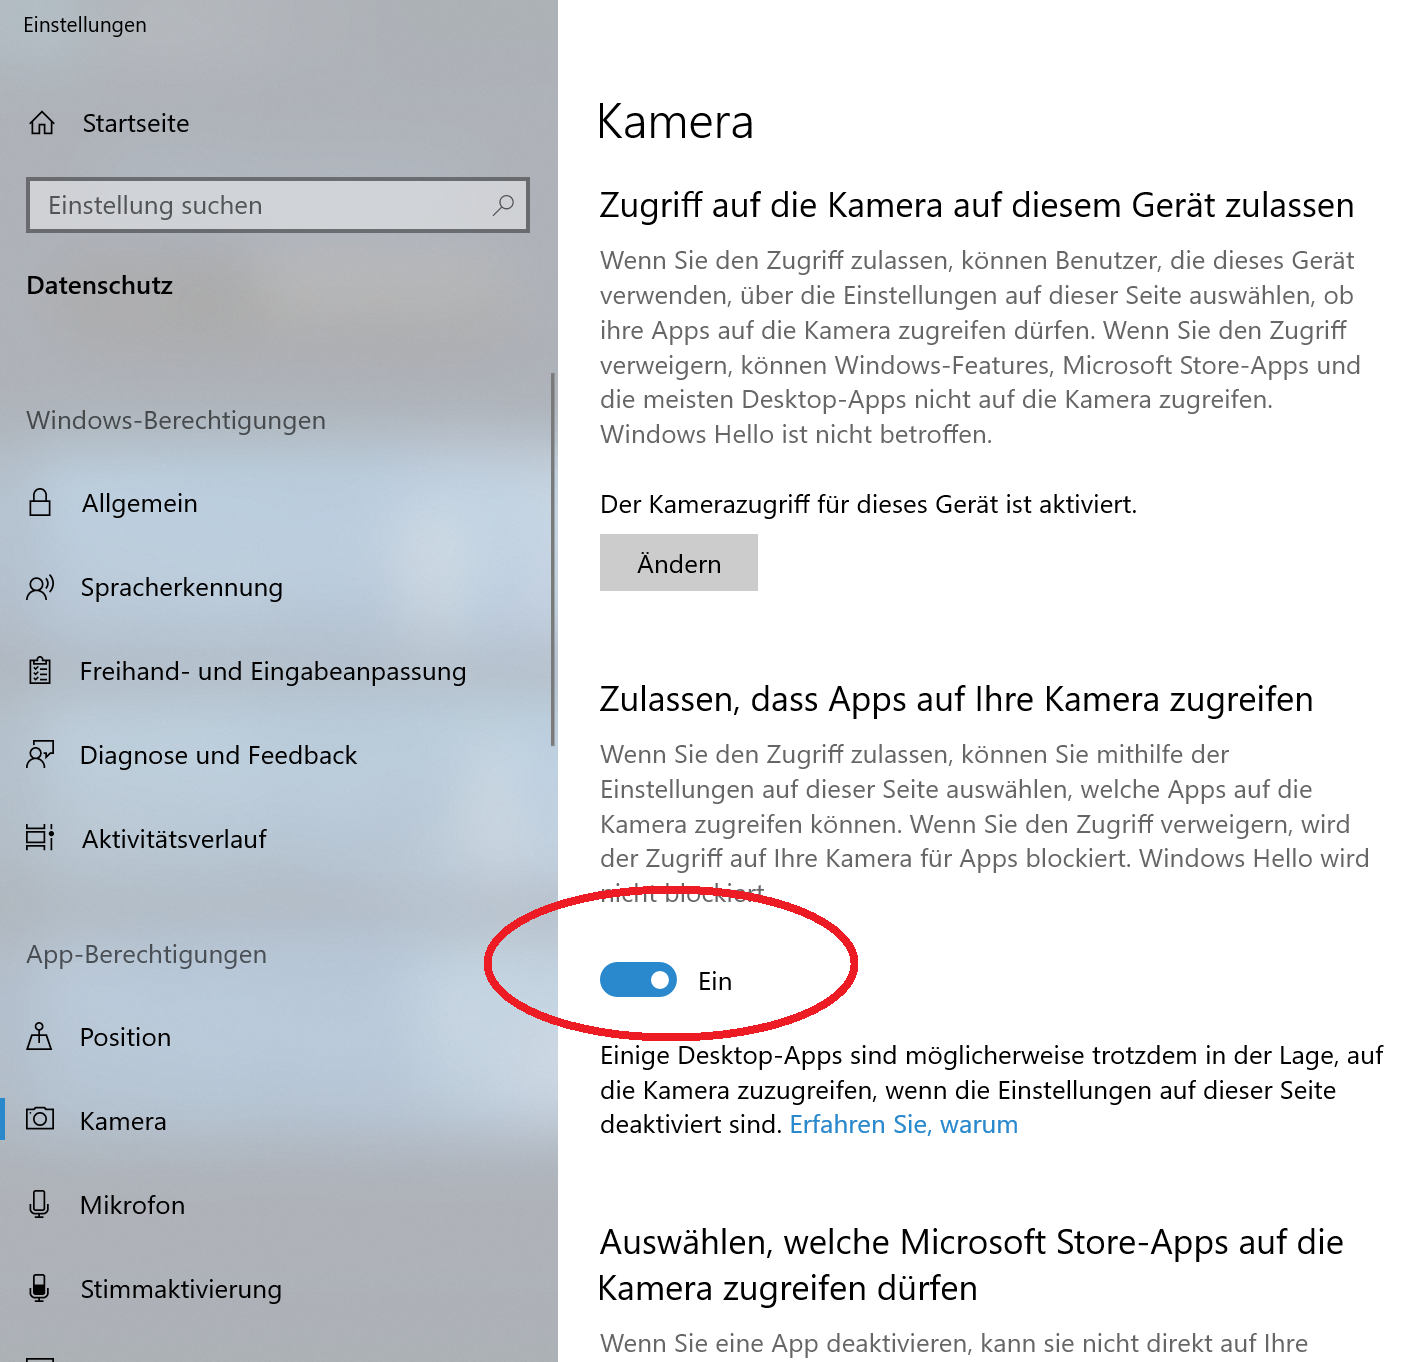
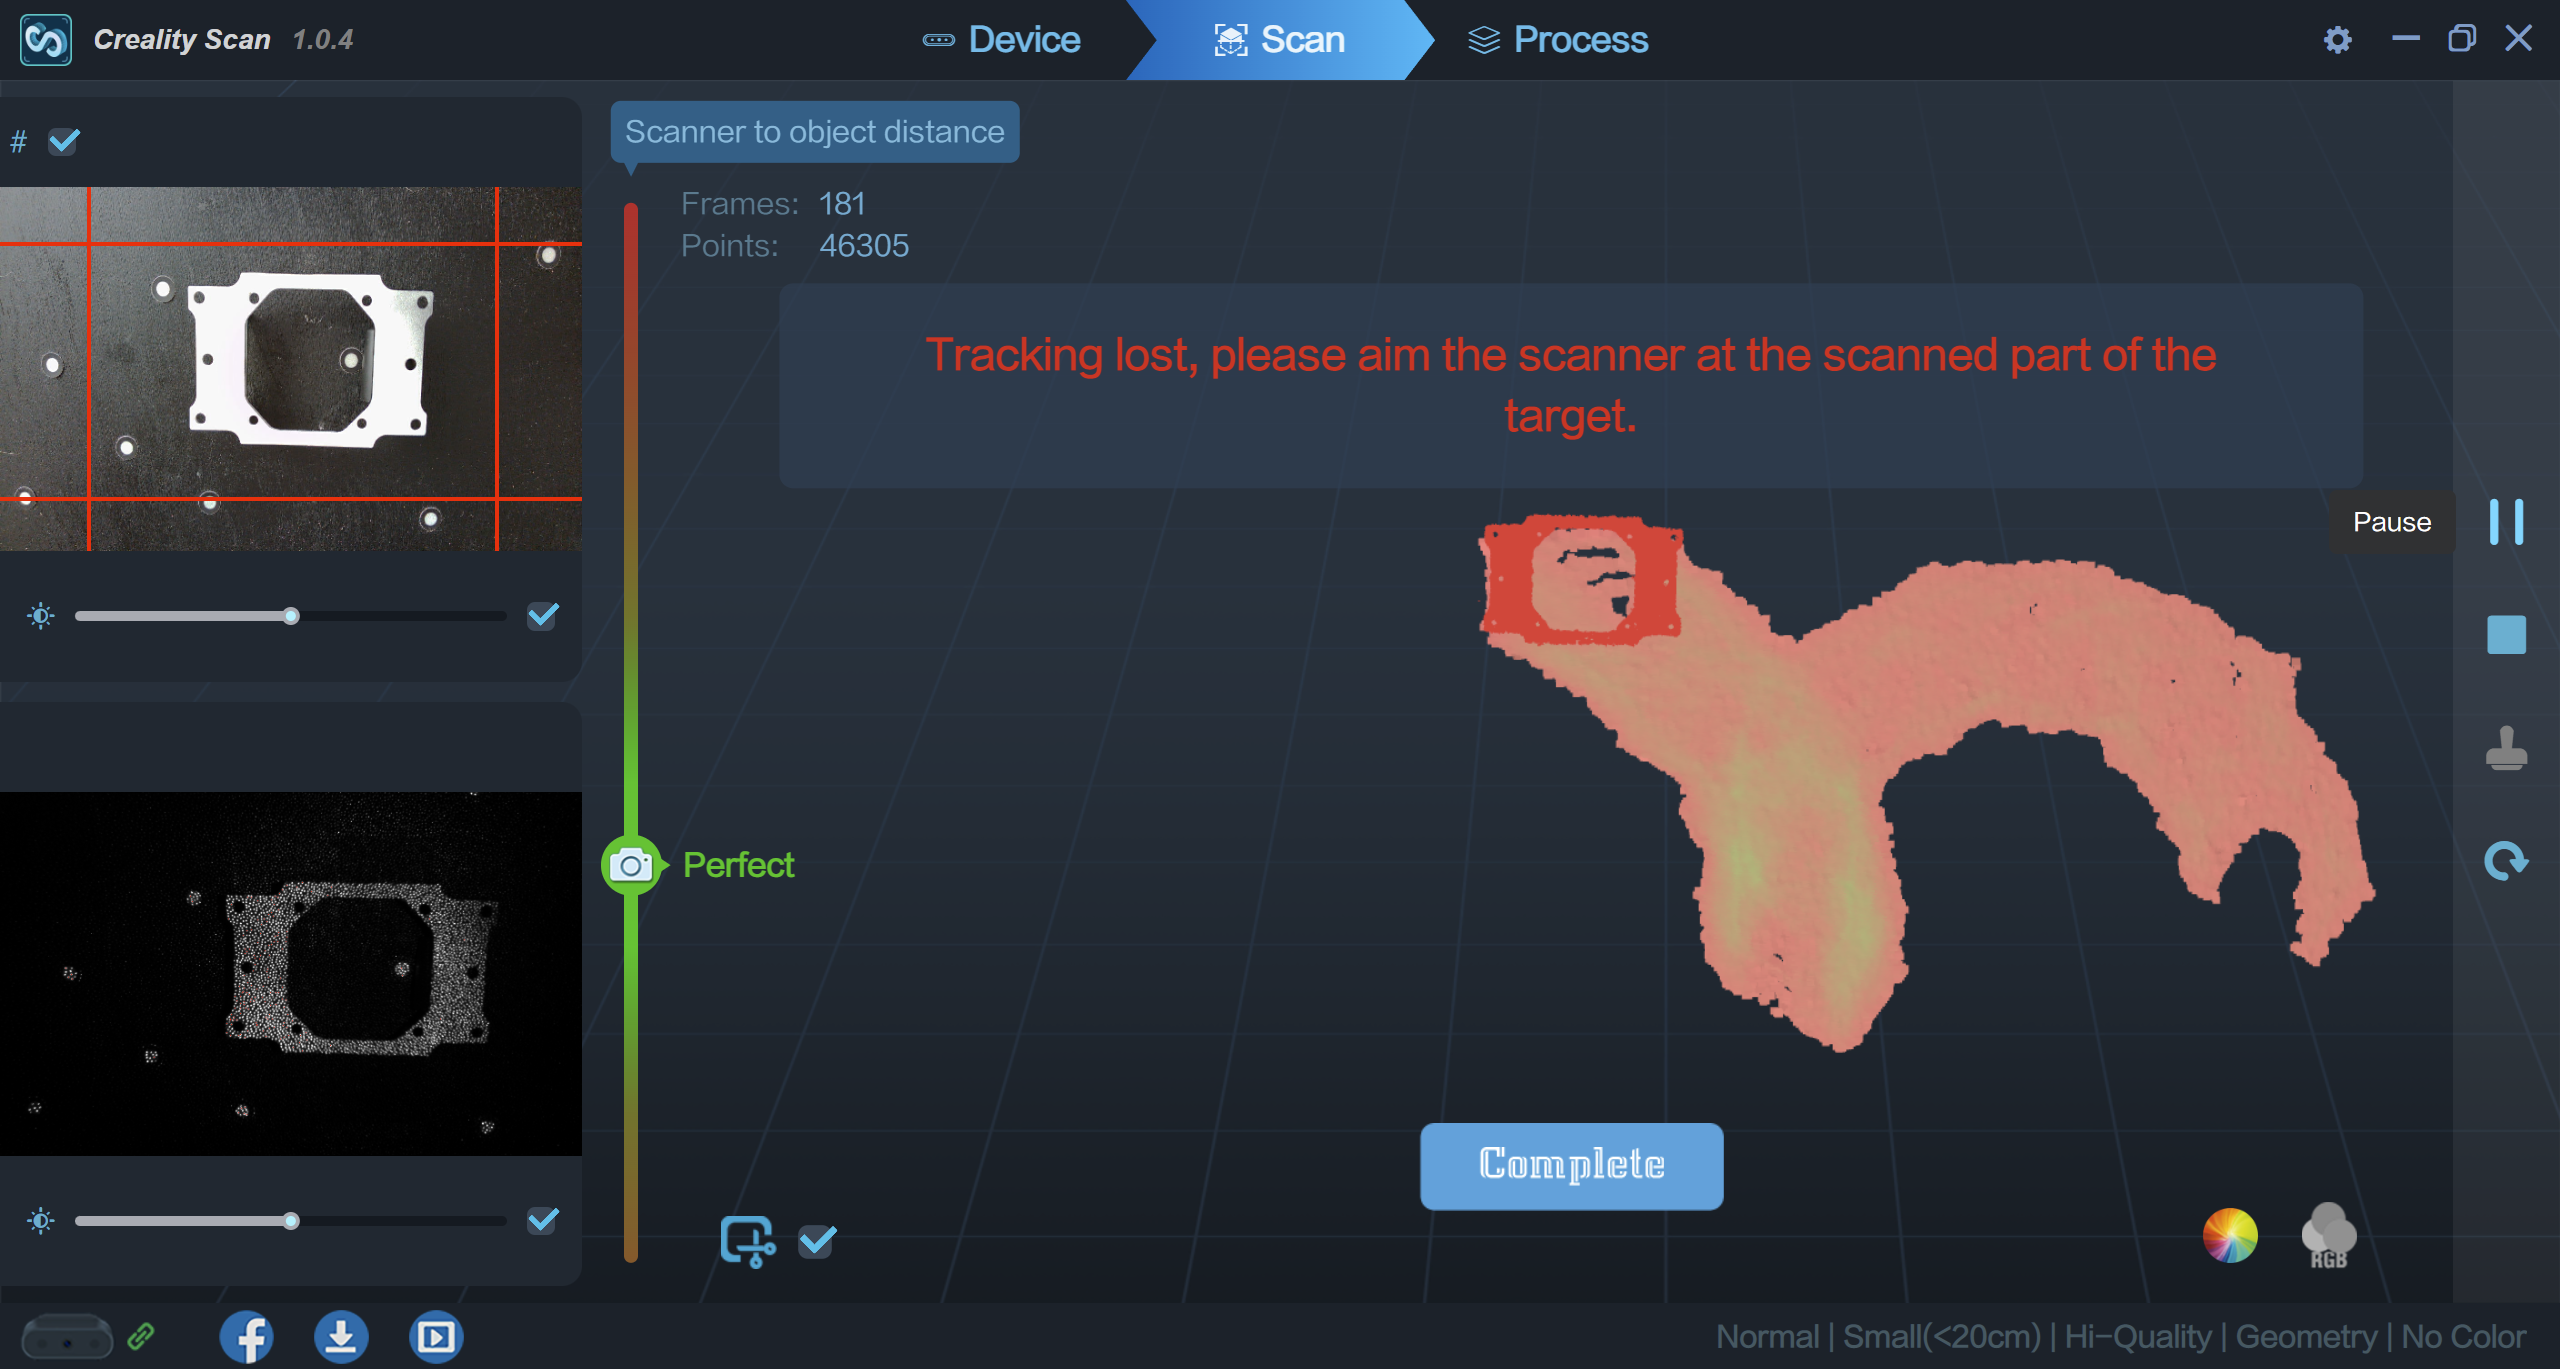
After the start, a video greets us, which makes it a little easier to get started. Definitely recommend for the basics. Otherwise, there isn't really much to discover in the main menu. The language can be set at the top right, but no German voice output was available at the time of the test. As soon as the 3D Ferret is connected and connected correctly, a pop-up will take you to the scan settings. If the scan ferret is not recognized by the software, but you still hear the USB connection noise, it is helpful to take a look at the Windows camera settings. To protect privacy, apps may be denied access to cameras. The Scan Ferret is ultimately nothing more than a camera, so the switch marked in the screenshot must be ON.
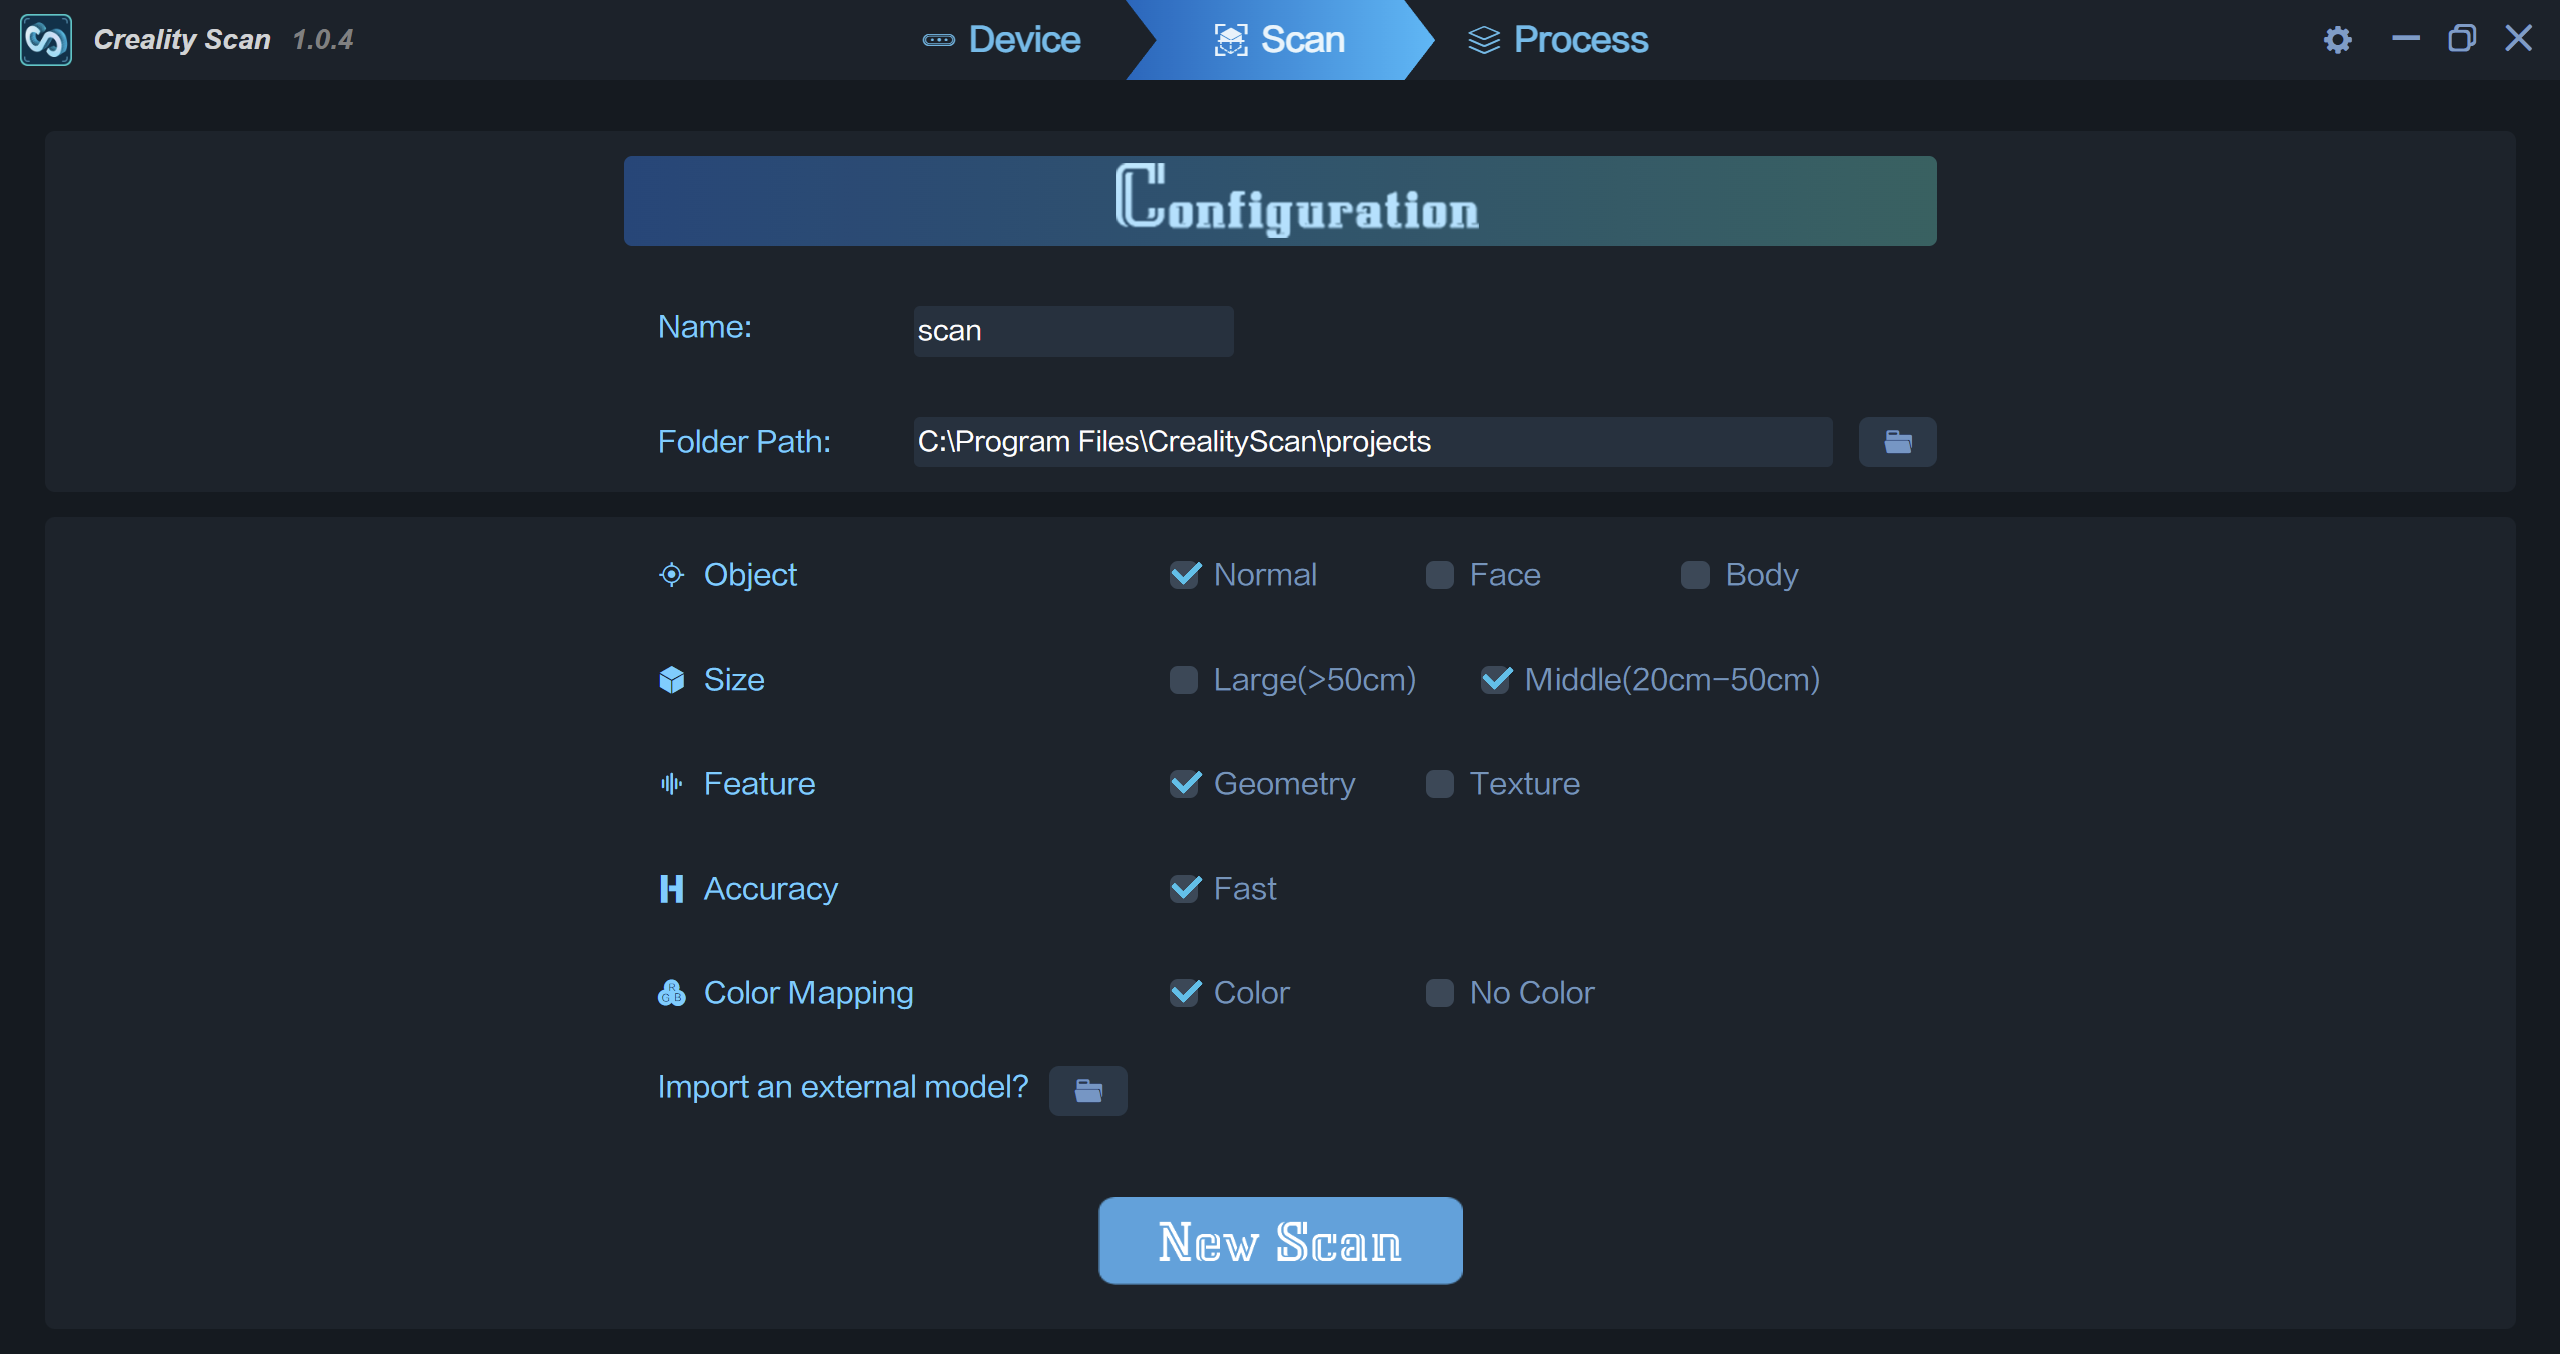
The scan settings are also the same as those of the app on the smartphone. Depending on the selection of the size selected under "Size", the scan distance and later the accuracy will also be different. This should therefore be selected to match the object.
Probably the most important choice is between Geometry or Texture mode. These two fundamentally different modes determine how the software orients itself and finds itself in the space related to the object. If "tracking lost" is displayed very often during scanning and you don't get a scan together, try changing this mode once. In general, I have often been able to achieve good results in texture mode. This mode looks less at the shape and more at the surface of the part to be scanned. If this is very irregular and has a wide variety of striking colors, then it can be used for orientation.
The geometry mode should be selected if your component has many and above all irregular surfaces, shapes and edges. After the first few scans, you quickly get a feel for which mode to choose.
I mostly left the accuracy on high in the tests in order to get maximum details. The scanning itself is a bit faster on Fast, but lacks details. However, since the objects were not particularly large, one could easily do without the increased speed. The bag was perhaps not the best choice as the first test candidate, since there were neither irregular surfaces nor varied textures. This also led directly to artifacts in the later 3D model. However, MeshMixer can smooth and remove them as needed.
When connecting via USB 2.0, the high quality mode is completely absent, as is the selection for models under 20 cm, so USB 3.0 is recommended:
In general, I would like more explanations of the individual functions and settings of Creality in relation to the scan software. The manual in printed form as well as online is to be seen more as a quick start guide, but unfortunately you have to gather your own experience of what and, above all, how it works best. The same applies to the execution of the software itself. I hope that further updates will follow and that incorrect scans will be minimized as a result. Sometimes I had the problem that a component was 90% scanned, but the tracking was lost due to an error and geometry was cheerfully generated in space. You could finally restart this scan – annoying. Sometimes there were crashes and involuntary restarts of the scans. It is similar with the Android app. Creality needs to make improvements here.
Comparison FAST vs. High Quality at 300 frames for both models:
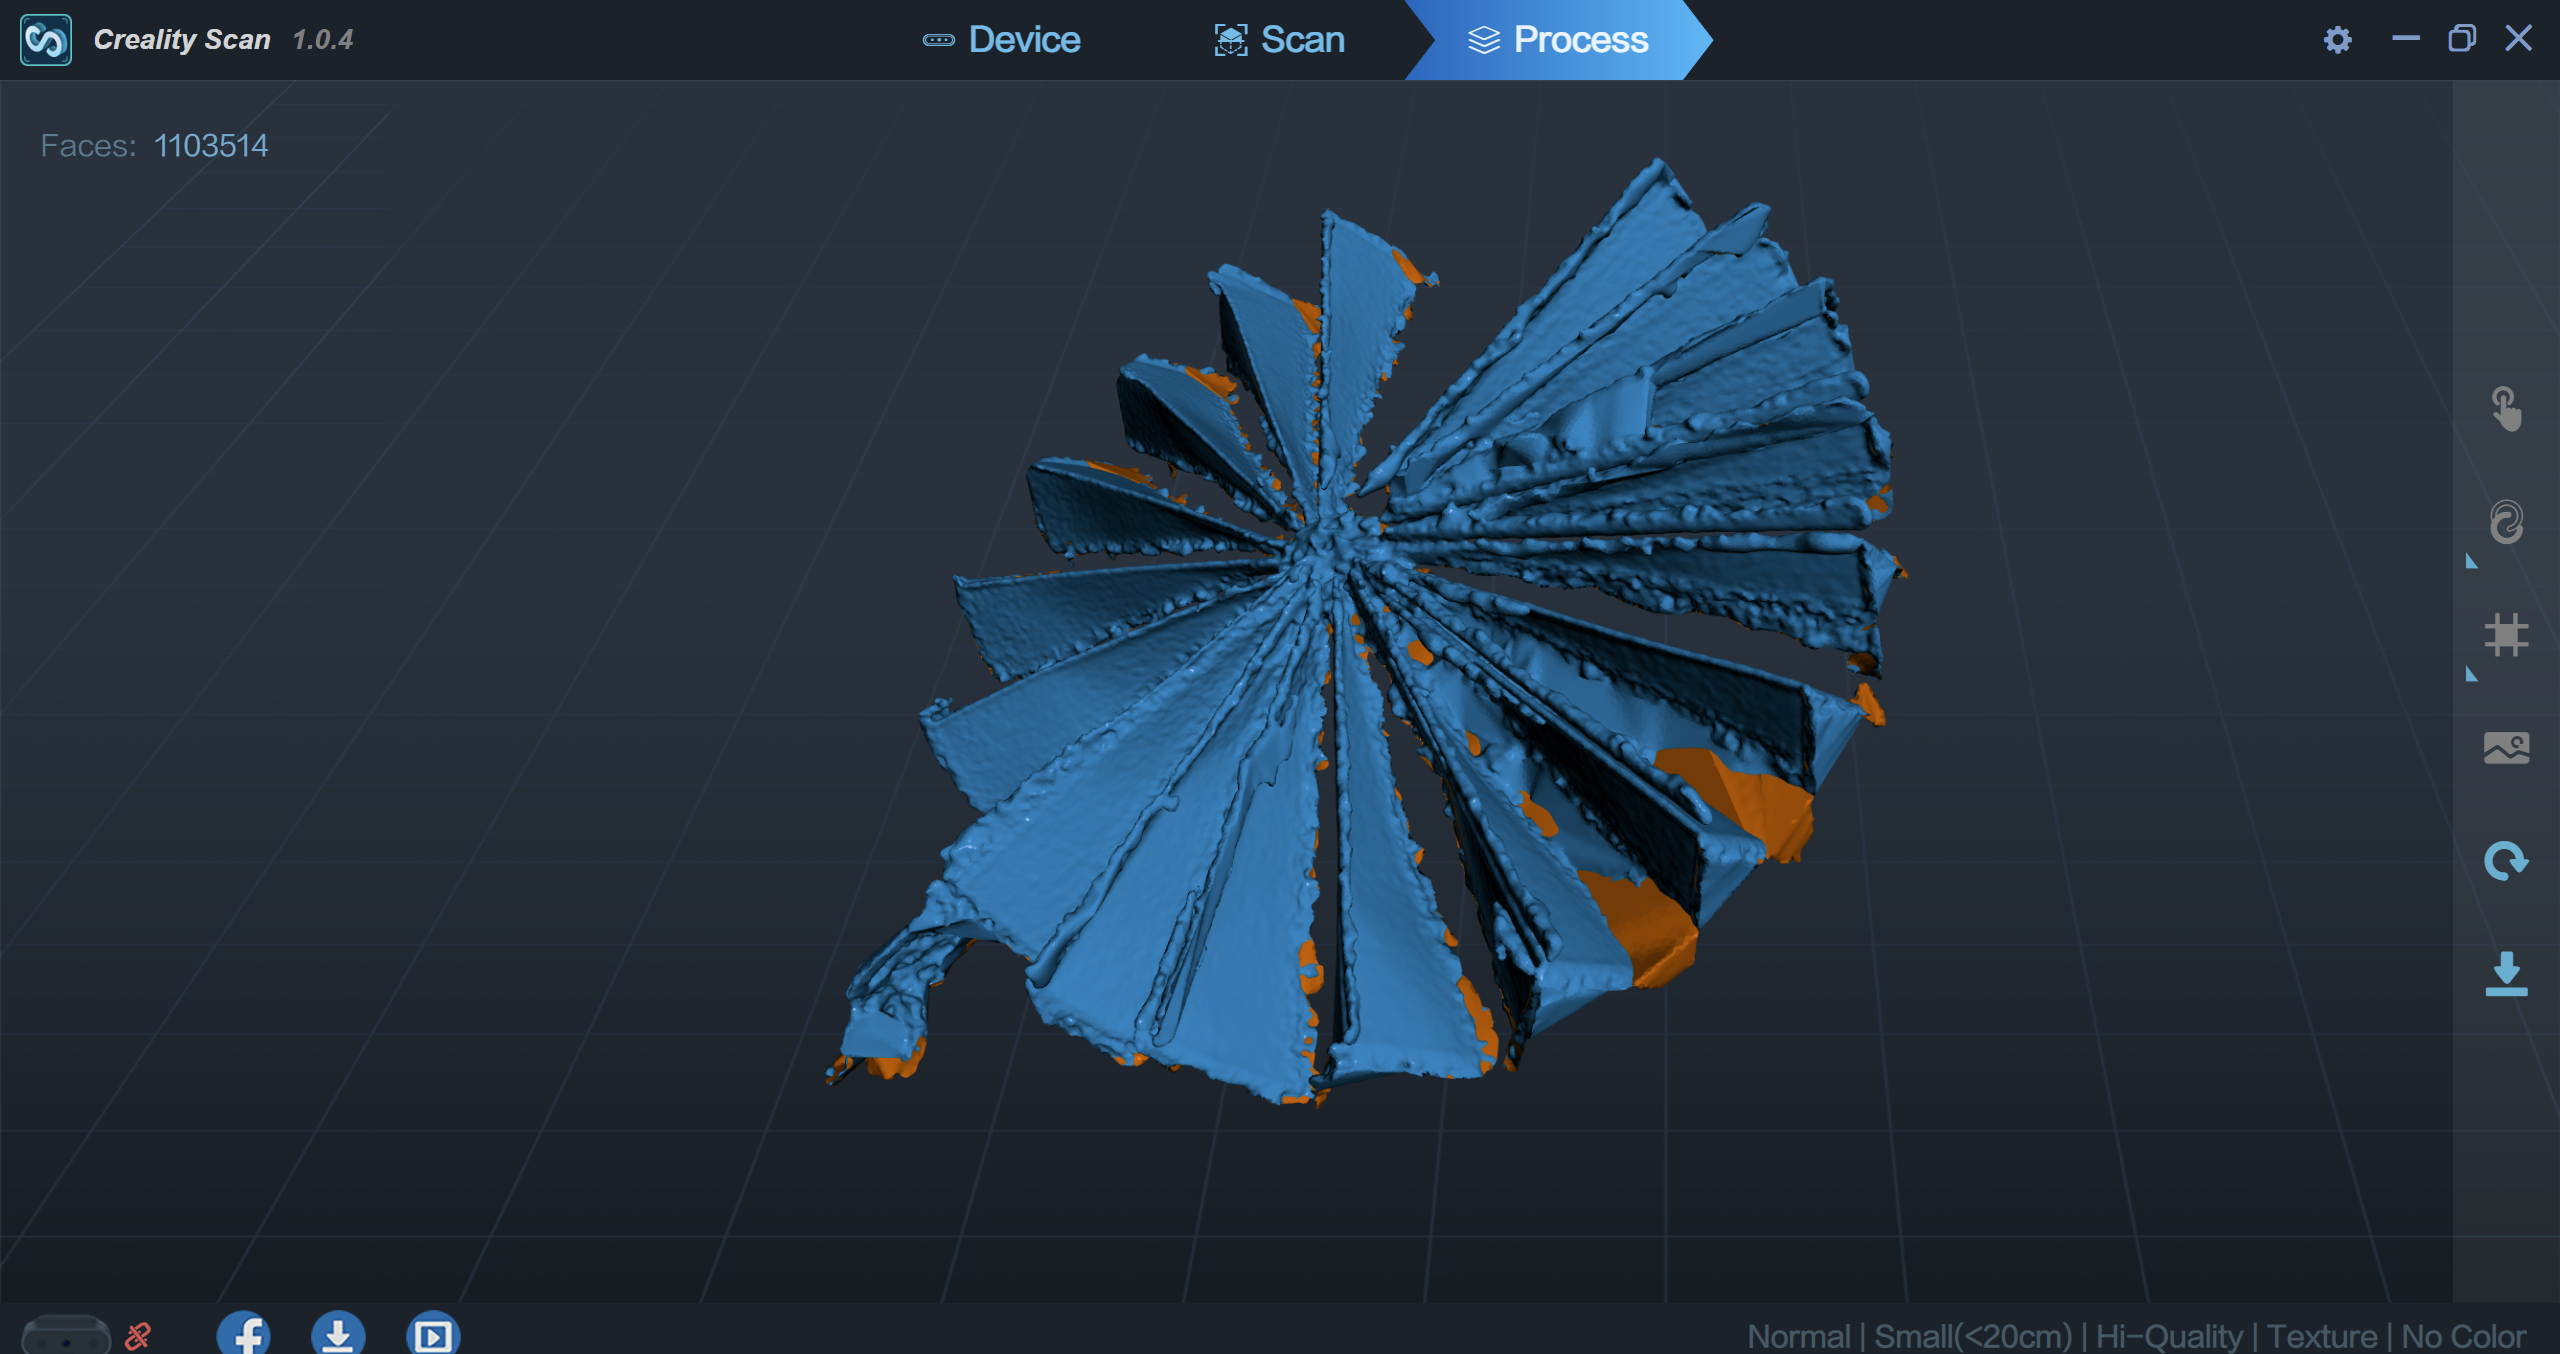
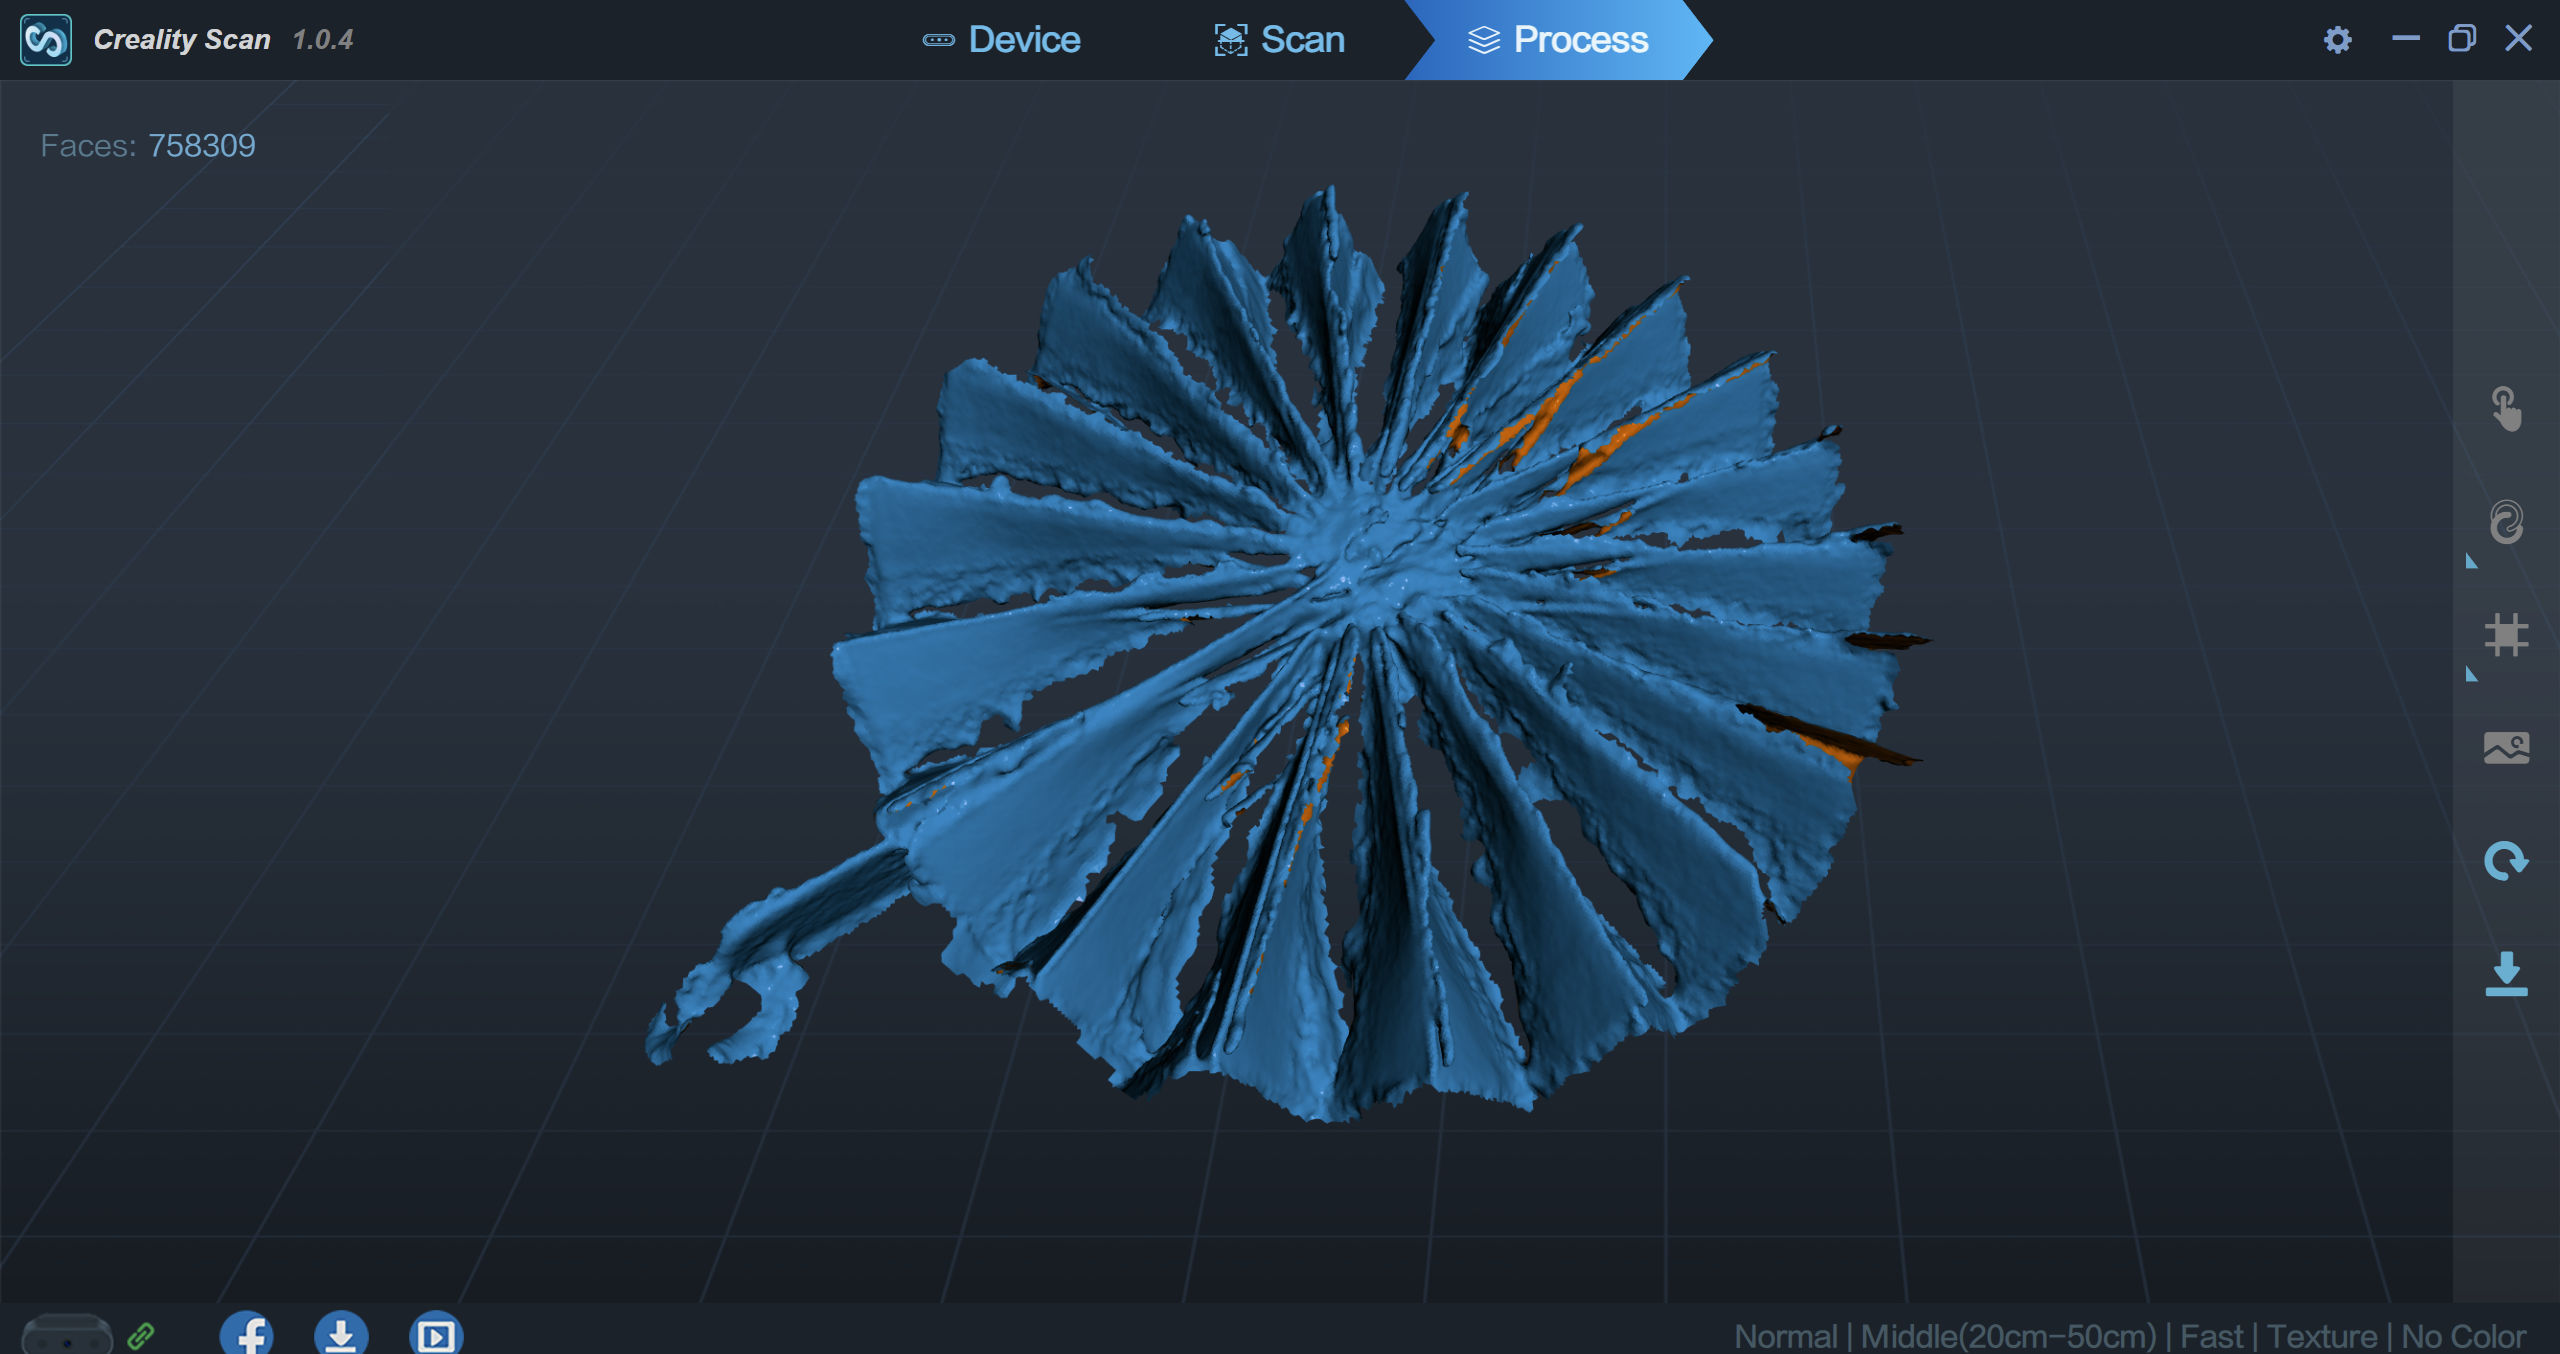
Nearly
The models are not completely scanned, since only 300 frames per scan. However, you can clearly see the difference between the Fast Scan (USB 2.0) and the High Quality Scan (USB 3.0). Incidentally, the post-processing time is linearly dependent on your processor performance. If it takes 10 minutes to optimize, mesh and color your scan on your mobile phone, it will take 5 minutes on your laptop or just 2 minutes on your high-end gaming computer.
AESUB matting sprays
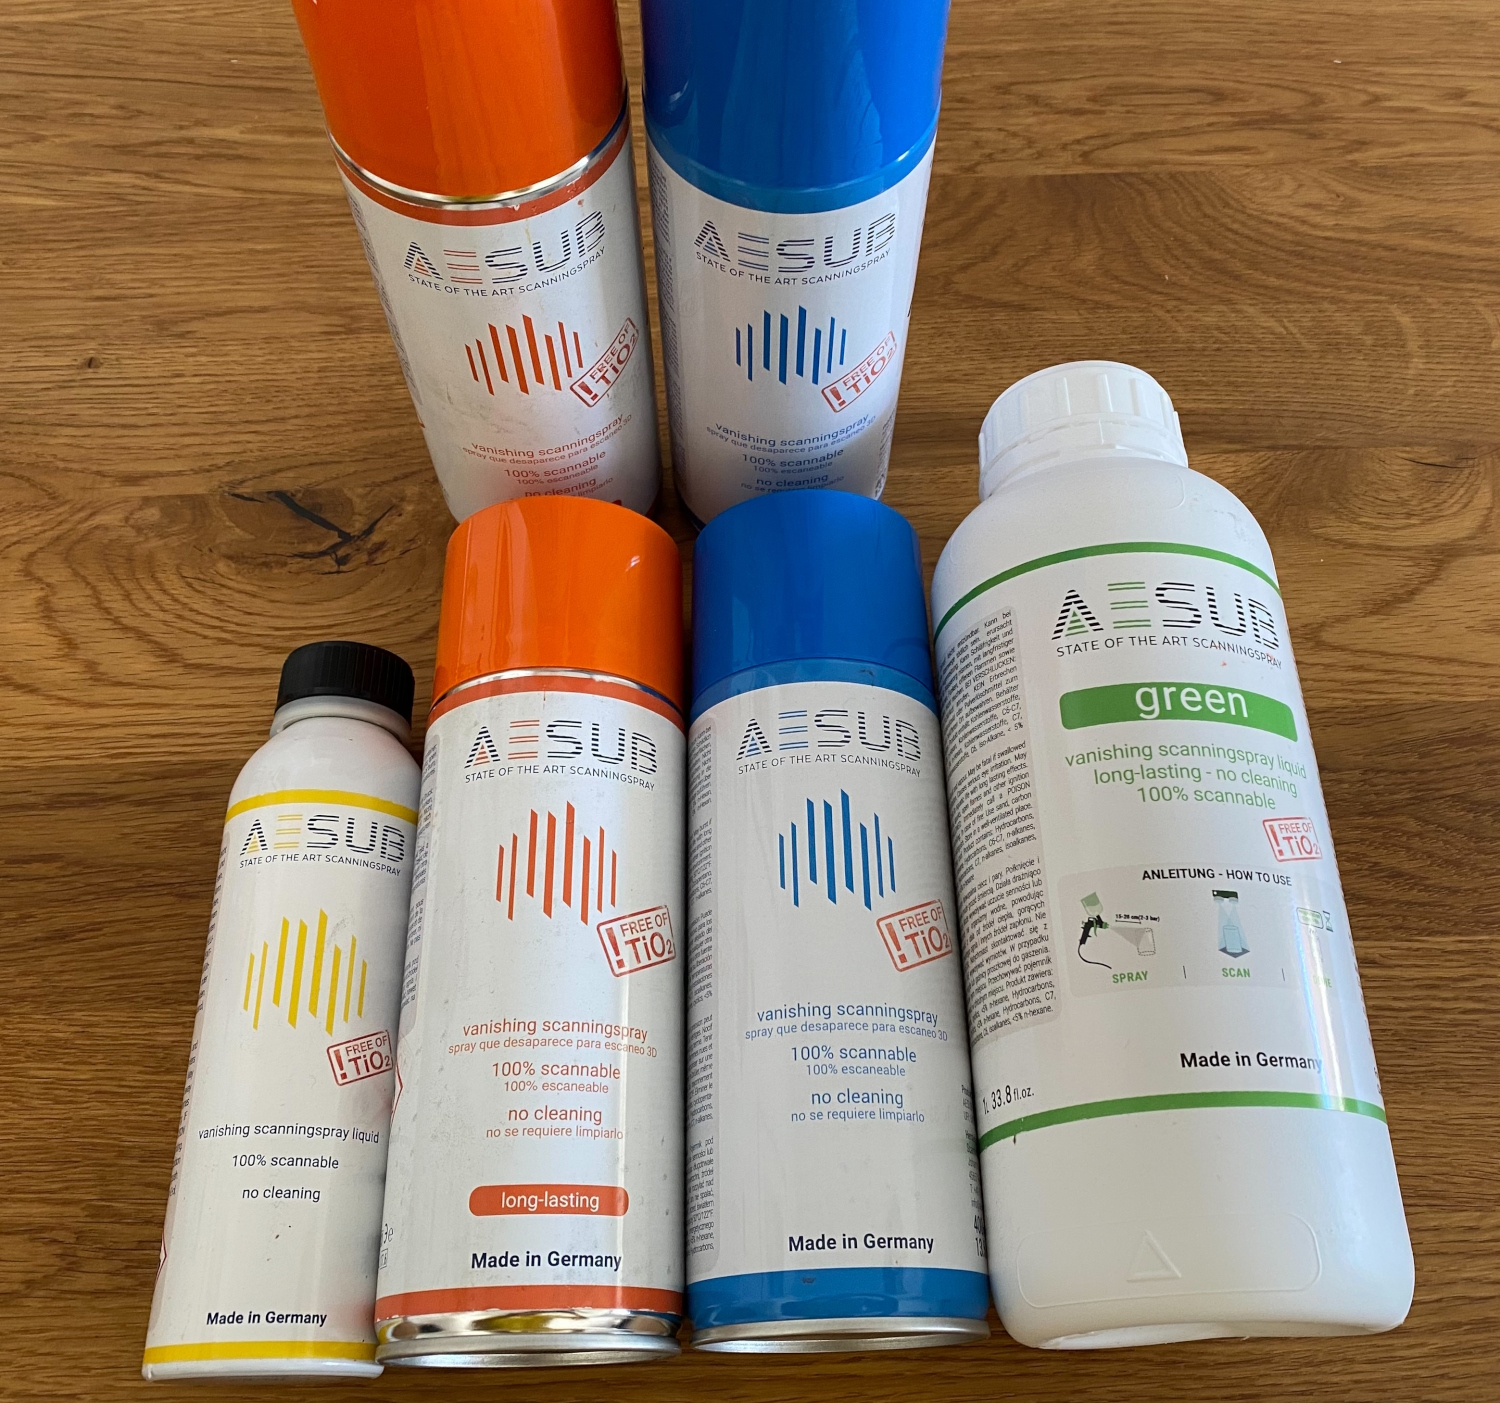
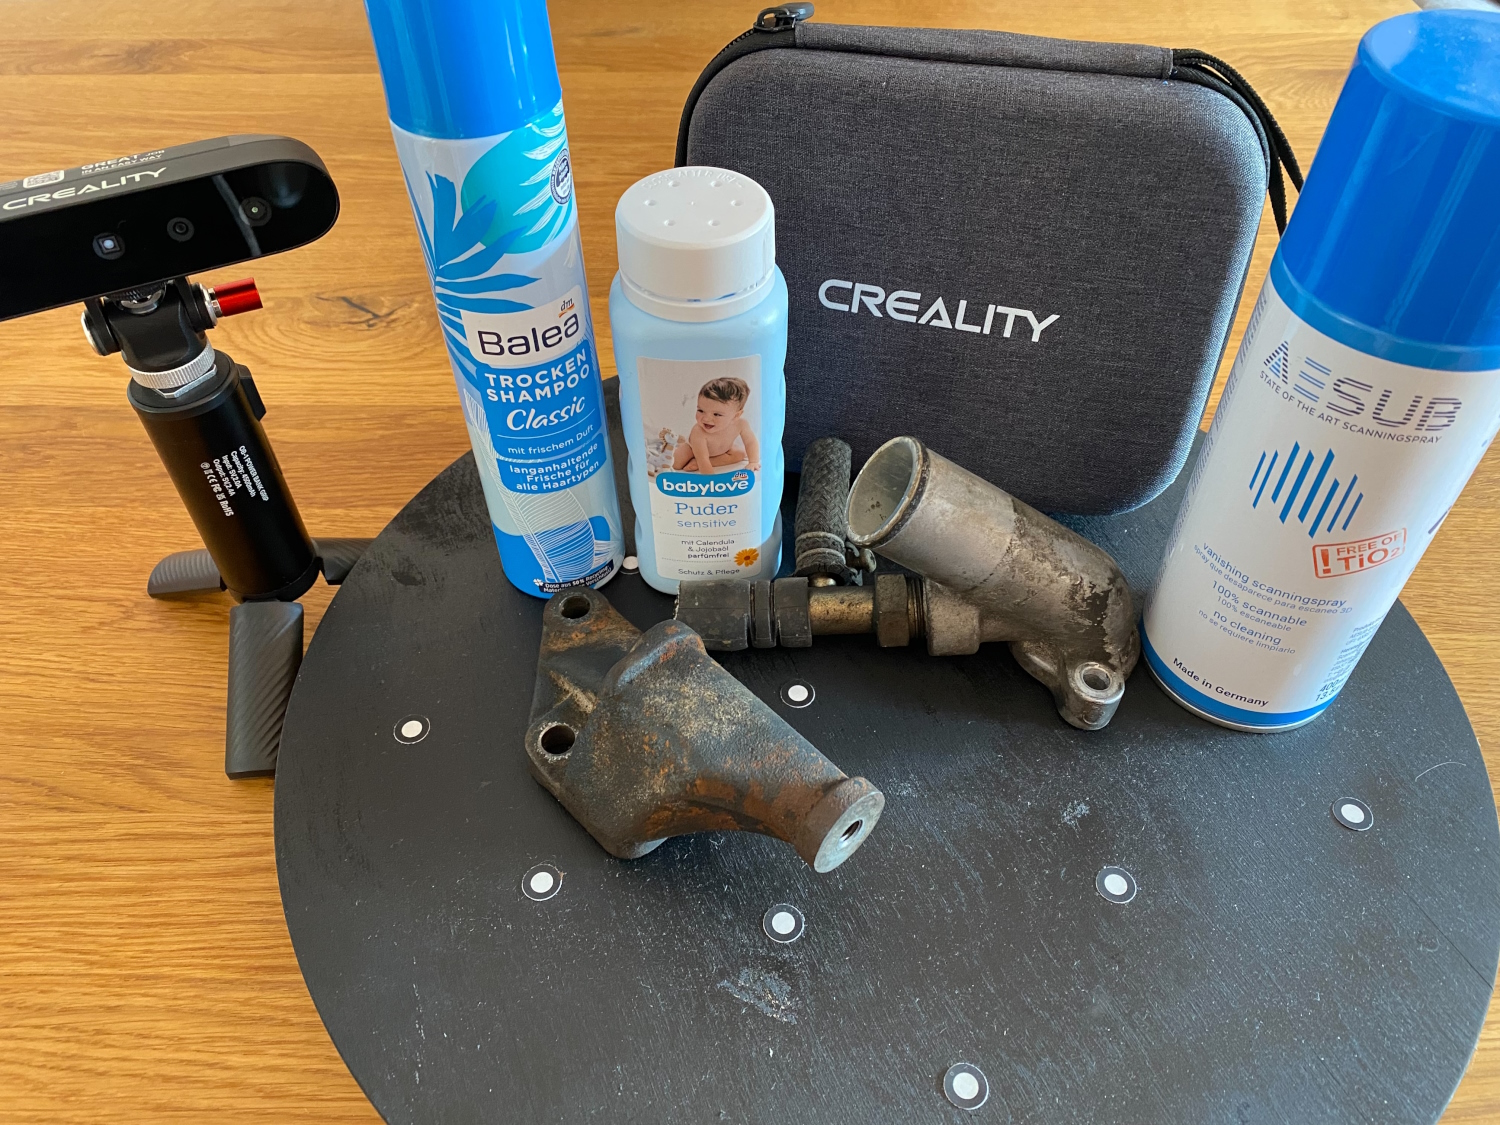
I will mention the technical limitations of an object or scanner working with light more often here, as they are critical when dealing with 3D scanners and, if ignored, make scanning impossible or can quickly lead to frustration. 3D scanner sprays or matting sprays are available to prevent problems with reflective, shiny or transparent materials, which a 3D scanner like the Scan Ferret cannot perceive. Partly from the spray can for direct use or as a liquid for spraying with your own spray gun or with an air brush gun. As it couldn't be any other way, I was able to talk extensively at work with the department that deals with 3D scans in our company. The devices are of course of the caliber in completely different spheres, however, the company AESUB came up during this conversation. The colleague also had a test kit with him, which was also given out at various trade fairs. Maybe you can get your hands on one or just talk to the ladies and gentlemen at the AESUB booth:
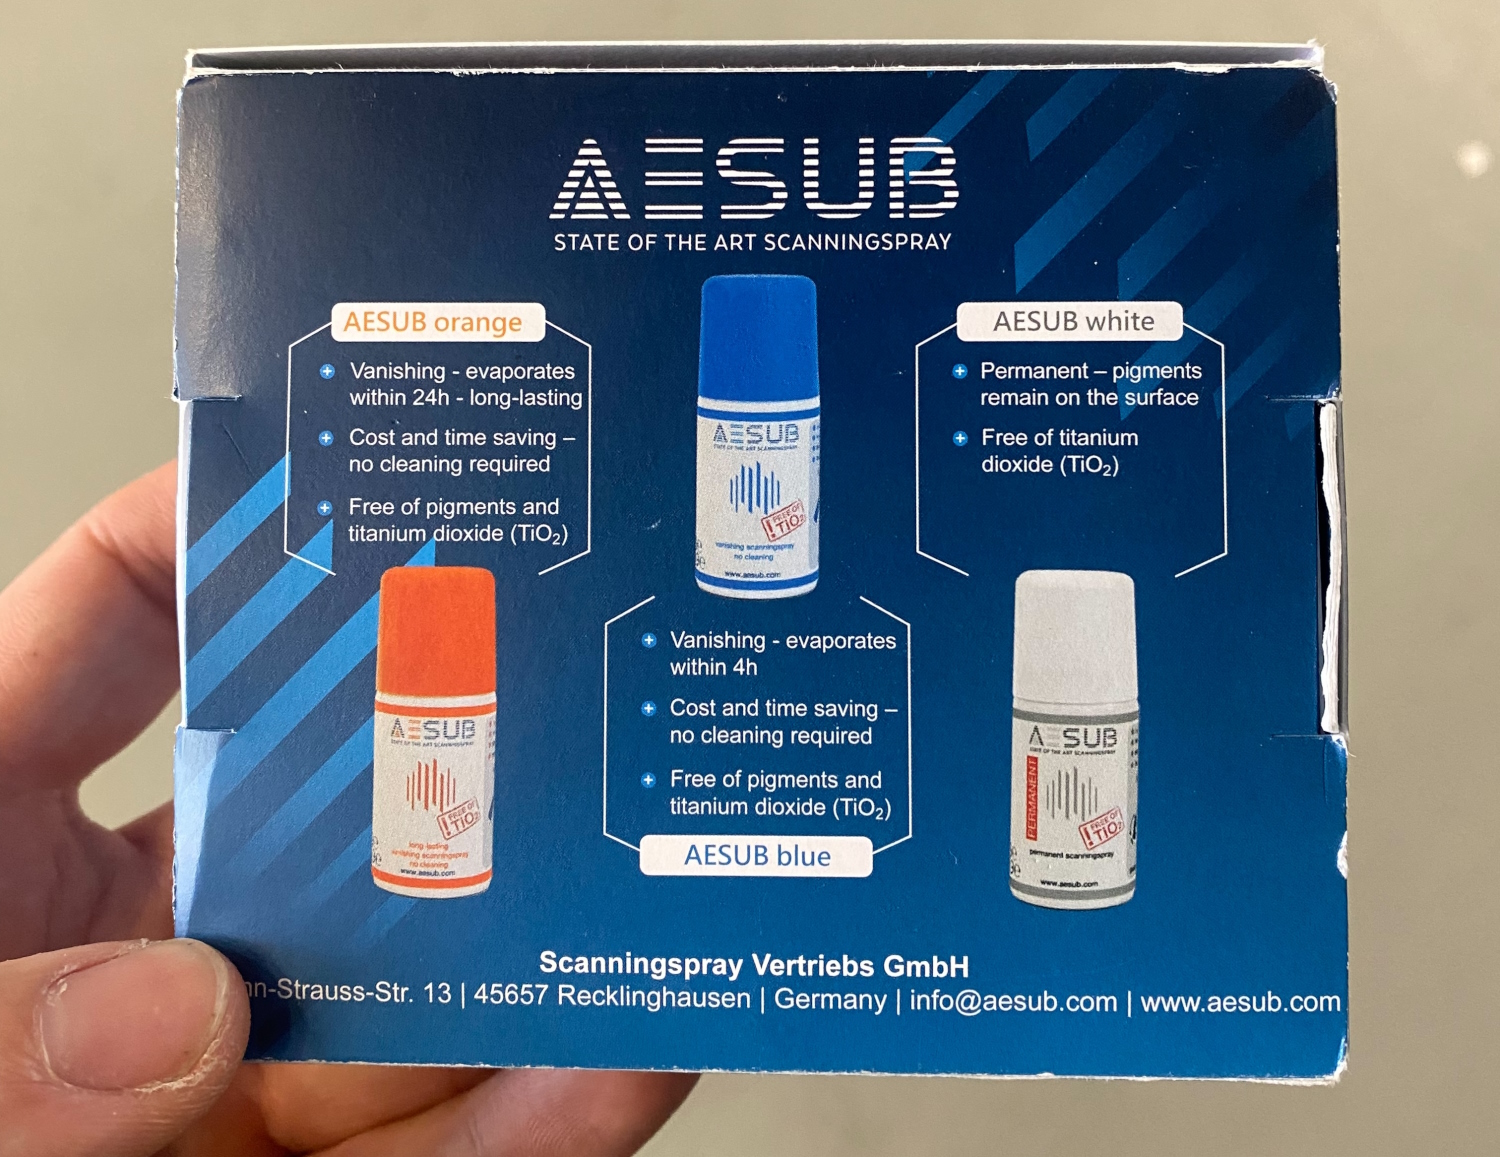
AESUB is a Germany-based and manufacturing company specializing in the development of 3D scanner sprays. We will also look at exactly these sprays in the context of this article, since they are associated with the use of 3D scanners. The products from AESUB are mainly used in a professional environment and are probably not applicable to every Ferret user, which is why we also make the comparison to "household products".
First of all, before I go into more detail about the various products that AESUB kindly made available to us for this article. The cleaning effort afterwards with the household agents compared to e.g. AESUB Blue is huge, because almost all AESUB sprays evaporate WITHOUT RESIDUE after a certain time. (Not visible to us, but there is also a permanent product if volatilization is not desired).
AESUB Blue, shown on a test scan from a DSLR camera. I did not want to use alternative products, as shown below, due to the later manual cleaning and the fact that the camera is not waterproof. The AESUB Blue has mostly self-evaporated. It only stayed on the edge of the lens hood, probably because at this point it consisted more of spray mist than pure scanner spray. A black EKWB holder was virtually invisible in the software before matting. After applying AESUB Blue, the holder revealed itself.
I first scanned the camera without matting spray, but due to reflections and the black color in general, this was very tedious. The attentive viewer of the pictures may also have noticed that, despite the lens protection at the front, nothing was recorded at this point. The 3D model only shows the inside of the hollow body on the lens. Without further ado, AESUB Blue was applied and this area was also noticeable for the Ferret. The spray can therefore ensure that parts are scannable at all. However, be sure to observe the safety data sheets when using it and use appropriate protective equipment. The volatilizing properties are shown below, in this case no post-cleaning was necessary.
In the end, the data from the EKWB scan could not be used at all because the software did not display the holes correctly, but it was worth a try. Especially the "geometry" mode often leads to glitches, as in the following image. In "Texture" mode, the holder could be scanned, but as already mentioned, it could not be converted into analyzable data. For our next PC, the classic photo-scale variant has to be used to build a drawing on it.
| AESUB Blue
|
AESUB Orange
|
AESUB Yellow
|
AESUB Green
|
(the stated values come from the corresponding product page)
AESUB products
Advantage: simple application
quickly covering and matting
respray possible
improves or creates scanability in the first place
easy to no cleaning afterwards
thin layer thickness and virtually no change in the material surface
Disadvantage: not a pleasant smell
relatively expensive
Alternative scanning sprays
In the various forums and communities I found two alternative tools, but they have their own advantages and disadvantages.
-
baby powder
Advantage: cheapest product
slightly faster and improved scanning possible
Disadvantage: difficult to apply evenly as it cannot be dosed/sprayed finely
manual "rubbing" necessary
to achieve only a slight effect/matting, as it is still relatively transparent
dusts relatively heavily and leaves traces when touching other objects or hands
Cleaning with water is relatively quick, which limits the usability, manual removal with cleaning cloths is possible, but laborious
2. Dry Shampoo
Advantage: cheap product
easy to spray on
even application possible
opaque/matte
improved scanability
fresh smell
Disadvantage: not grippy, the spray flakes off almost immediately when touched, and for the same reason it is difficult to re-spray
Particles stand up and create a rough surface that could affect the scan
Cleaning with water is relatively quick, which limits the usability, manual removal with cleaning cloths is possible and faster than with baby powder
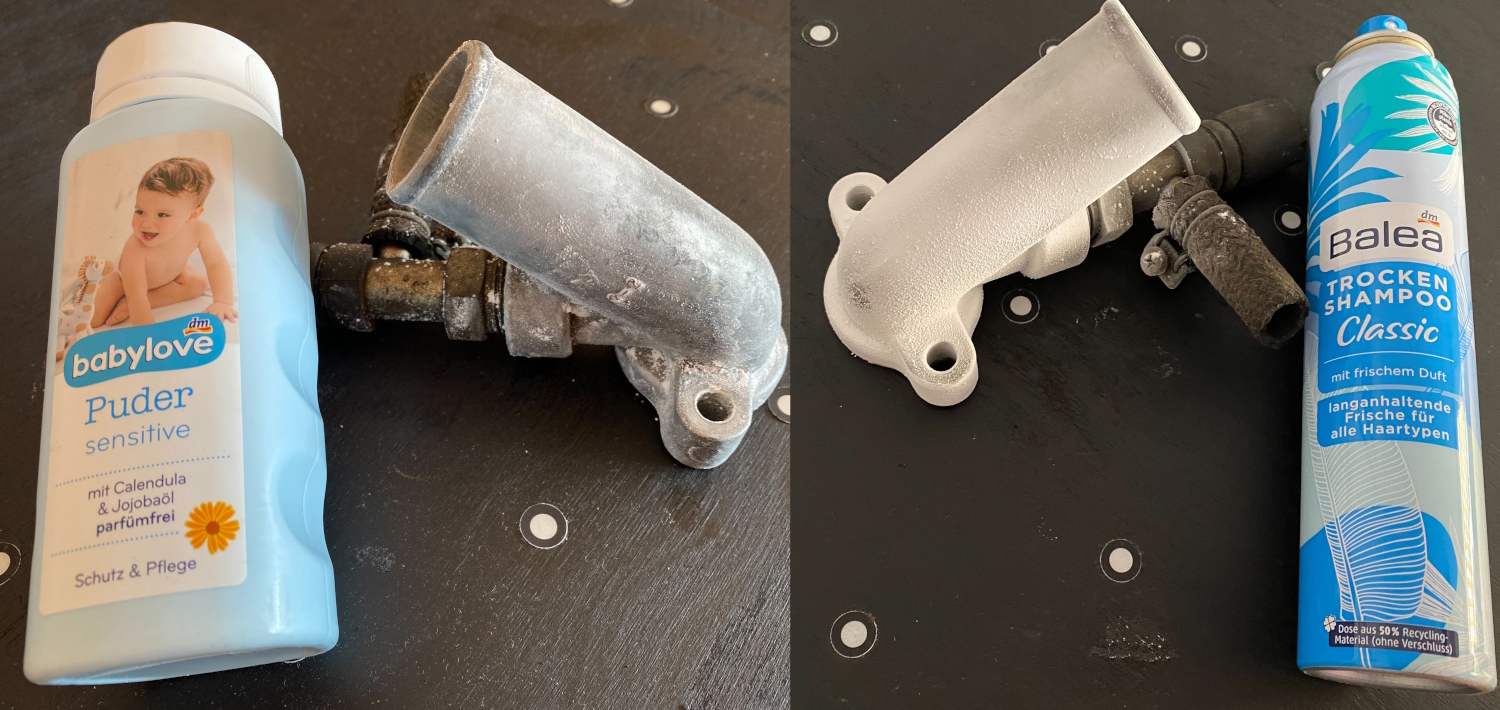
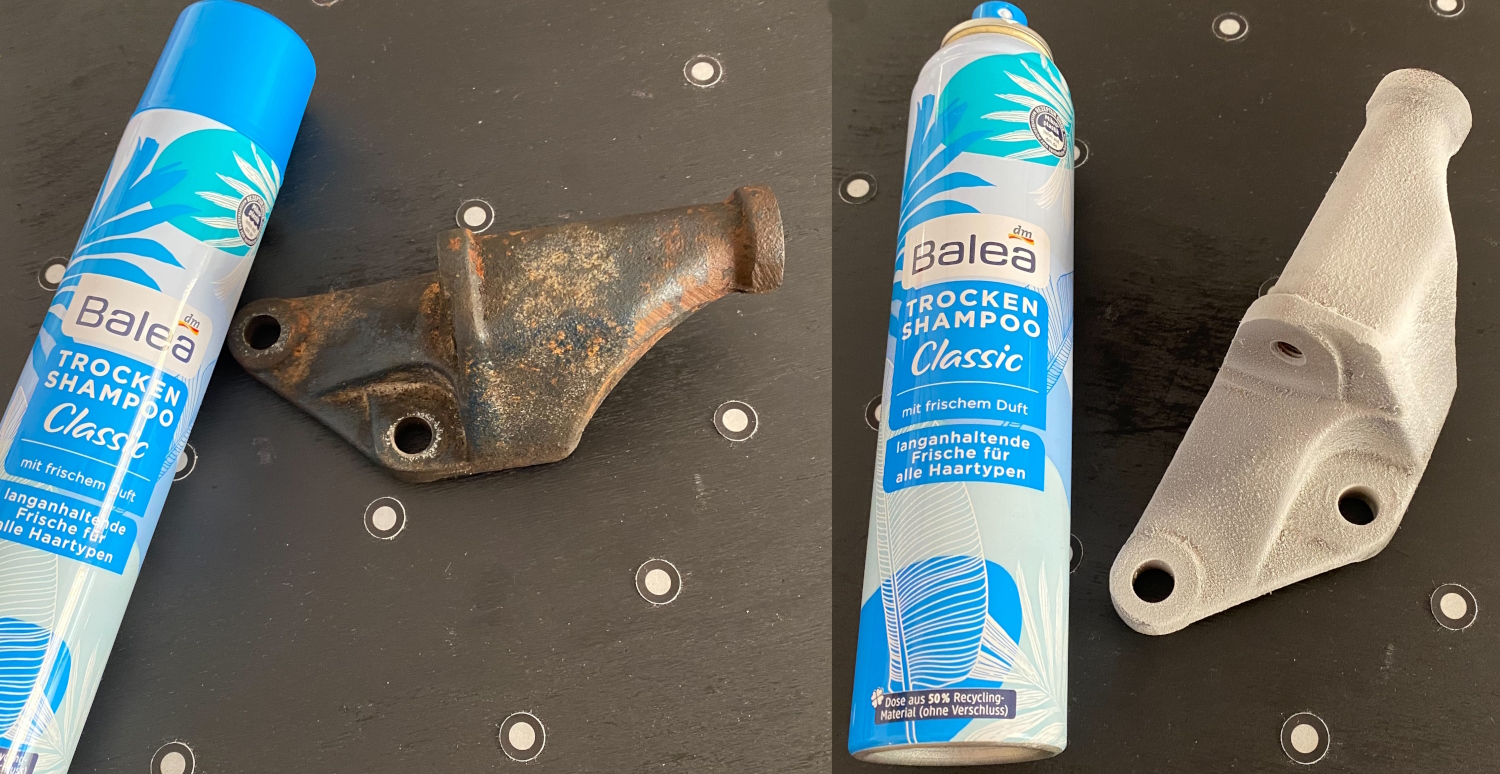
The pictures of the water connection are first without matting, then with baby powder and finally with dry shampoo. With each step we see a more precise and finer surface, which is why I can definitely recommend the use of such products. The same with the cast-iron holder, which could not be scanned at all without matting - tracking was lost after a few seconds. The scan on the last screenshot was made with Spray.
In the end, everyone has to know for themselves which scanning helpers they want to use. The AESUB products definitely have their justification and immense advantages. Especially when it comes to more critical areas than just scanning a piece of metal. In the private sector, I would again use the dry shampoo as a cheap alternative for scanning a metal recording, such as the alternator holder in our example. But when it comes to scanning a more vulnerable part such as an interior part, for example to be able to manufacture a new panel (which we want to test on a 350Z soon), then I would definitely use the AESUB sprays.
In the industrial environment, the weighting may look different, but in the private sector, the price may play a greater role than the time factor in cleaning.
projects
1. 3D scan for construction - CNC milling
Let's start with something simple. In order to construct a cover plate for an engine, you not only need the shape, but above all the hole spacing for attachment. One option is to get the right seal with a scale on a flatbed scanner on the PC and use this as the basis for the design. A photo is also possible. Of course, this cannot always be applied, which is why we are trying to get the data today using the 3D Scan Ferret:
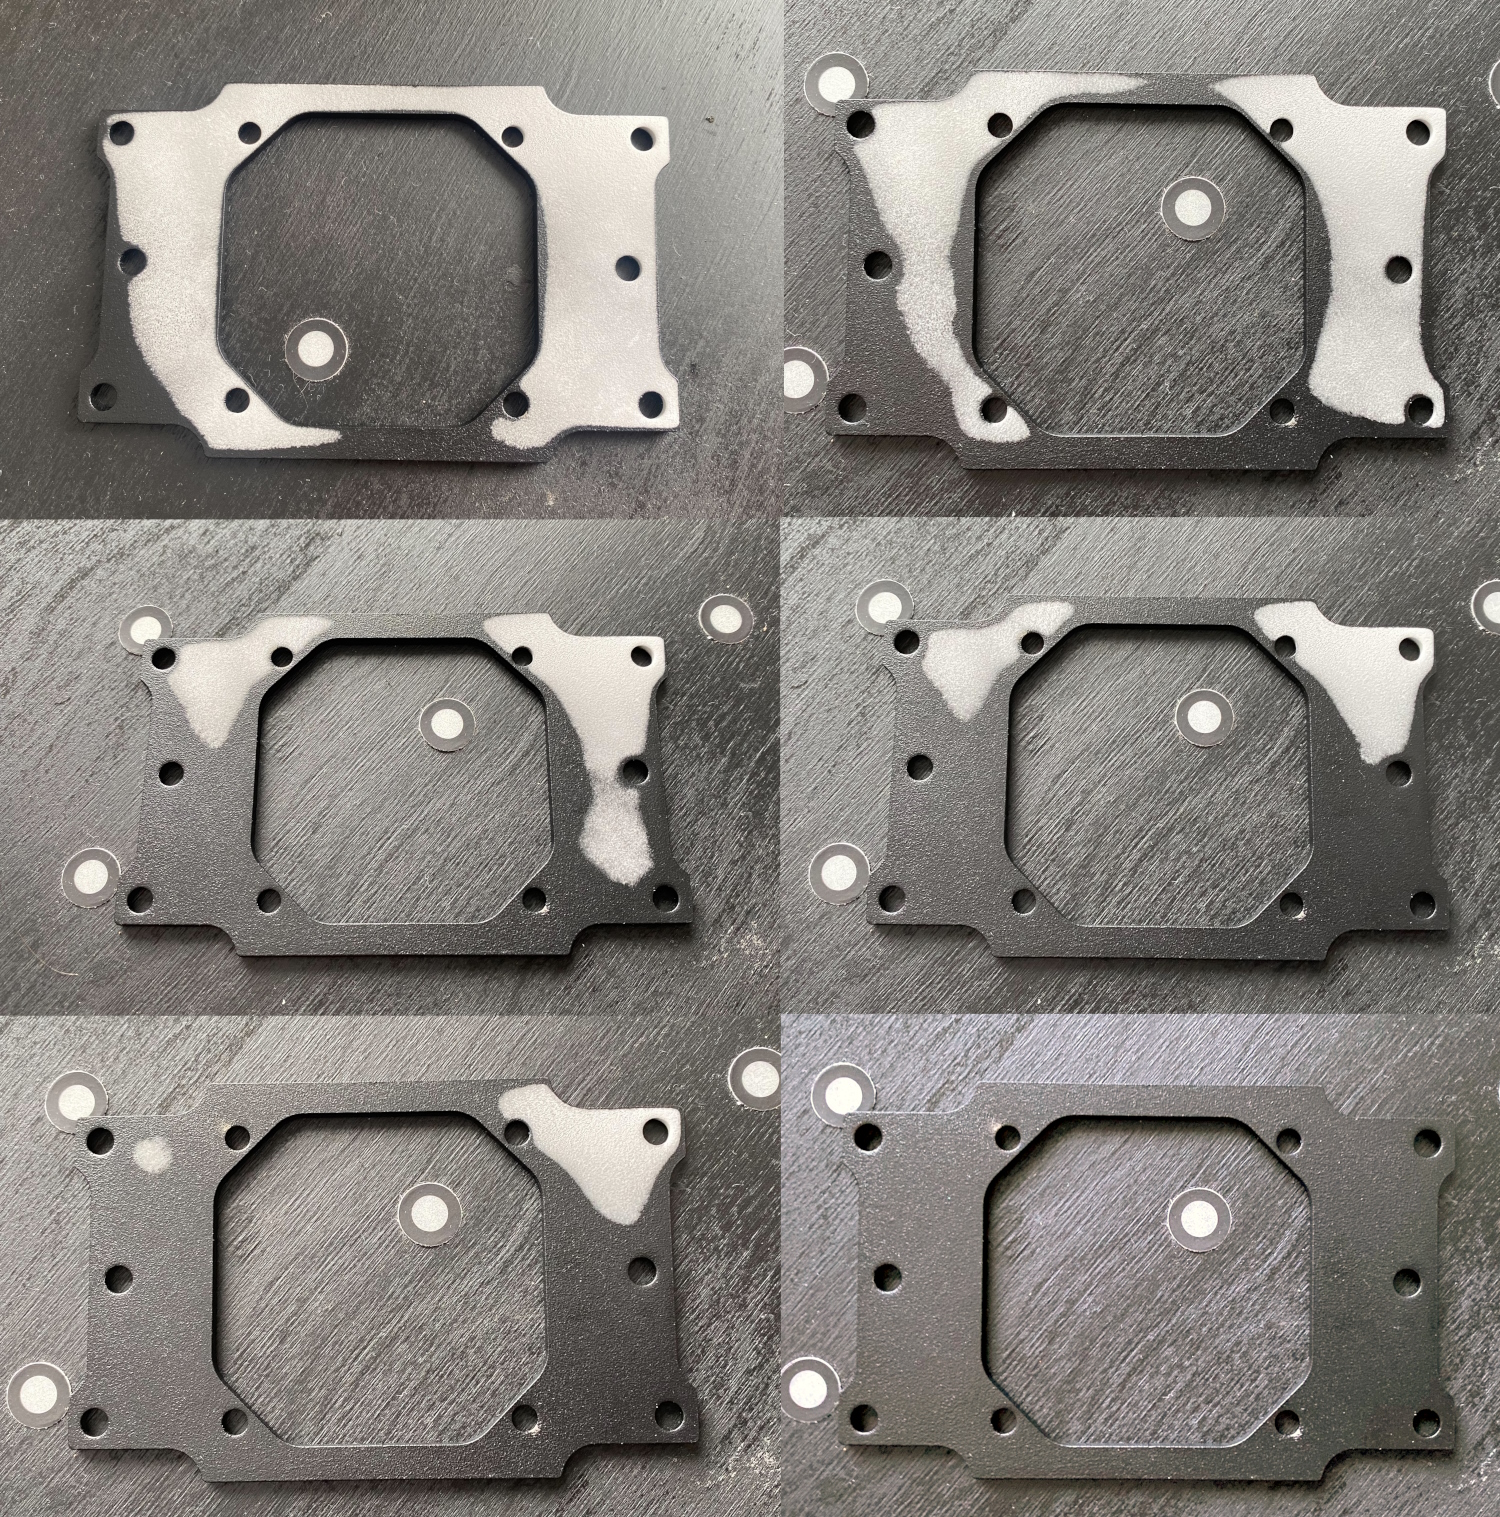
Since it is bare aluminum, we matt the surface to get the best possible scan result. As with any handling of spray cans, the distances should be observed. As you can see in the photo, I probably got too close once. But does not abort the scan:
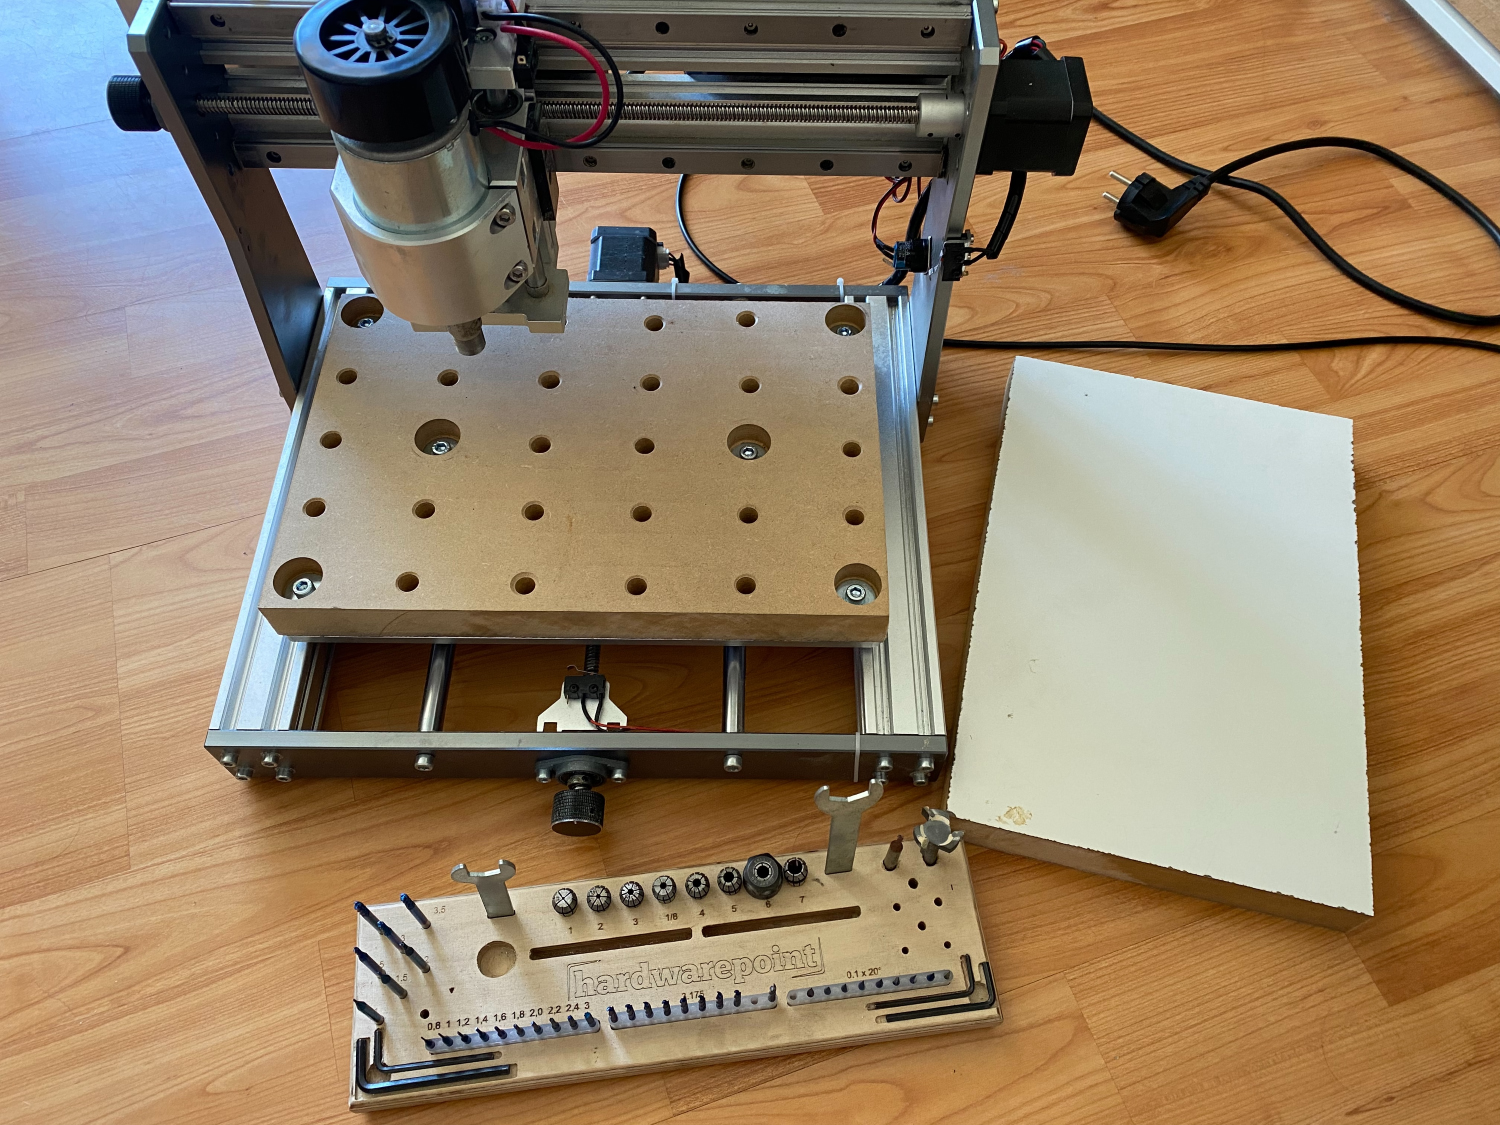

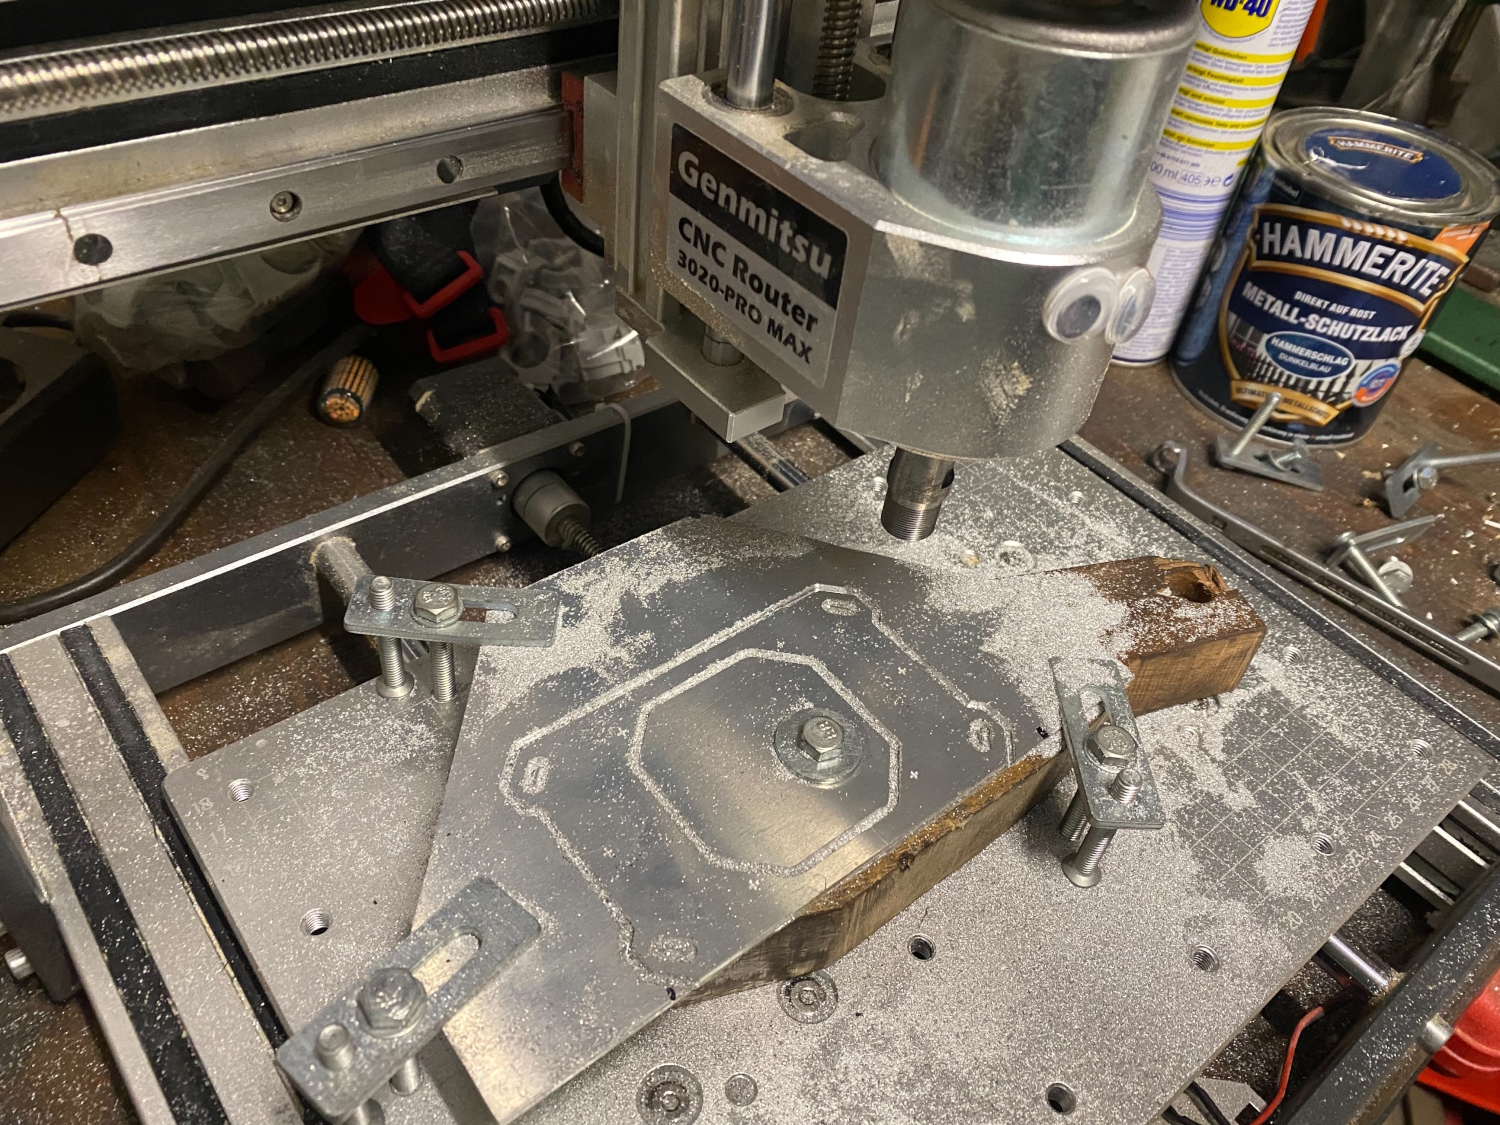
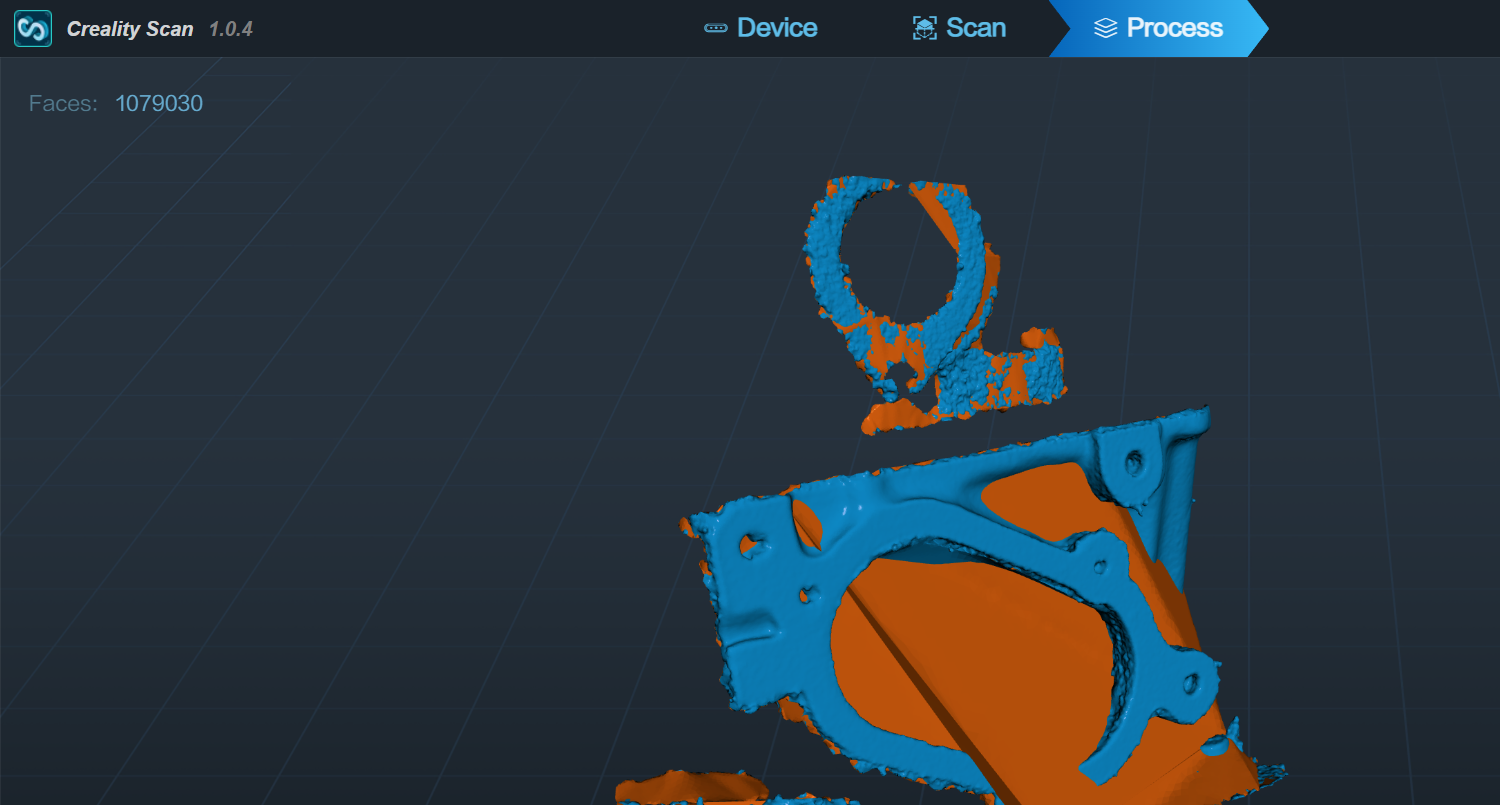
The first screenshot still shows the bare cylinder head, due to the overexposure/reflections, the Scan Ferret hardly recognizes anything at all. Screenshot 2 shows the matted cylinder head with AESUB Blue. We then load the file into our favorite CAD program (in the example Fusion 360, which is free for private users) and create our new lid on this basis. For simple 2.5D processing, we use EASEL as a CAM website and can also add a design to our part. In our case, the whole thing is milled on the 3020 Pro Max, which we present to you in this article have. We have already produced other aluminum parts on this milling machine for the Datsun (see next picture), so it should not have any problems with this project in aluminum either. More pictures of the finished lid to follow:
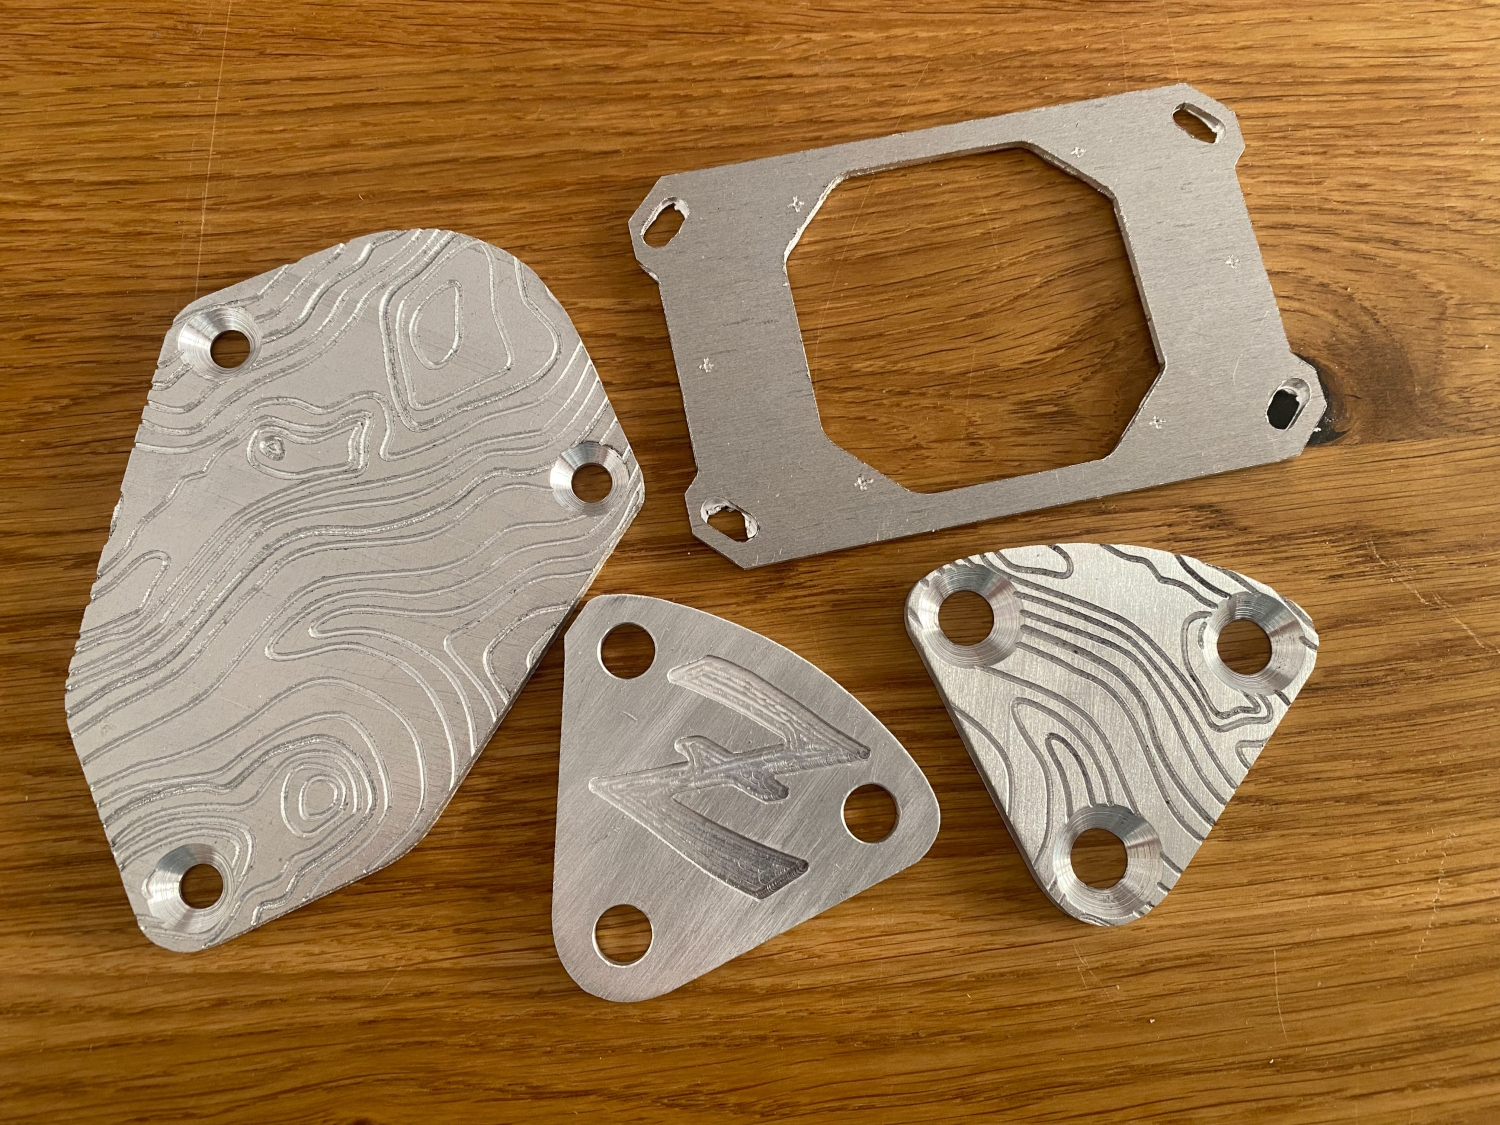

Areas of the cylinder head that were either not matted or did not receive enough attention when scanning come across as very bumpy and very different from reality on the model. Sometimes the optimization in the scan software also causes problems. Same scan object but this time the front side for another lid was scanned perfectly. When optimizing, however, the orange area was drawn completely through the model. Since there is no option in the software to undo individual steps, the scan must be completely recreated - there is a need for improvement.
2. 3D scan for construction - 3D printer
Plan
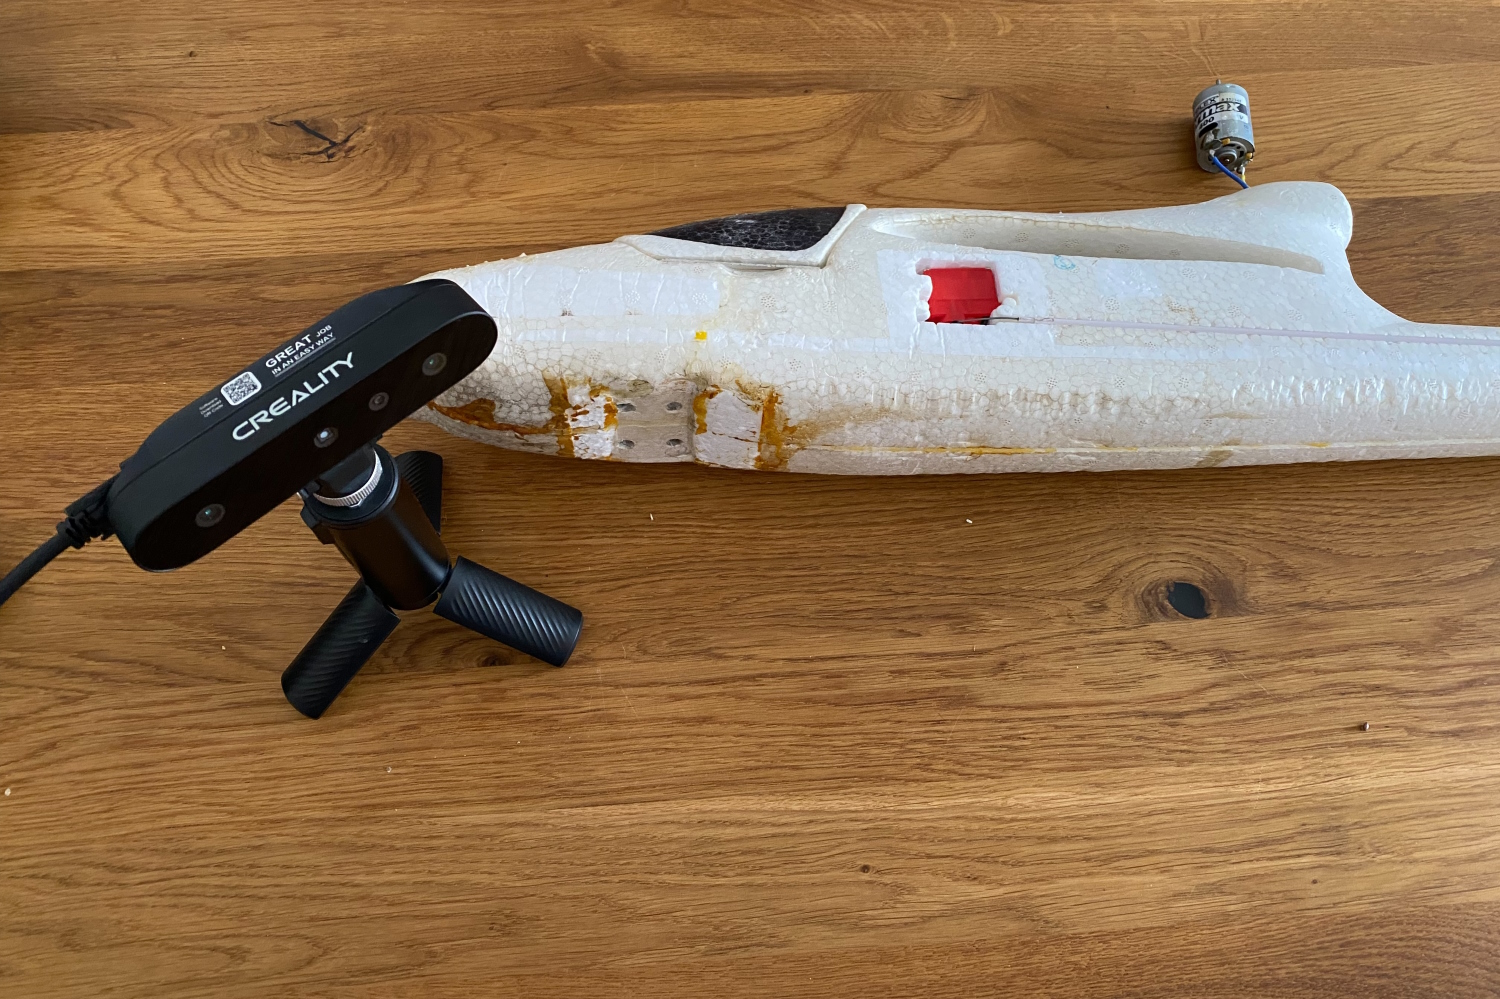
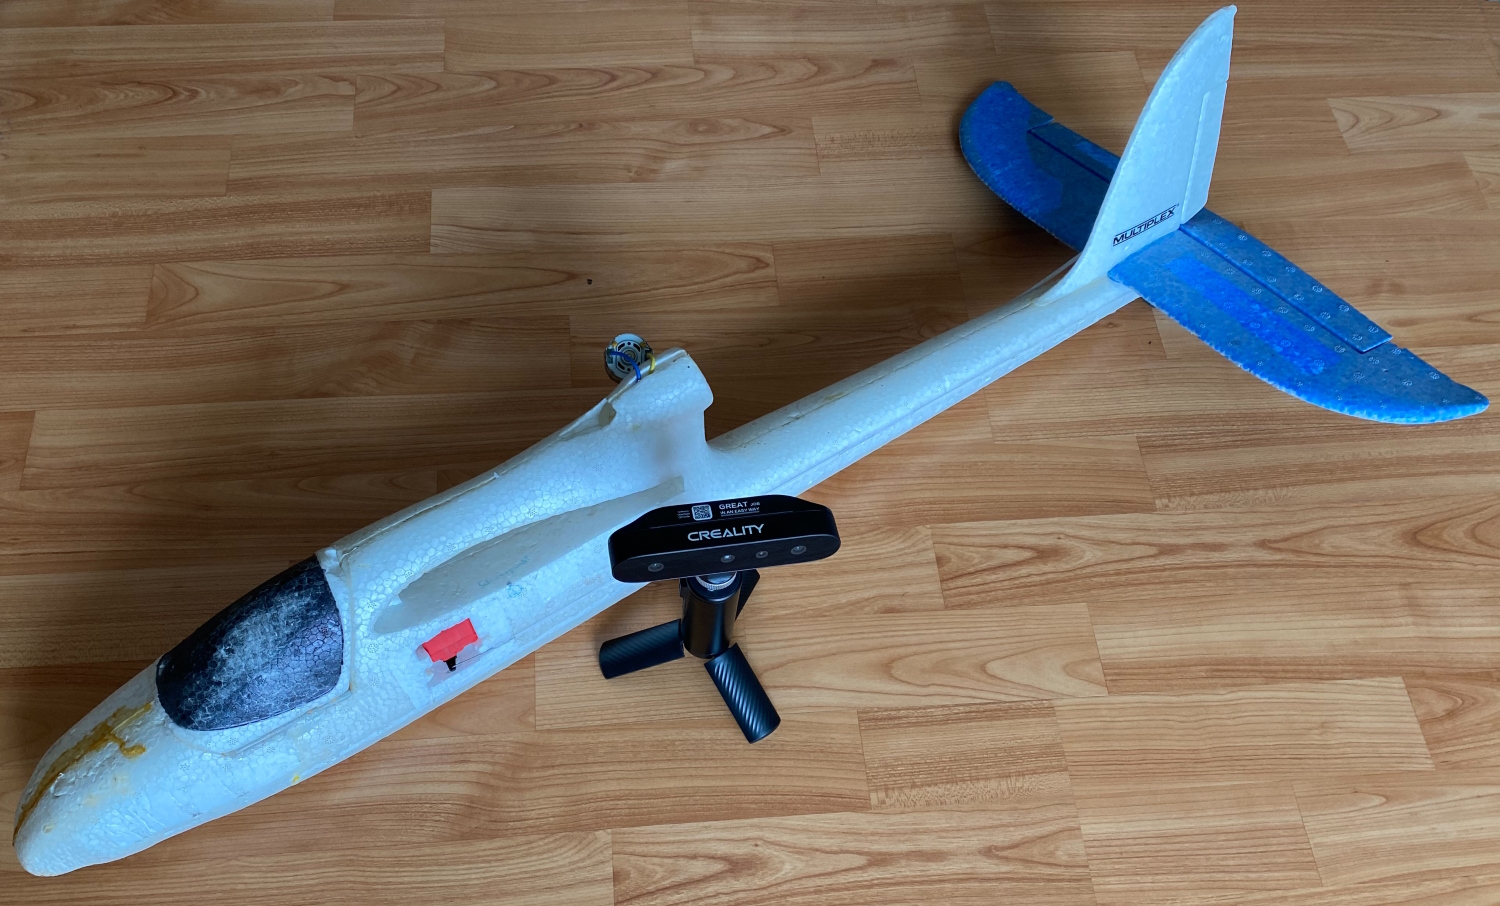
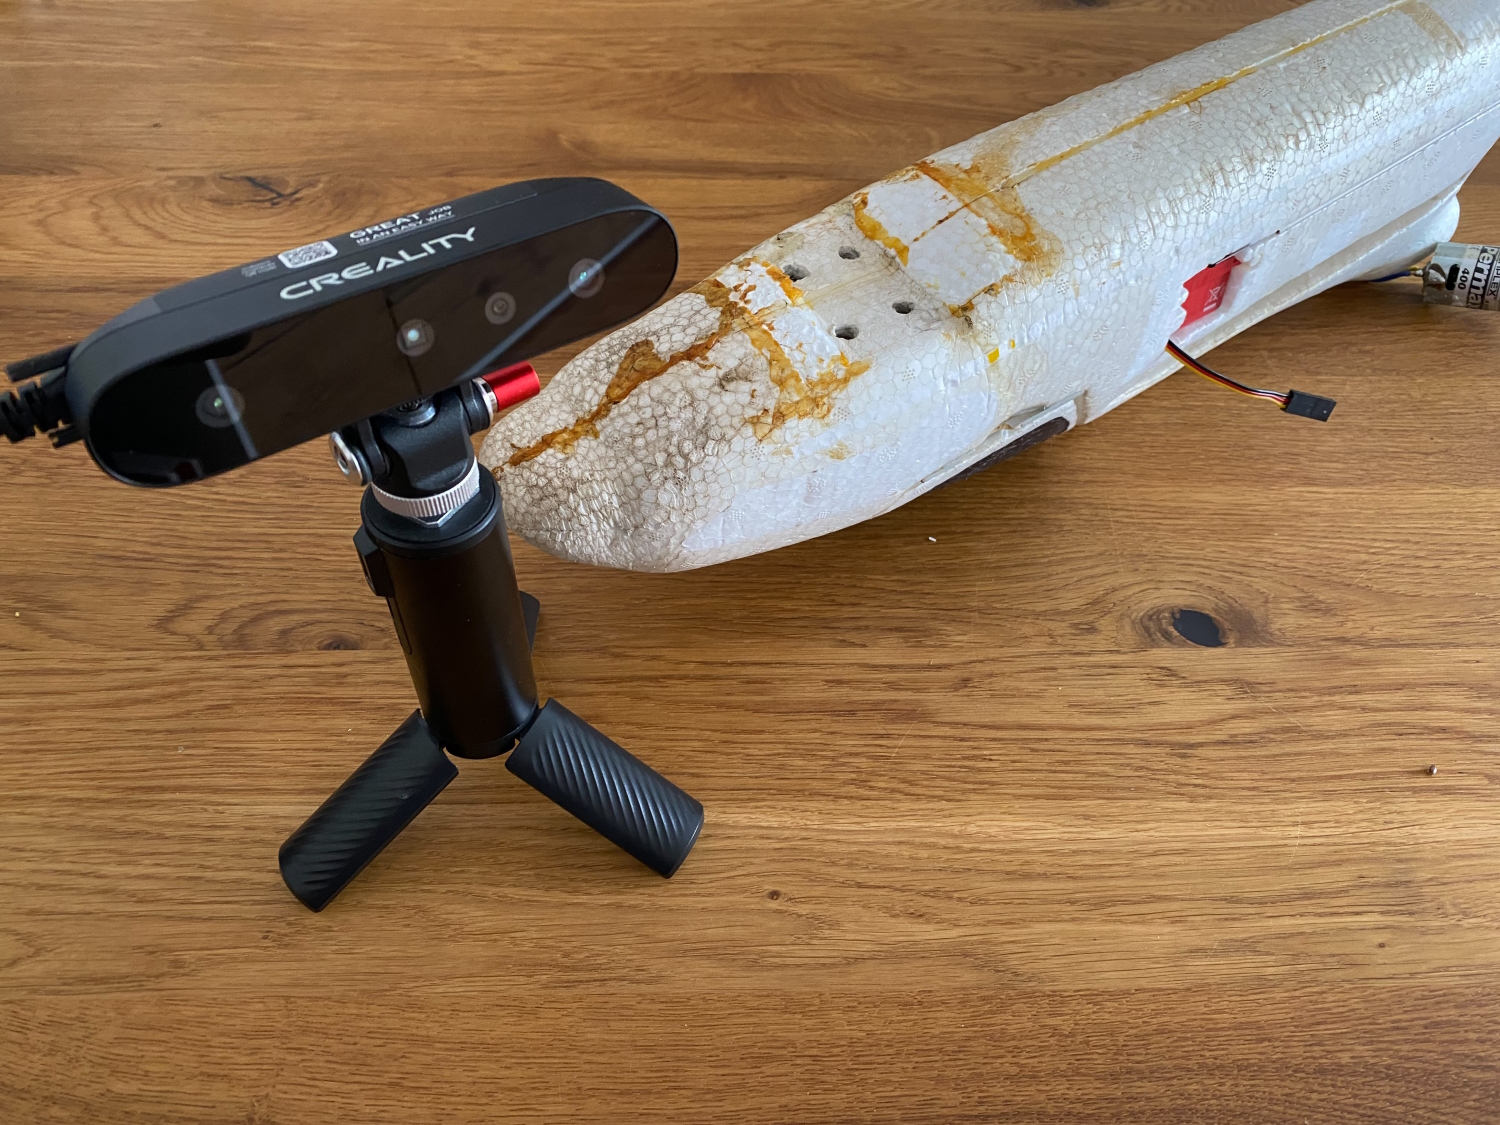
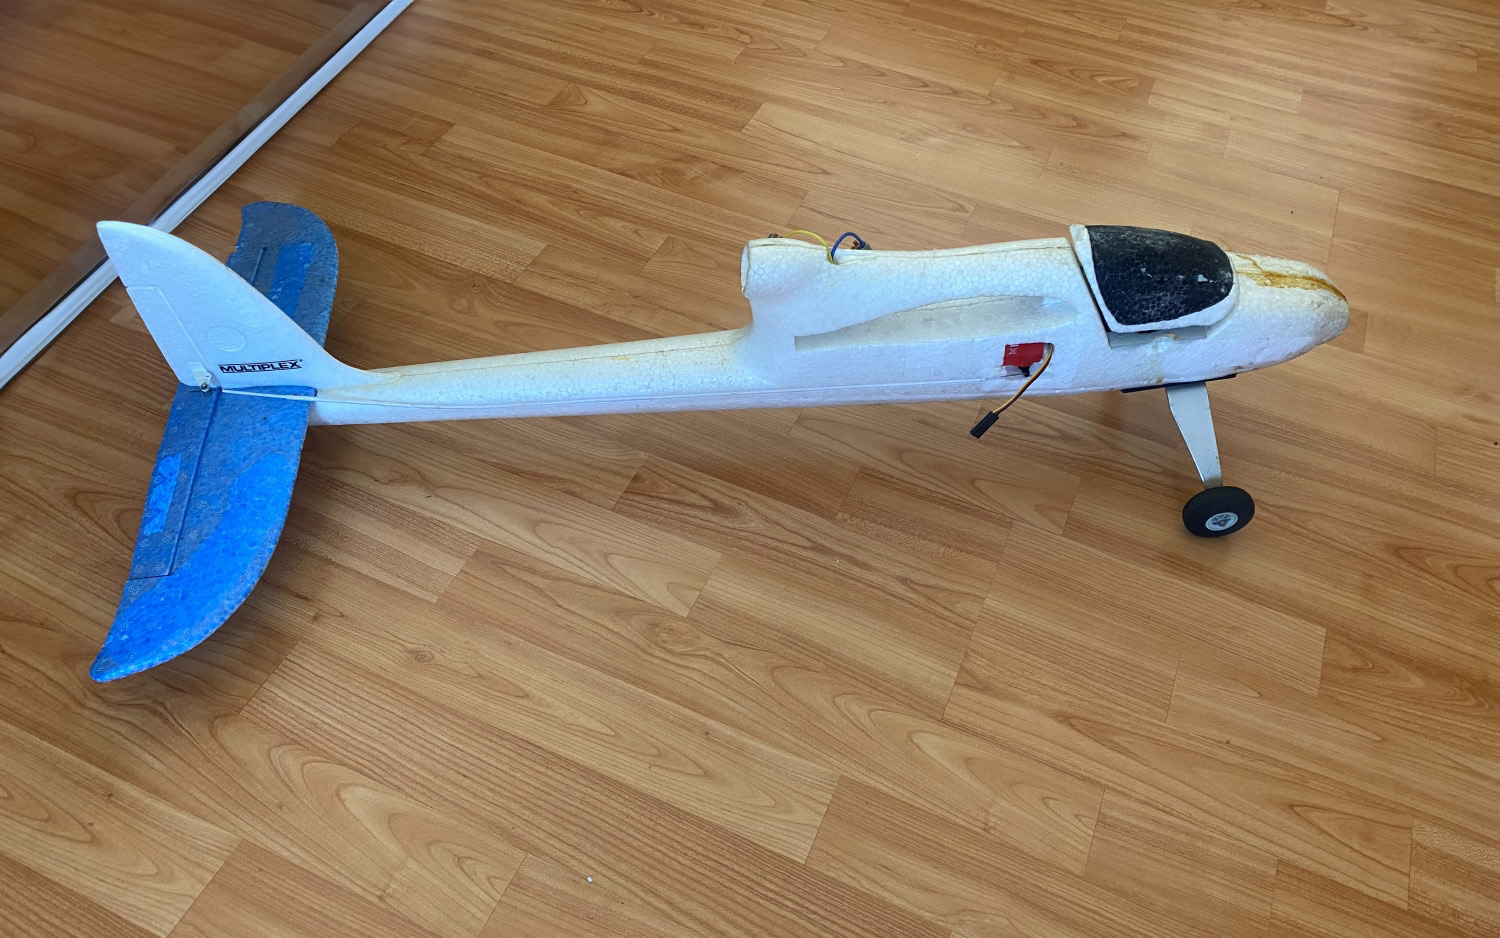
Together with some friends, we wanted to relive our model airplane past. It's probably been 15 years since our last flights, and a lot has happened since then. Our models are still the same, but thanks to today's battery and motor technology, they have been significantly upgraded. As you can see in the picture below, my "EasyStar" has been through quite a bit and has often gotten a kick out of it. Both parts show the scan of the Ferret, the pure 3D model and the colored model.

But back to the beginning. Why scan the model at all? After several crash landings, the self-made landing gear has worked itself properly into the styrofoam-like Elapor. As you can see in the picture, everything is crooked and crooked. I would like to compensate for these areas precisely and print a reinforcement plate that also accommodates the undercarriage. Such a 3D contour is impossible to measure by hand. Too many angles, radii and different gradients. So perfect for the 3D Ferret, especially since white is one of the best to scan anyway.
scan
Connected to the laptop again, first scan the plane with the Scan Ferret. After about 5 minutes, the nose was completely green in the scan software. The model just lay flat on the table. So that I could scan both sides, I pressed pause once in the software, turned the model over and then continued. Despite turning, he was able to quickly find his way around the structure of the aircraft, so that it was finally time to export. For this test, I left everything in the automatic settings and let the software do its job. We have recorded every step in the following picture gallery.
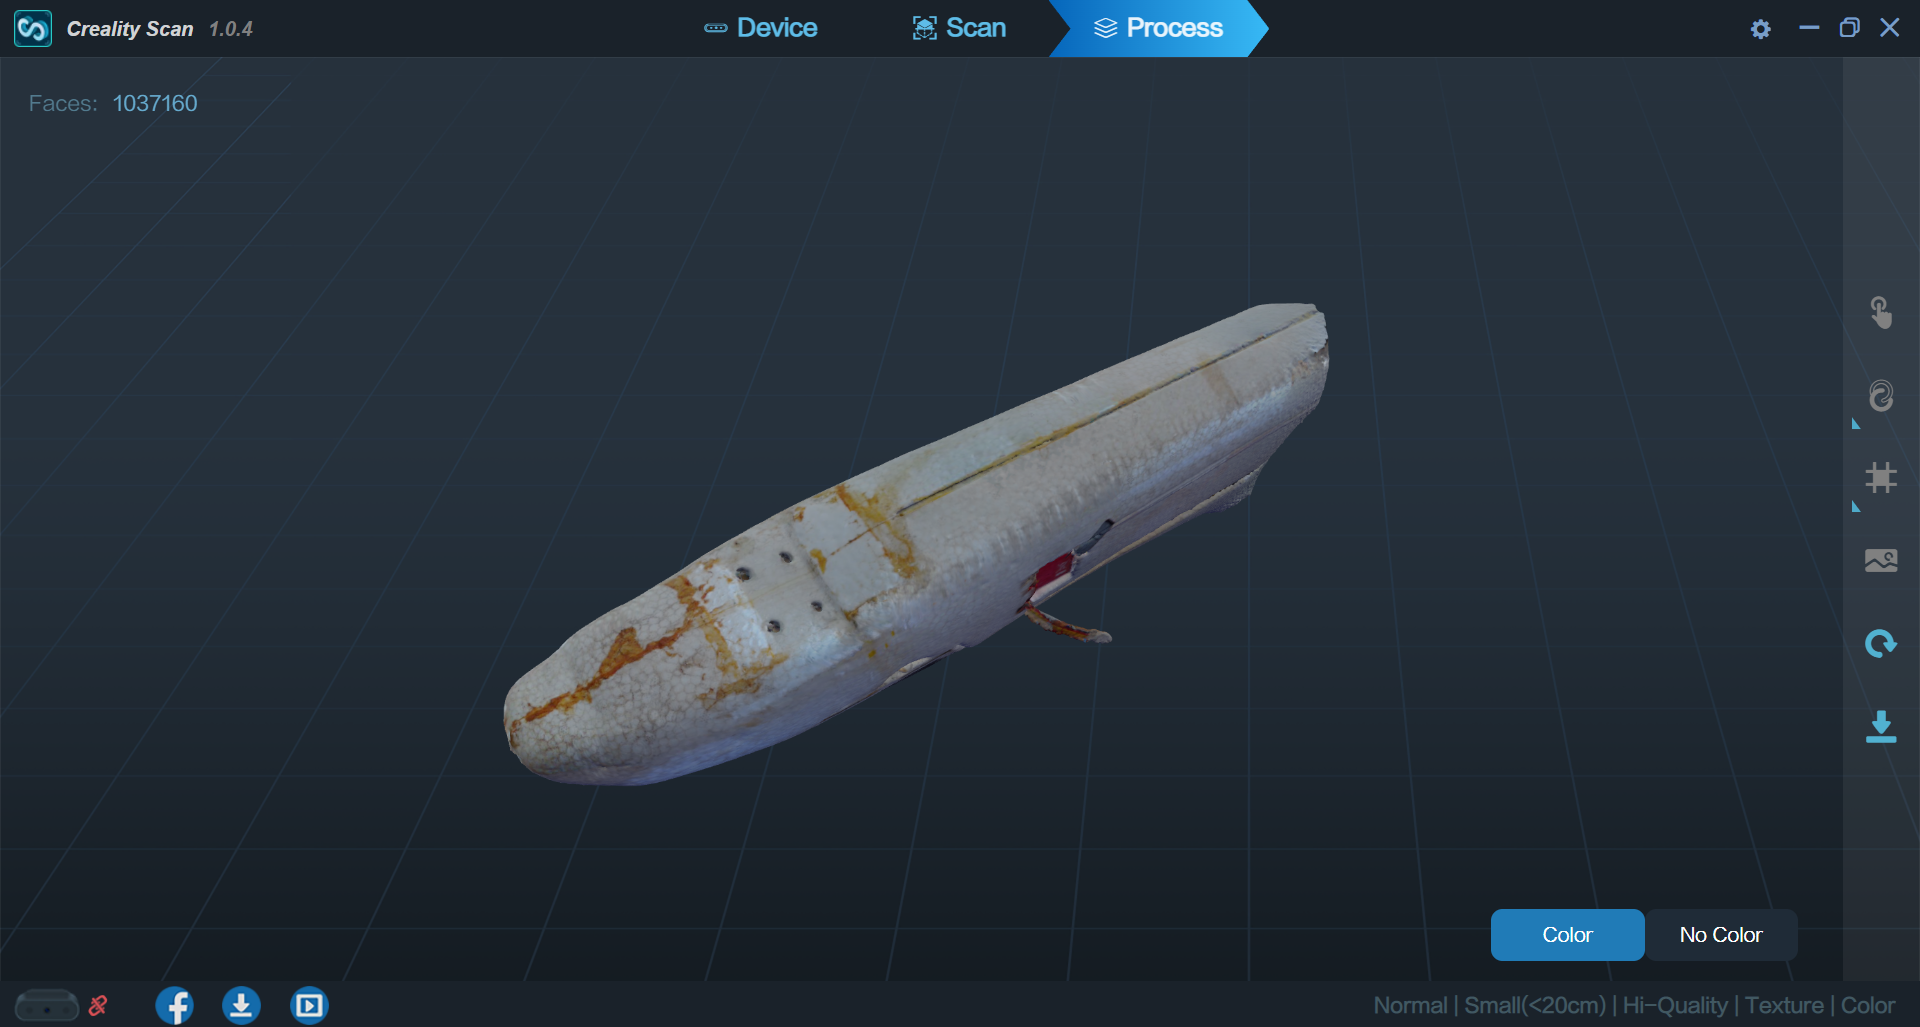
The export is possible in several file formats, but only .obj and .ply allow saving of color information. With .obj, these are stored in an extra PNG file, so don't be surprised if an image with lots of parts of your scan appears in the same location.
processing
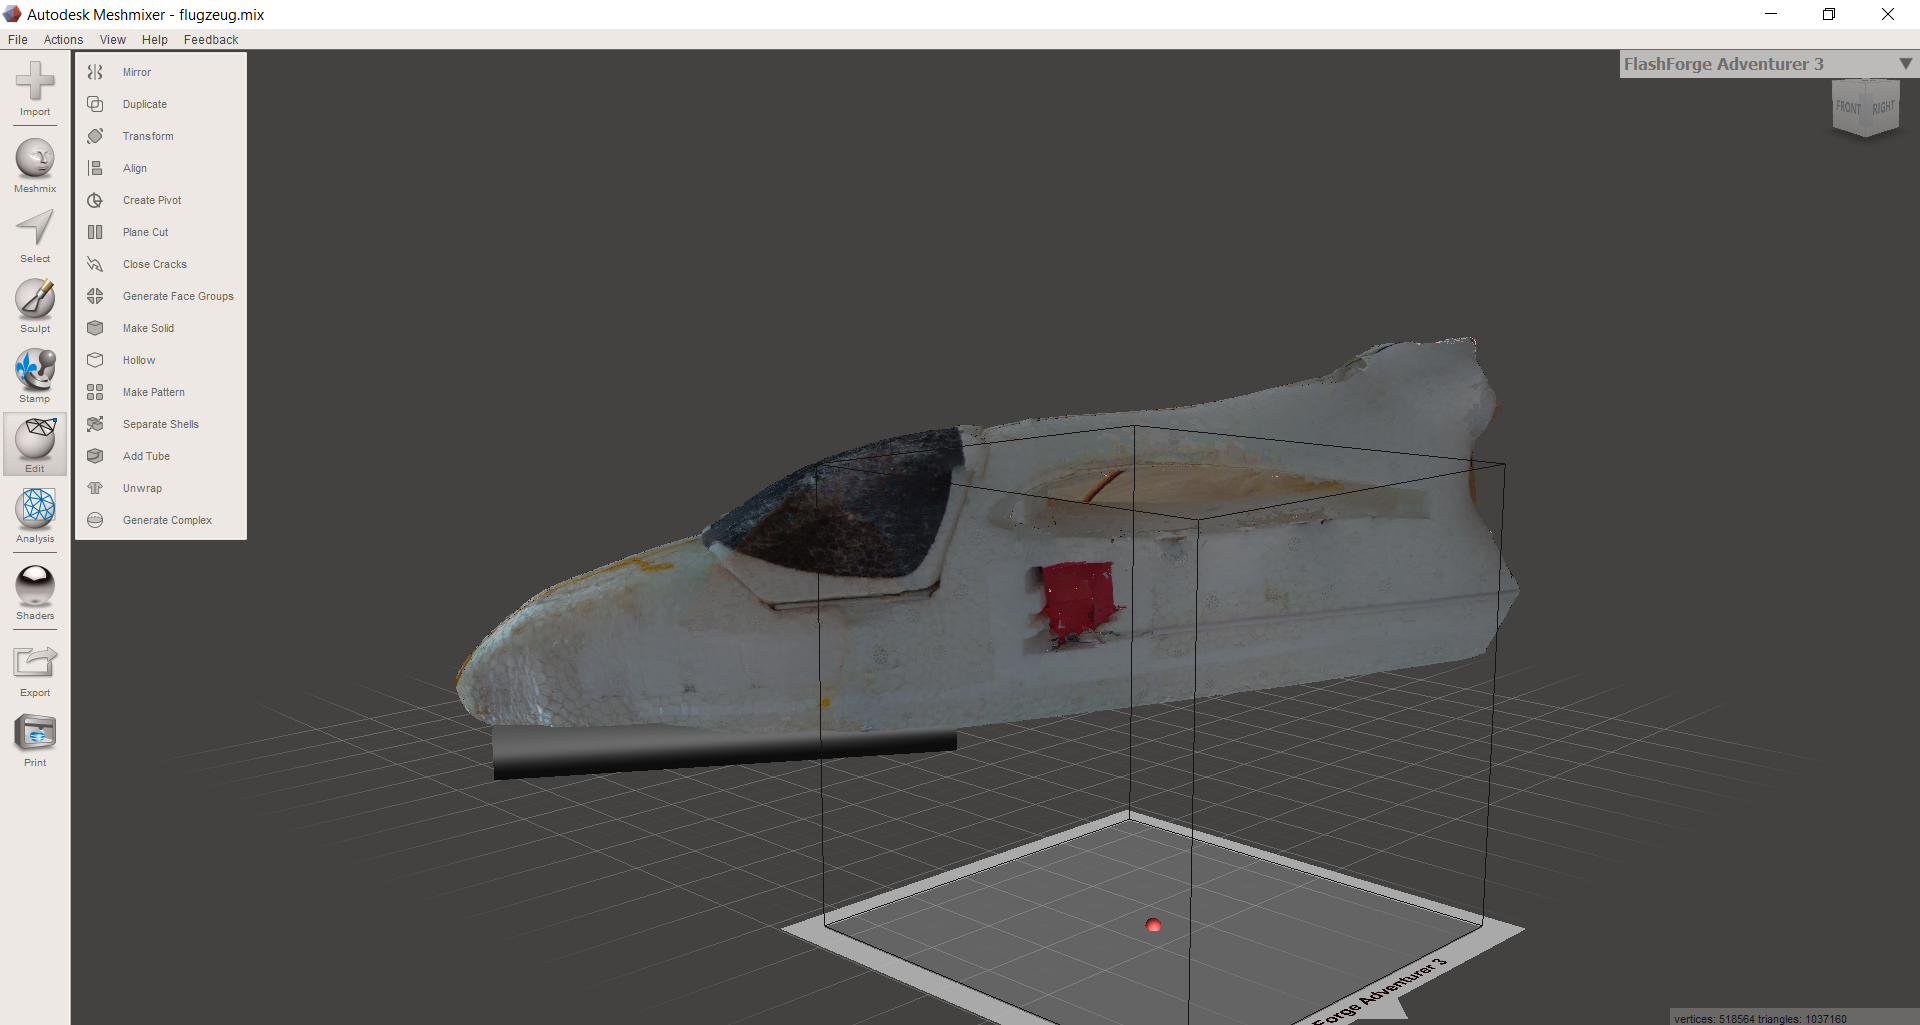
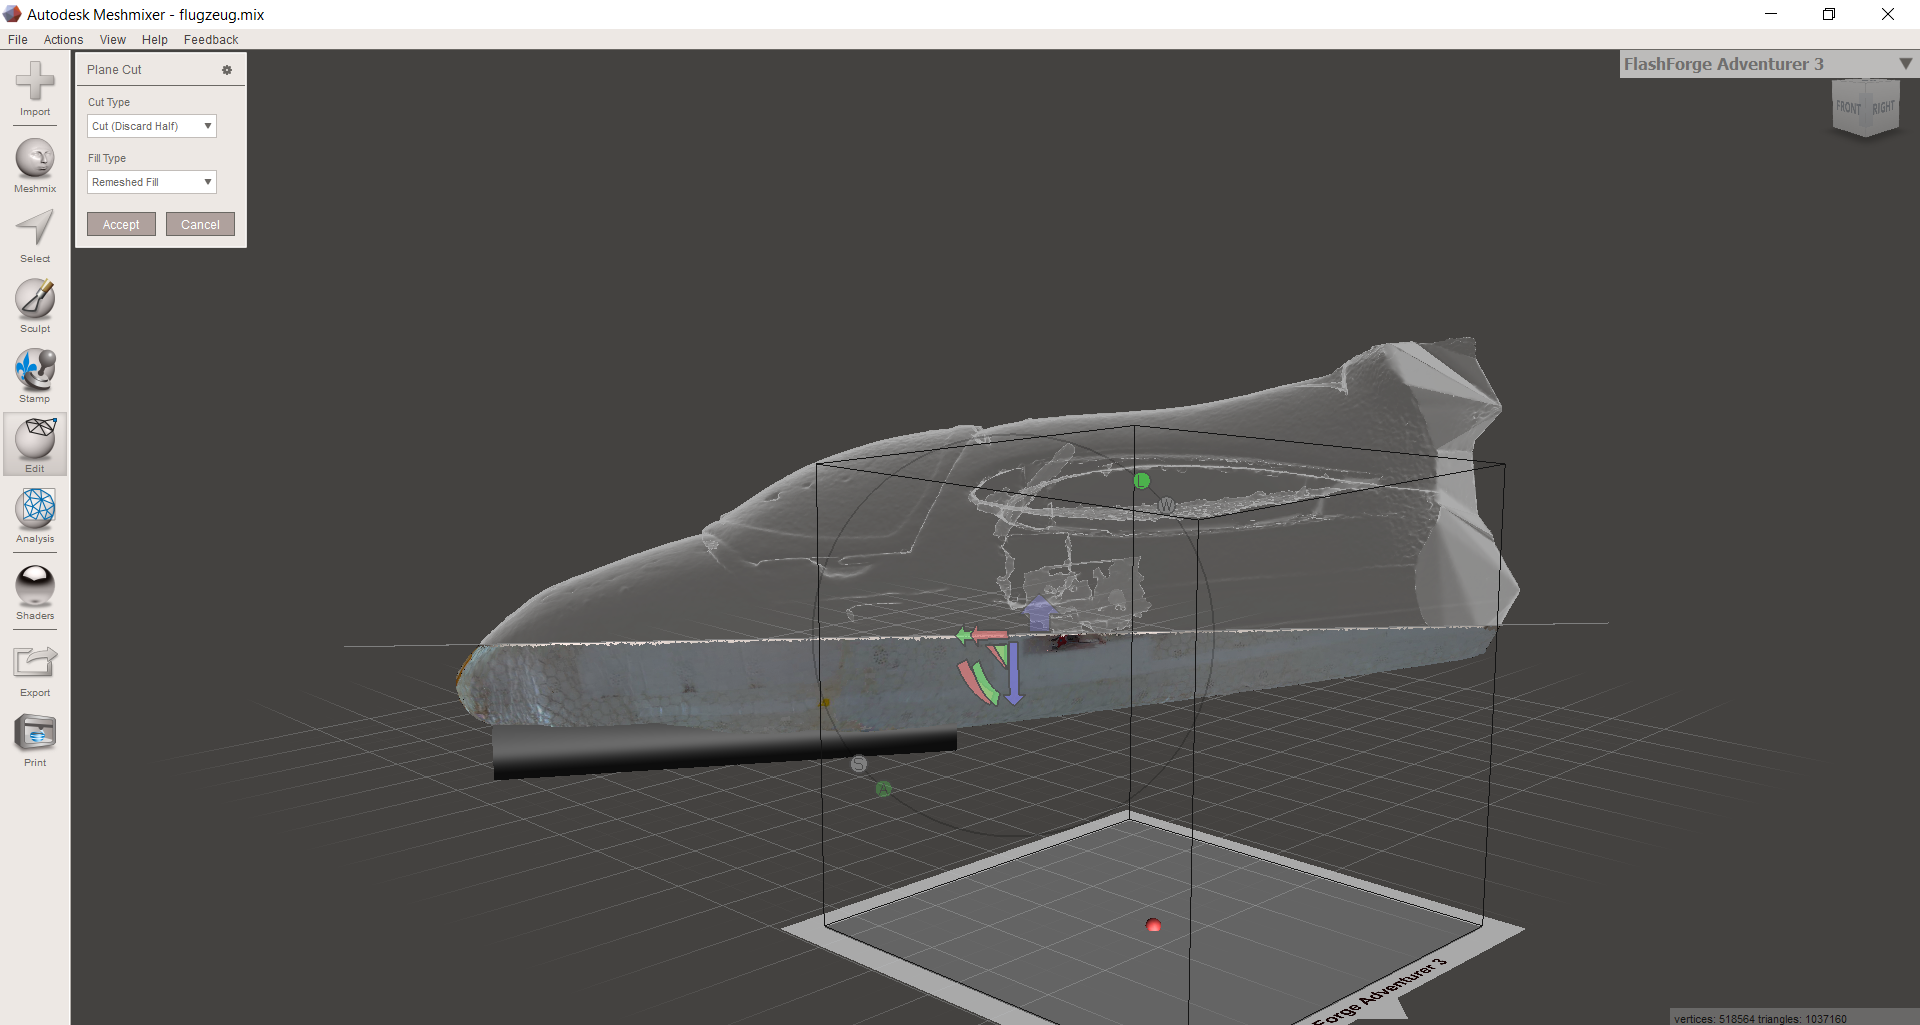
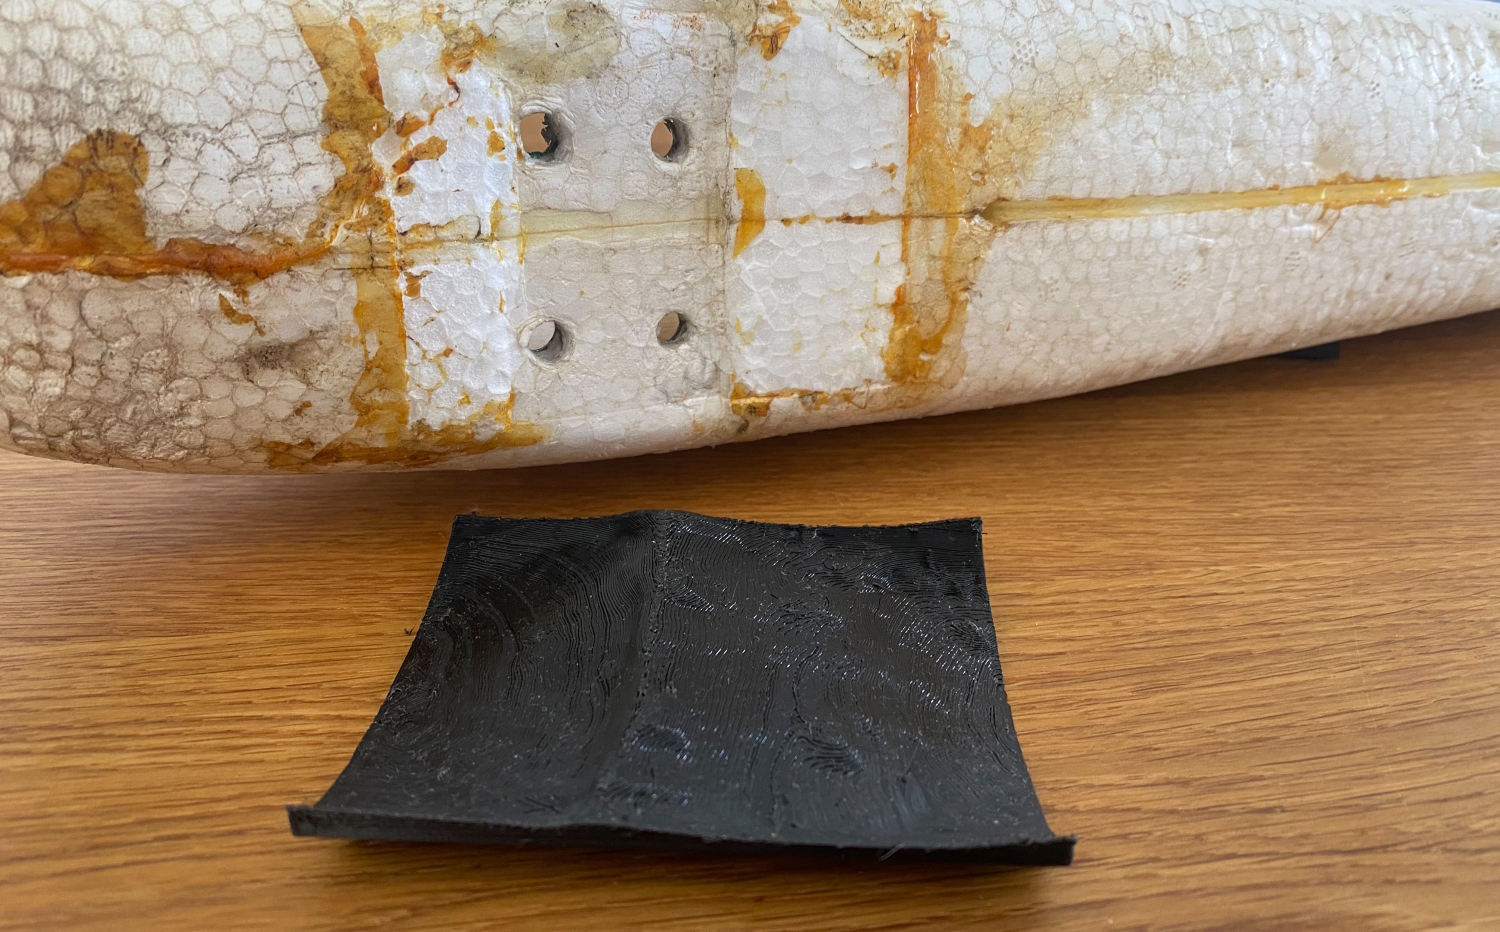
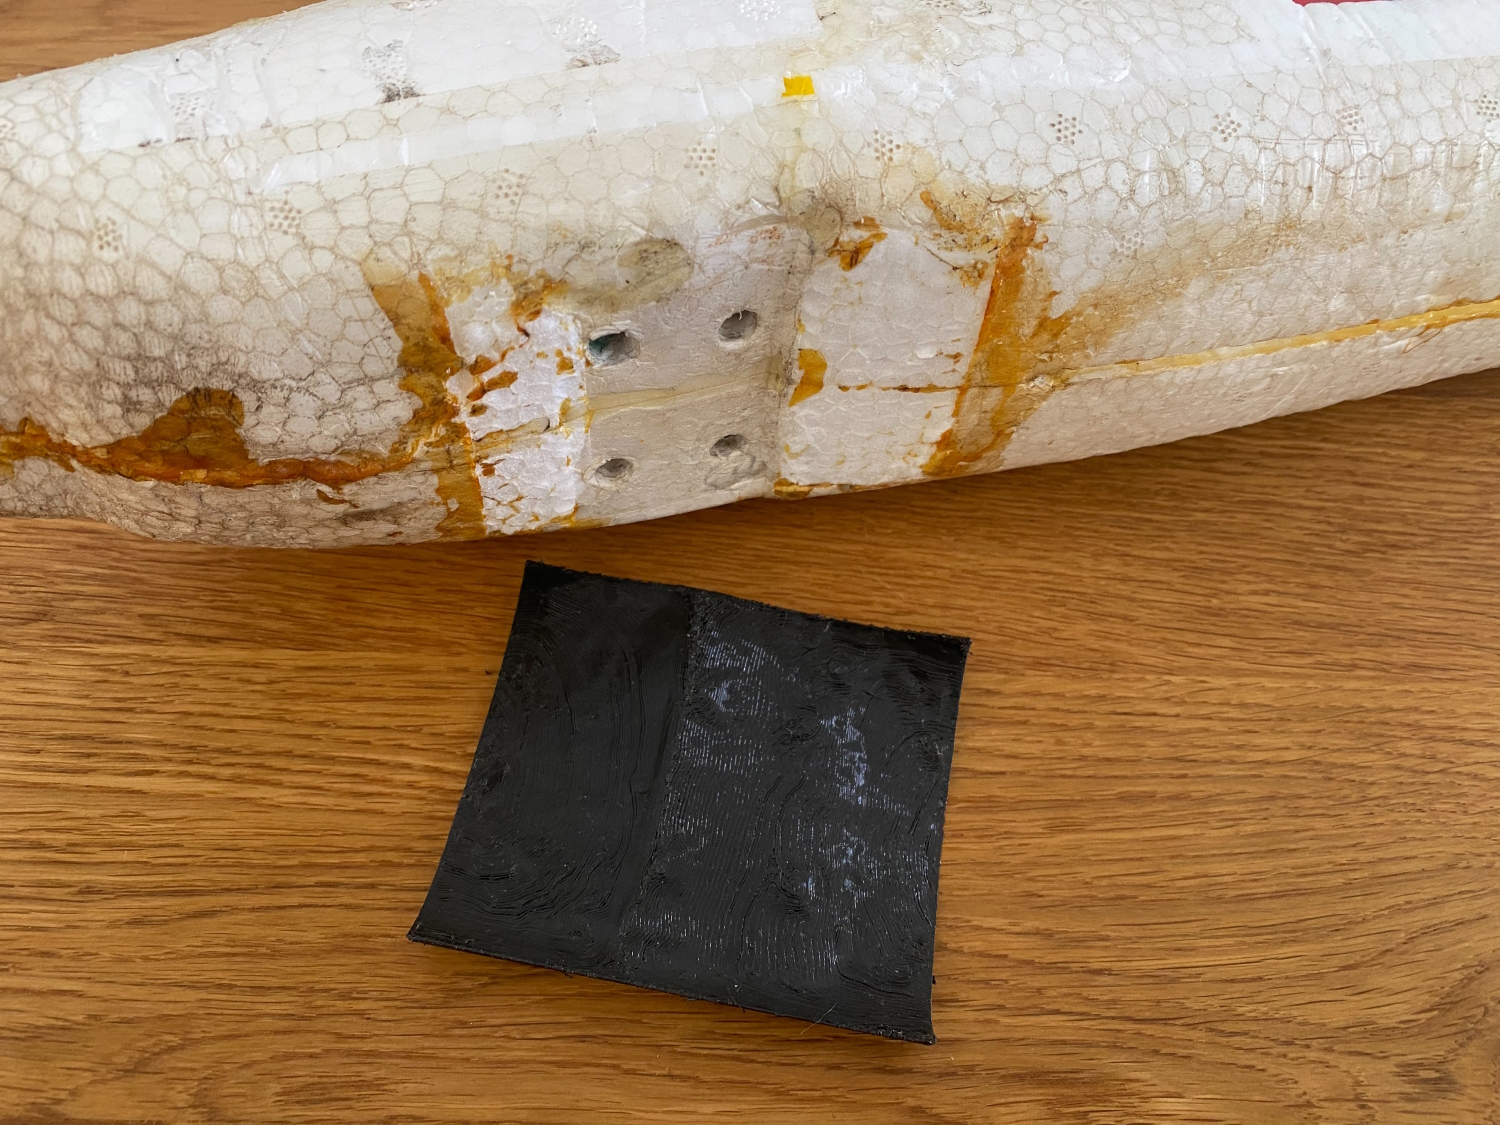
I loaded the generated model into MeshMixer . A program that I can warmly recommend to you if you want to edit or manipulate mesh bodies, like all 3D print files (STL's) or .obj, as in our case. MeshMixer is now part of Autodesk but is free to download. Once loaded, it makes sense to align the model and crop it to the most important areas. Depending on the component, there are a number of points, in our example almost 800,000, that require a certain amount of computing power when juggling. The fewer there are, the faster the software can implement commands. Now I have designed and imported my reinforcement plate with landing gear mount in a normal CAD program. This gray box can now be seen below the aircraft, positioned directly where it should later be on the real model aircraft. Using MeshMixer, you can now remove the aircraft model from the landing gear mount and only have one component left, which should nestle perfectly against the damage and dents - provided that the Ferret Scanner has recorded all dimensions correctly.
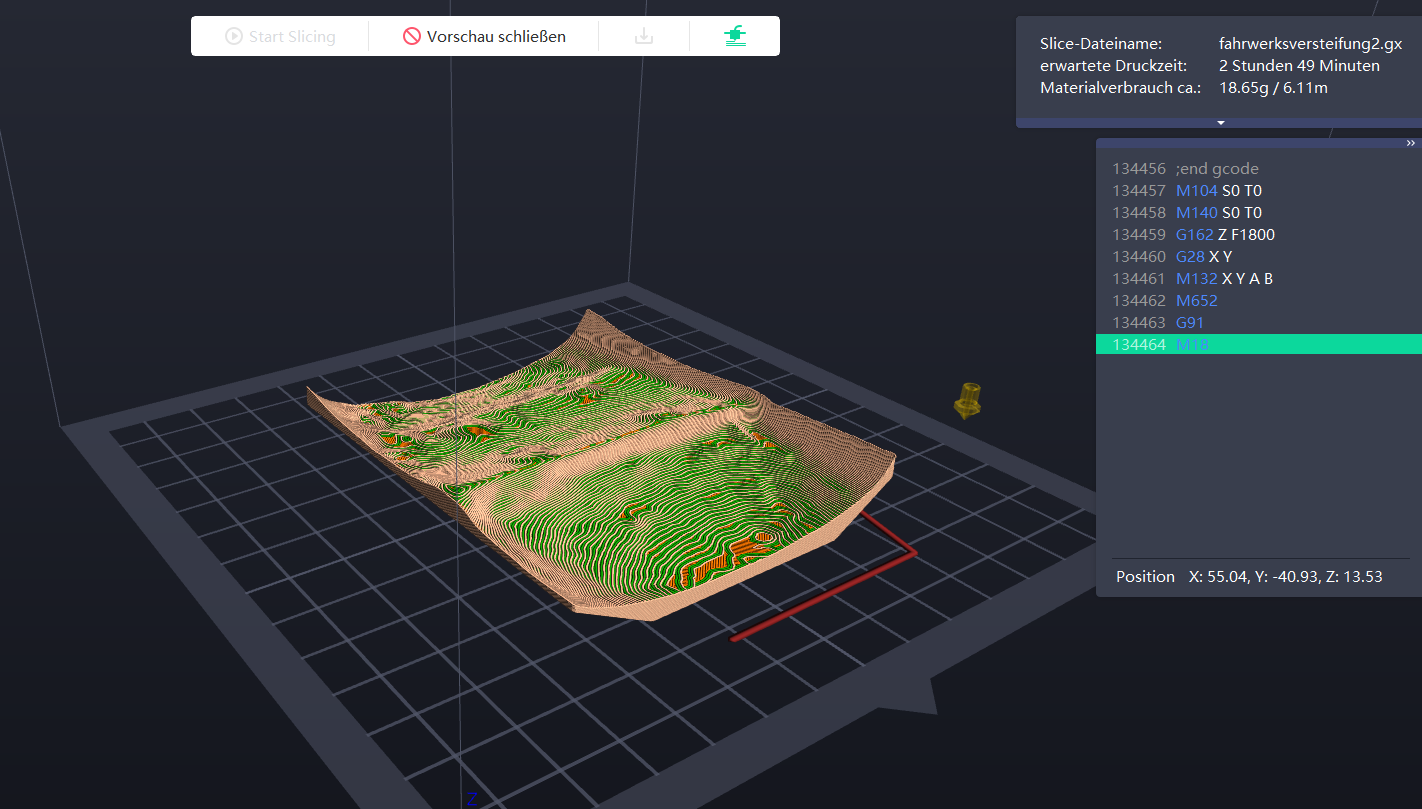
2.5 hours later in the 3D printer and we have a component in our hands. In fact, this one fits really perfectly. It falls right into position and has virtually no play at all. Unbelievable! That's what makes it fun. Fix the landing gear mounted and the plate would hold even without glue, just by clamping the landing gear. But I still decided to glue them to distribute the load. However, it will only be seen later whether everything will become too stiff and break again if you do a hard landing. Be that as it may, it now looks perfect and adapts perfectly to all forms:
3. Reproduce/Scale Items
We described it in more detail in the “Mobile Mode” chapter. We were mobile and used the Ferret in combination with a One Plus 8T and Creality's Scan App. The object of desire was a porcelain sheep that we found in the garden. The task was to scan the sheep and make a miniature version of it.
Everything attached to the handle, the unit is relatively compact and allows the Scan Ferret to be used anywhere. After the 3D model is available, it can be modified as desired and of course scaled. So nothing stands in the way of a miniature version.
In addition to these three, there are of course a number of other ways in which a 3D scanner can be used sensibly. With regard to classic cars, parts that are no longer available and some of which are already damaged can be recorded, reworked and reproduced, for example. Feel free to write in the comments what you have already used a 3D scanner for here or what you have planned.
Important for a good result is the preparation - one cannot mention it too often - for black, transparent or highly reflective materials a scanner spray MUST be used. Alternatively, dry shampoo or talcum spray also work, depending on which product is easier for you to get hold of. The cleaning effort afterwards is of course primarily based on your selection. Only the AESUB products manage without post-cleaning.
2. Choosing the scanning mode: Objects with many unique shapes and geometries in Geometry mode, objects with different surfaces and textures in Texture mode. As an example, a wooden panel cannot be captured in geometry mode at all, as it is not unique enough for the scanner to track. However, the grain can be captured in texture mode and ensures recognition of the software or localization of the scanner. I was able to scan the plane in geometry mode, for example, but it was faster and easier in texture mode because of the "styrofoam" surface. So sometimes you have to try something around. In my tests, a bad scanning experience was always due to one of these two points: badly scannable surface or wrong mode.
Conclusion:
 3D scanning is slowly coming into the end user area. A few years ago, this technology was reserved exclusively for industry due to the immense costs. With the 3D Scan Ferret, Creality has brought a consumer model onto the market, which of course is still in the shadow of the professional devices, which are thousands of euros more expensive and boast above all in terms of accuracy, software solution and speed.
However, the presented package works quite well. However, the learning curve is a bit steeper than, for example, getting started with 3D printing. The latter has been on the market for a long time and has made its way. In the beginning this looked different. With 3D scanning, this is still to come, which is also noticeable. Unfortunately, as an end customer, you also have the feeling that you are still the product tester. Not all functions are available from the start, the software whether for Windows or Android has bugs, some of which were removed in the first few weeks after release, which hopefully Creality will continue to do.
For good results it is important to understand the basic technology behind it and how to best work around its weak points with transparent and reflective materials. When this knowledge is applied, 3D models are quickly created that can be used for the further construction of new parts or spare parts or for direct printing.
A fact that “technology people” are very enthusiastic about – at least for me. Hobbyists who already own a CNC milling machine or a 3D printer can take their constructions to the next level with the 3D Scan Ferret. Too often you have trouble measuring complex shapes or radii when you want one part to fit neatly into another. The same applies to hole spacing or the like. This often ends in trial and error. With a 3D scan, it just fits in the end. We have shown the accuracy using the model airplane as an example. It would have been impossible to measure a fuselage deformed by accident by hand. The 3D printed part resulting from the scan just fitted perfectly. However, with thin models, for example, there may be problems with scannability, not every model can be transferred to the 3D space with the Ferret. I would also like the software to get even more improvements. More features for editing the point cloud before meshing or cleaning up the scan would be beneficial. A "back" function would also have advantages.

As already mentioned, the learning curve is very steep, since the pure scan is often not enough. Most of the time, the scan is only the basis for the construction and so it can happen that you first have to find your workflow with a wide variety of programs in order to get the desired result. For pure duplication, the scan file can be used almost directly, possibly a small optimization here and there with MeshMixer, but otherwise nothing stands in the way of direct 3D printing.


