
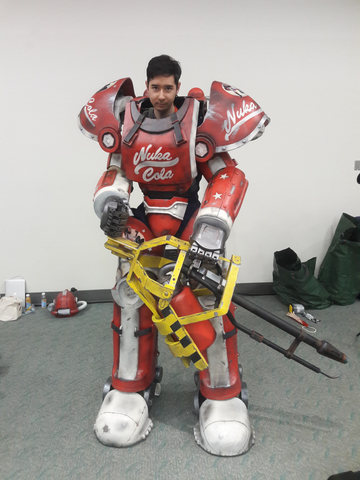
There are a lot of times and use cases where you need a material that is absolutely tough and can handle rough handling and frequent impacts. If you are flexible you might find that TPU fits the bill quite nicely. Some examples of what you can print with TPU include hinged objects, phone cases and wheels to name a few, or this lifesized Fallout power armor!
TPU filament has two distinct properties. The first is its flexibility and ability to be bent or twisted in a variety of different directions without breaking, this is good for applications that subject your object to strain that would require the part to flex without breaking but also makes the object resistant to drops or impacts without shattering.
The second less noted property that TPU exhibits is its high resistance to wear from friction or abrasion, meaning your printed object can be repeatedly rubbed against rough surfaces and not wear down--of course this also means its very difficult to sand a TPU printed part smooth.
How to print TPU on most printers
Compared to basic materials like PLA filament, TPU is a more challenging plastic to get good results with, but with the right settings TPU can be printed on most consumer grade 3d printers such as the Sainsmart x Creality Ender 3 S1 PRO with little to no modification.
Speed
Slowing down your print speeds is the most critical setting that will help improve your success rates with TPU. This will vary depending on the extruder design you are using but the following ranges are a good starting point to test out and optimize:
Direct Drive (E3D Titan, E3D Hemera, Bondtech): 30mm/s-40mm/s Bowden
Extruder (Ender 3/CR-10 Stock Extruder): 20mm/s-30mm/s
Slow speeds are necessary to ensure that the flexible filament does not kink up and get tangled around the extruder gear or expand and get stuck in any hollow spaces within the extruder. There is no magic speed setting and it’s best to experiment and tweak to see what works best with your machine.
Temperature
The most consistent temperature extrusion range for TPU is between 205 ℃ and 215 ℃. Anything lower than this usually results in occasional under extrusion and artifacting. Higher temperatures as high as 240 ℃ can produce stronger parts but at the cost of a rougher surface finish if you have insufficient part cooling on your hot end.
Nozzle Sizes
TPU can also be printed with a variety of nozzle diameters ranging from .3mm to 1.2mm without issue. Though it should be noted that TPU is sensitive to non level bed and can jam easily if the nozzle is too close to the bed which is often the case with first layers on high resolutions such as .1mm.
Retraction
Finally, retraction is a tricky setting to get right, too little retraction and you get really bad stringing that is difficult to clean off the part after the print is done, too much retraction and the hotend either jams or your prints show signs of what looks like under extrusion.
For direct drive extruders a good starting setting for retraction is about 1mm - 1.5mm retraction distance with a retraction speed of 30mm/s.
For Bowden extruders its best to completely turn off retraction or keep the distances/retraction speeds very low to ensure the print has no extrusion issues. Unfortunately., this ensures that stringing of a part is inevitable. This can be managed by printing one part at a time and setting your slicer to never cross the outline of your prints unless absolutely necessary.
Extruder mods
As mentioned above, some extruders have rather large gaps between the feed gears and the top of the hot end which makes it easy for flexible filament to bend and escape through. A number of mods have been created by the 3d print community that address some of these issues to make certain extruder designs better suited for printing TPU or allow them to operate at faster speeds. Here are a few links to those mods for popular extruder designs:
Bed surfaces
TPU sticks extremely well to a variety of bed surfaces including glass, PEI, most composite surfaces, and even bare aluminum. A bed heater is also optional but generally recommended for large prints to avoid any warp along the edges of the print.
Storage
Like other filaments TPU, are slightly hygroscopic, which means it absorbs moisture from air humidity. If the filament becomes too saturated with moisture in an overly humid environment such as near a coastline, then there might be print quality issues such as air pockets. Fortunately, this can be fixed by drying TPU in a food dehydrator or a low temperature oven. In general, it is advisable to store your unused TPU filament in an airtight container filled with desiccant.
Post processing and painting
Smoothing prints
Filler primer is commonly used to fill in print lines in PLA prints. Most hardware store brands of filler primer unfortunately are poorly suited to filling TPU lines as the flexible nature of the material causes the primer to crack and if it’s not adhering correctly chip and flake off. Unfortunately the only filler primers that can be made flexible are automotive 2k primers with a mixable flex compound which requires a relatively expensive dedicated compressor and HVLP sprayer setup.
One of the few really effective ways to smooth print lines without expensive equipment and a dedicated shop space is to use epoxy resin. While XTC-3D is marketed as a purpose built resin for smoothing prints, it is poorly suited for TPU due to its rigidity and hardness when cured. To quantify how hard or soft a material is, a unit of measurement called shore hardness is used. Shore A will typically measure objects of medium softness e.g. a rubber band will have a Shore A hardness of 20 whereas a denser harder rubber like wheel on a shopping cart can have a Shore A hardness of 90. Sainsmart TPU has an approximate shore hardness of 60-70 Shore A. At the risk of complicating the explanation further a different shore hardness scale is used to quantify the hardness of more rigid objects, this scale is called Shore D. On this scale, a car tire would have a Shore D hardness of approximately 20 while something very rigid and hard like a construction helmet would have a hardness of 80 D.
Now that we have defined shore hardness and given some sample harnesses of common objects we now have a baseline to work from. According to their data sheet, XTC-3D coating resins have a shore hardness of 80 D which is pretty much as hard as you can get. Even with a thin .4-.6mm coat your TPU part will lose most of its flex and won’t have much deflection without cracking. From personal tests I would estimate that a TPU part coated with 2 thin layers of XTC-3D will lose about 80-90 percent of its flexibility.
Smooth-on, the manufacturer of XTC-3D does sell an alternative called Epsilon Pro. It’s targeted as a coating for sealing EVA and EPS based foams but is perfectly serviceable as a coating for 3d printed parts. In contrast to XTC-3D, Epsilon Pro has a shore hardness of 65D which is substantially softer, while still being hard enough to sand and polish smooth. TPU parts coated with Epsilon lose a tiny bit of flex compared to an uncoated part but if you need a smooth, low hassle part finish this is one of the better paths to take.
Painting TPU prints
A wide range of paints will stick to TPU provided you use the correct primer or adhesion promoter this includes the following paint types:
- Latex based house paints
- Acrylics
- Solvent based aerosol paints (aka hardware store spray paint)
- Enamels
- Automotive Paints
If you need your paints to flex with your printed part without cracking or peeling that will be a bit more challenging and limits you to Acrylics, Latex based paints, and automotive paints that allow for a flex additive in the mix.
Keep in mind that thin coats of paint is preferable to ensure that the paint will not crack and chip off if the part is bent or flexed.
Hopefully this article provides a solid starting point on how to print and utilize SainSmart TPU and other brands of TPU to its maximum potential. At the end of this post we are providing screenshots of a profile provided by a user as well as Cura and Simplify3D printer profiles for the Ender 3 .
Simplify3D Profiles for the Ender 3
By Yasu Tano
Twitter: @yasutano
Facebook: Hiro Creations
Instagram: @yasutano


2 comments
Hello. I know this is old topic but I have a kinda soft tpu phone case which I like very much,but I want to find the glossy sealant spray to protect it. Do u know what kind of sealant leaves good protect for that this tpu material?
Hi, great write up! You mentioned “correct primer or adhesion promoter” for the TPU. Do you have any recommendations for this?